Lets Get Crafty!

Looking to create some awesome cards but short on time?

New to crafting but overwhelmed on where to start?

Then the Kits Collection by Stampin’ Up! is just what you have been looking for!

The Kits Collection by Stampin’ Up! is the perfect program for crafters, of all levels. The kits provide a variety of projects, styles, and designs to choose from. With the Kits Collection by Stampin’ Up!, you can create gorgeous projects without the pressure of starting from scratch and you can be confident of a successful experience every time. This is not a monthly subscription service like Paper Pumpkin, you simply order what kits you like through my online store. And if you like a kit and would like to make more cards, you can simply order another one. **

** Kits are available while supplies last, some may sell out.

To start off the new year, why not try the Birthday Card Organizer Kit? It comes with all you need to send birthday cards to your friends and family while staying organized. Don’t ever miss a single birthday celebration!

BIRTHDAY CARD ORGANIZER KIT DETAILS

Kit includes:

  • One 8″ x 10″ (20.3 x 25.4 cm) monthly planner with space to record birthdays each month as well as a pocket sleeve to hold birthday cards.
  • 12 full-size birthday cards, 6 of 2 designs, and 12 coordinating envelopes.
  • Glue Dots, Stampin’ Dimensionals, Adhesive-Backed Embellishments, and Tear & Tape Adhesive
  • Die-cut florals and pieces ready for you to use­—no prep work required!
  • Sticker sentiments and die-cut labels in Dutch, English, French, and German

Coordinating colors: Basic Black, Evening Evergreen, Petal Pink, Sahara Sand, and Soft Succulent

Where to find the kits:

The kit selection changes frequently . To see what kits are currently available, please check my online store.

Let me know if you have any questions !

Happy Stamping!

Joanne

~Making the world a happier place, one card at a time!

In person classes to start up again!!

I have finally been given the go ahead from the church to start classes again. and I am soooo excited!! It has been a long time and I have really missed being able to stamp with you.

I am finalizing my class schedules right now through November with the first class to start on Saturday, July 31st.

Be sure to check back later this week for the full class announcements, can’t wait to see all of you!!

Please refer to my personal message on classes for guidelines.

Happy stamping!!

~ Making the world a happier place, one card at a time

Joanne

Oh Bee-Hive!

IMG_0685

One of my favorite sets in the 2020 January – June Mini Catalog is Honey Bee.  It coordinates with the Detailed Bees dies and will be one of the sets retiring on June 2, 2020.  The Golden Honey DSP was a Sale-A-Bration gift at the $50 level and is no longer available but there is still a way to receive a pack of this gorgeous paper.  See the contest below for all the details!

I didn’t stamp too much on this card because I wanted the detail in the DSP to showcase the card.  Also I didn’t use the dies so it is perfect for a beginning or casual stamper.  To step it up you could die cut the bee on the front and attach with dimensionals to give it some depth.  

IMG_0680

For the card base I didn’t use a full piece of cardstock.  When closed it gives the illusion of a full card but when you open the flap you have the greeting hiding behind the bee and another layer of DSP with ribbon so the inside is as pretty as the front.

IMG_0682

Card Dimensions:

  • Basic Black cardstock – 5 1/2″ x 6 3/8″, score at 4 1/4″
  • Whisper White cardstock 2 1/2″ x 2 1/2″ – cut two
  • Gold Foil – 2″ x 5 3/8″ and 2 5/8″ x 2 5/8″
  • Black Foil – 2 5/8″ x 2 5/8″
  • Black & Gold Honeycomb DSP 1 7/8″ x 5 1/4″
  • Bee and flower DSP 4″ x 5 1/4″
  • Gold metallic-edge ribbon 5″

Directions:

  • Stamp the bee on a small Whisper White square using Black Stazon ink with the greeting above. Color the bee body with a Crushed Curry Stampin’ Write marker.  Add some shimmer to the wings with Wink of Stella.
  • Stamp the flowers on the other Whisper White square again using the Stazon ink.  Color with the Crushed Curry marker.
  • To create the coordinating black ribbon, lay the ribbon on your grid paper, place a sheet of cardboard behind it.  Taking a Basic Black blend color the Gold Edged ribbon, set aside to dry.  Since the Blends are alcohol based they dry pretty quick.  This works for any light colored ribbon, using this technique you can always have ribbon to match your projects!
  • Attach the honeycomb DSP to the gold foil panel and then place on the flap on the left of the card front
  • Attach the bee panel to the gold foil square then attach to the flap in the center as shown, taking care to only put adhesive on the RIGHT side.  That way the card will open.
  • Wrap the ribbon around the bee and floral DSP attaching to the panel in the back.  Attach entire panel to the inside of the card.
  • Adhere the inside greeting to the black foil square then to the center of the card, making sure the outer greeting completely covers this panel.  This will hide the “surprise” for the recipient.

Try using the ribbon technique and fold with other stamp sets and Designer Series Paper, I would love to see what you come up with!  Send me your creations and I will display them in my customer gallery!

Supplies Used:

Additional Supplies:

How to win a package of the Golden Honey DSP

Love the Golden Honey DSP but didn’t get a package when Sale-A-Bration was going on?  Well now is your chance!  All you have to do is:
  • purchase the Honey Bee Bundle or the Honey Bee Stamp Set and
  • use Hostess code DJPSQ474 when placing your order and
  • you will be placed into a drawing to win a package of Golden Honey DSP!

BONUS: When using the Hostess Code DJPQ474 and placing an order $35 or more you will receive a DSP sampler pack as a free gift as a thank you for supporting my business!

The winner will be announced on June 3rd and the DSP pack will be shipped to the address on your order.  Be sure to place your order soon, retiring products are only available until June 2, 2020 or while supplies last.

b78451ae2c7de48e7f0b0db503304669

SHOP WITH JO

If you have any questions on the project featured, please let me know. I would be happy to help!

Happy stamping!

Jo

~Making the world a happier place, one card at a time


12″ x 12″ Sampler featuring the Parisian Blossoms Suite

IMG_0413

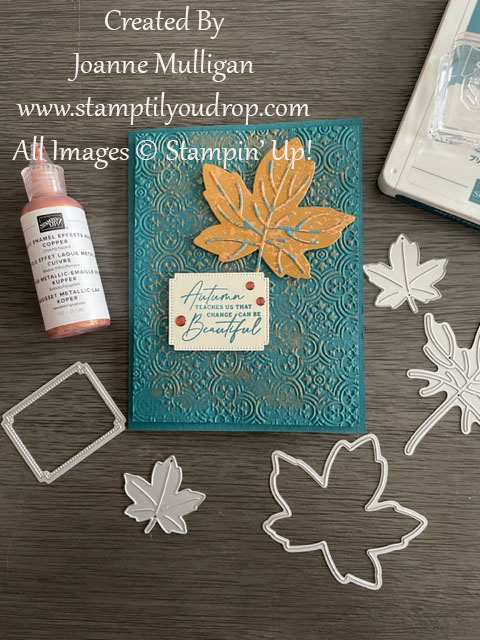
My favorite project that I made for my presentation at OnStage in Hartford was my 12 x 12 sampler using a bit of everything from the entire suite.  I guess you like it too as I have received so many emails and comments asking for close up pictures and a template to download.  So here you go!!  If you have any questions, please send me an email!

IMG_0472

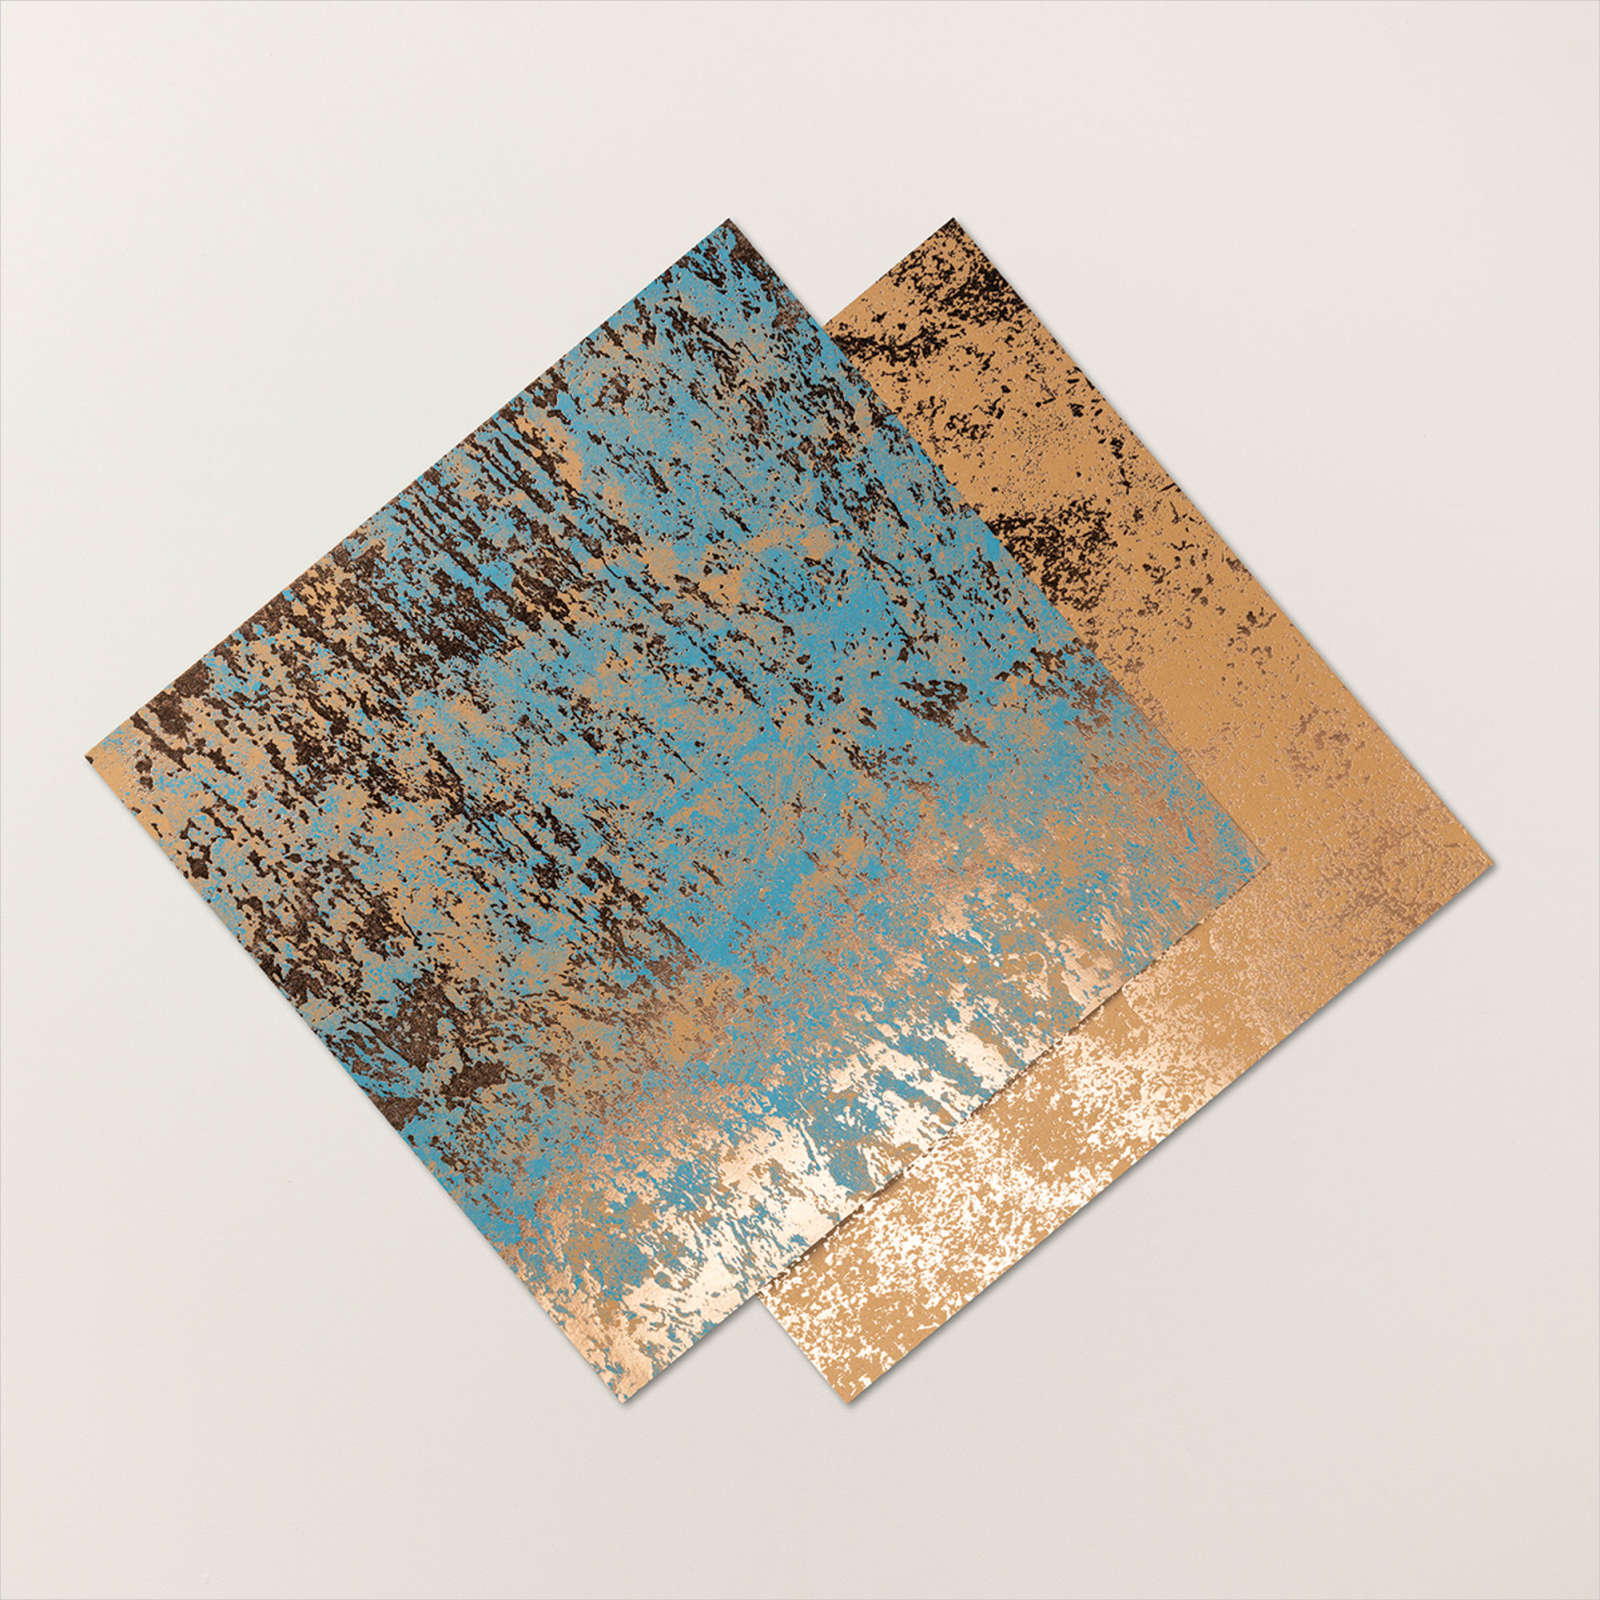
For the Eiffel Tower I stamped the image from Parisian Beauty on Champagne foil paper with VersaMark then thermal embossed with black embossing powder.  I then used the coordinating die to cut it out.  The base of this panel was Champagne foil and I added the Parisian Blossoms DSP on top.  The paper it is Petal Pink and the script is in Champagne foil, so beautiful!  I attached the image with mini dimensionals and stamped “Amour” in memento black on Whisper White and punched it out with my  Classic Label punch, I mounted in on Champagne foil and trimmed.  This was also attached with mini dimensionals.

IMG_0473

This floral spray from Forever Blossoms was done the same way as the Eiffel Tower. I really love how the black contrasts with the shiny foil it really makes the image stand out.  For the saying I stamped “Love” on Whisper White and used the Stitched Shapes to cut it out, then mounted it on a piece of  Champagne foil cut from Layering Ovals.  Both were attached using mini dimensionals.

IMG_0474

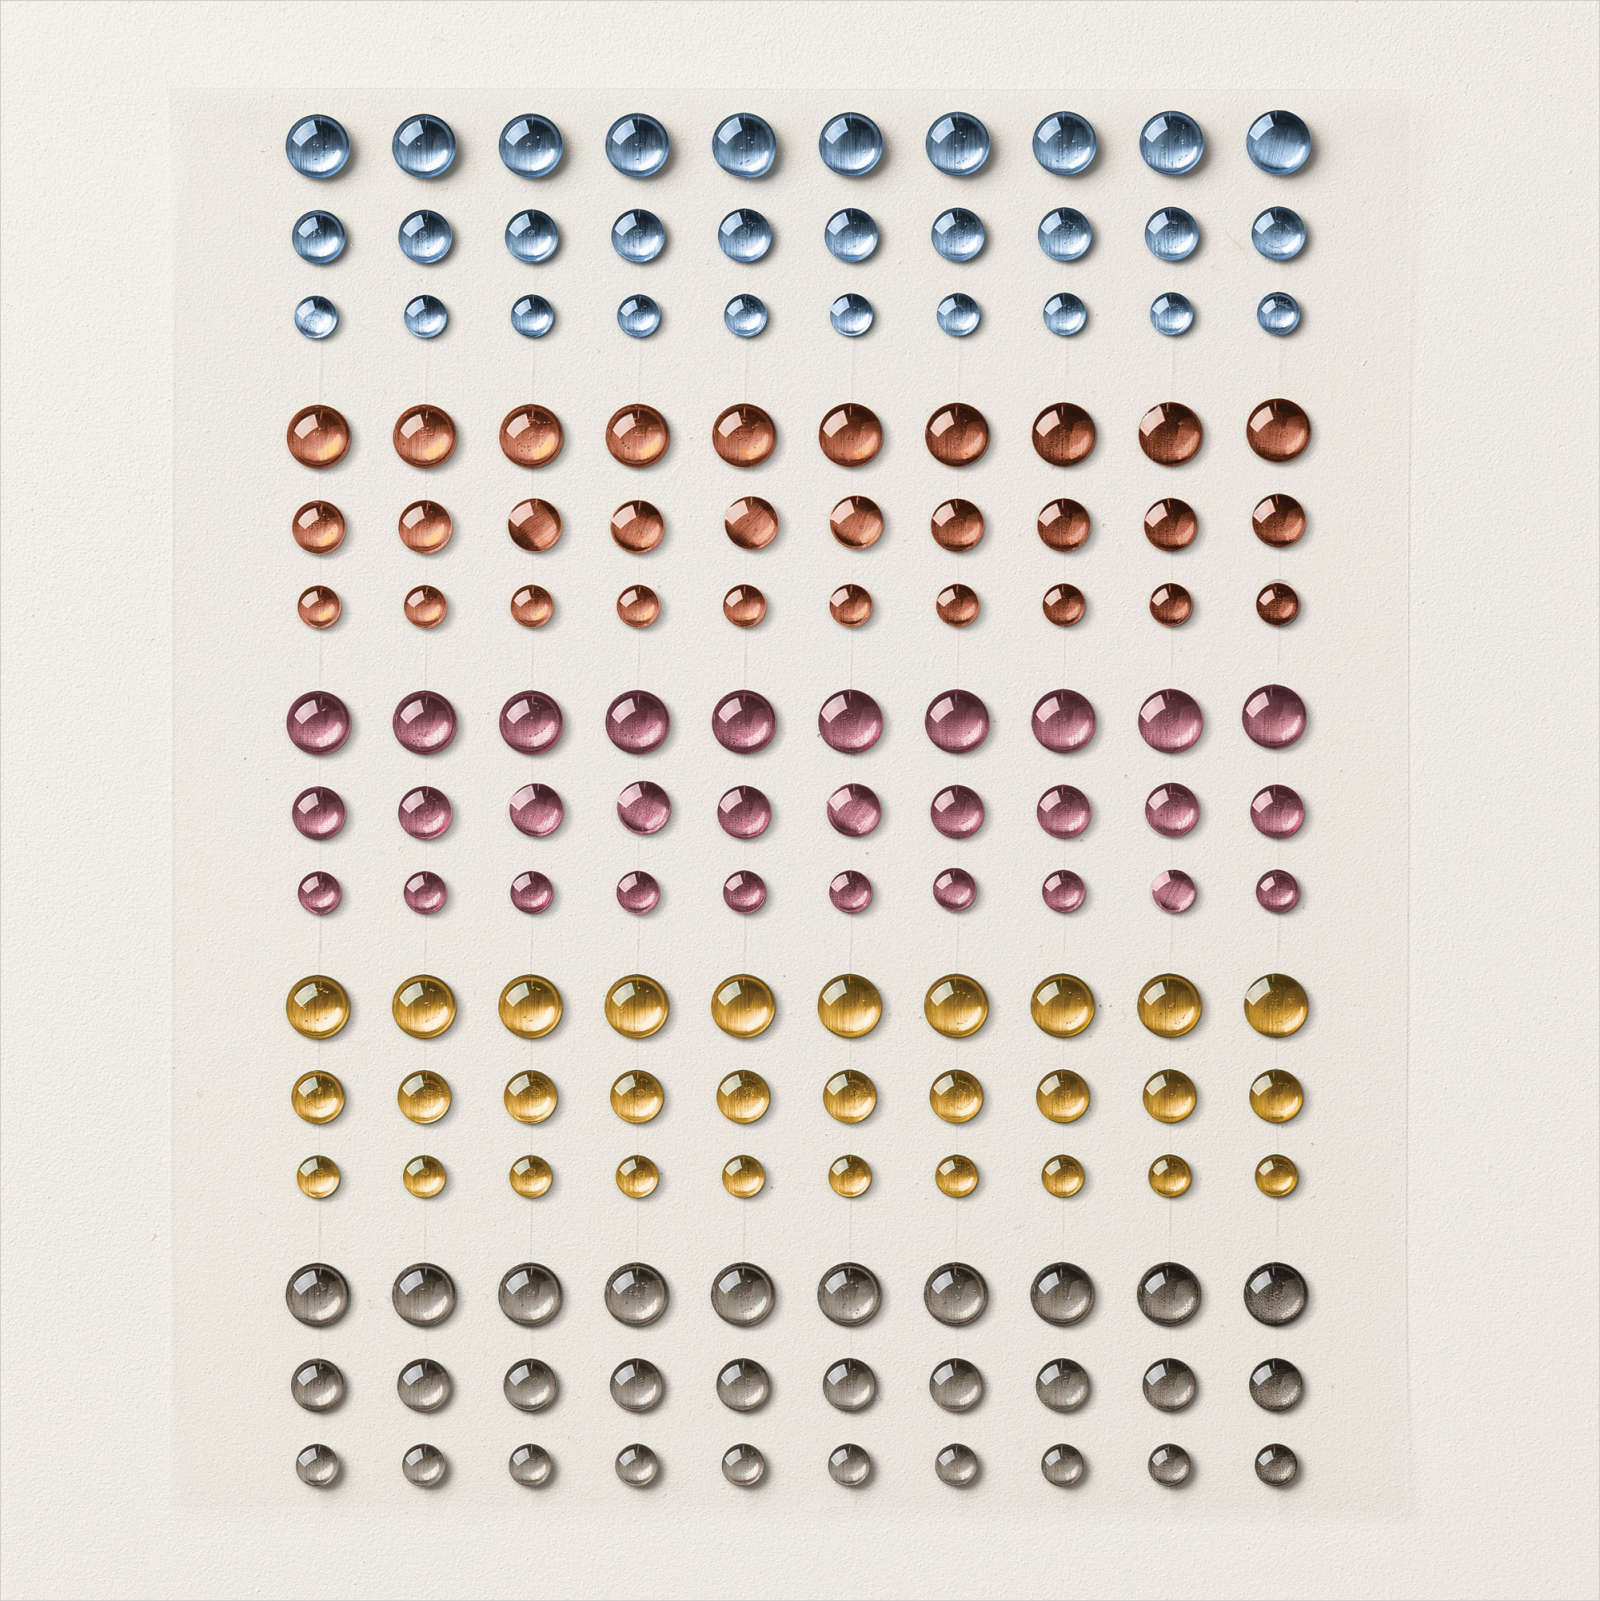
On the center panel I stamped the flowers in Memento Black and colored with Dark & Light Pool Party and Old Olive Blends then cut them out with the matching dies.  I used the Petal Pink Satin Ribbon with Champagne metallic edging behind the saying and added a few Champagne Rhinestones.

IMG_0475

IMG_0477

For the remaining panels I wanted to use as much of the gorgeous Designer Series Paper as I could, adding accents of the smaller flowers, rhinestones and ribbon.  The new Label Me Lovely punch was used on two of the sayings.  This punch is not part of the Suite but will be in the 2020 January – June Mini Catalog (available January 3, 2020).

I came up with the design by starting in the middle with a large square and then built off that.  I wanted something a bit different from the usual squares and to show the beautiful suite and how all the products coordinate so beautifully together.  Feel free to download the template below to use in your own projects.

Download the 12 x 12 Sampler Template

This sampler was made with my son Michael and his fiance Jen in mind.  They are getting married next October and it would make a perfect gift for a special couple.  I hope this inspires you to make your own samplers to celebrate someone special to you!

See more projects made with the Parisian Blossoms Suite

If you would like to get a copy of the 2020 Mini Catalog and Sale-A-Bration catalog please let me know and I will send one out when they are available!

Happy stamping!

Jo

~Making the world a happier place one card at a time!


Happiness Blooms Suite

It’s been some time since I have posted and I am excited to be back sharing some projects with you!  I finally had some time to play this weekend and once I got started with this suite it was hard to stop!!

img_2376

Cards made using the stamp sets Bloom by Bloom from the 2019 Occasions catalog and Part of My Story from the 2019 Sale-A-Bration Catalog

The minute I saw this suite at OnStage in Orlando I knew I had to have it. I just love the bold images and bright colors, it just makes me happy looking at it!  But I think my favorite thing about this set has to be how all the products work so well together, the possibilities are bound only by your imagination.

This suite not only contains a 17 piece photopolymer set and 4 mini punches, but there is coordinating Designer Series Paper (DSP), satin ribbon, enamel dots, a textured inpressions embossing folder, cardstock pack, and a Memories & More card pack with matching cards and envelopes!  This suite has so many pieces it takes up a full three pages in the 2019 Occasions Catalog.  Although the set doesn’t have any sayings, I found the exclusive Sale-A-Bration set, Part of My Story worked really well.  As a bonus, during Sale-A-Bration (SAB) spend $50 and you can get the Part of My Story set for free!

Lets get started!

img_2400

First up I used a sheet of Happiness Blooms DSP, matching Night of Navy and Pineapple Punch cardstock, Pineapple Punch 1/8″ grosgrain ribbon, Happiness Blooms enamel dots in Pineapple Punch and my go to Layering Oval framelits.  The saying is stamped using Call Me Clover ink.

img_2402

This card shows some versatility to the set.  I started with another sheet of the DSP, this time in stripes. Night of Navy is the card base and a layer behind the Whisper White piece making the stamped images really pop.   For the butterfly I used the smallest flower and Calypso Coral ink to make wings.  For the body I used the Dark Night of Navy blend and drew it freehand, adding little antennae.  A little epoxy heart was placed over the inked heart to give it a little shine. This card is very easy to make and doesn’t require any special tools, perfect for a beginning stamper.

img_2399

This card is stunning in person, since it showcases the Grapefruit Grove Foil Sheet, available only during SAB with a $50 purchase.  It has a holographic look and is a must have for one of your free SAB items! I wish I could have really captured the beautiful colors in the photo.

The foil sheet is embossed with the Dot to Dot Textured Impressions Embossing folder and paired with some DSP. A piece of Calypso Coral 3/8″ Satin Ribbon covers the seam and adds another layer of sheen to the card. Call Me Clover and Calypso Coral are the cardsock colors used along with Whisper White.  Inks used were Grapefruit Grove for the flower, Call Me Clover for the stem and Night of Navy for the little dots to match the DSP.

img_2390

Cards made using the Happiness Blooms Memories & More card pack and matching Memories & More Cards & Envelopes

After I played only with the the set and some of the products from the suite I really wanted to dive into the whole suite. You can make some really simple notecards and full sized cards using the Happiness Blooms Memories & Blooms Card Pack and the coordinating Happiness Blooms Memories and More Cards & Envelopes.

If you aren’t sure what a card pack is, the pack contains 50 double sided cards (2 each of 25 designs) in 3″ x 4″ and 4″ x 6″ sizes, 6 single sided 4″ x 6″ specialty cards (the designs are all embossed!!) and 4 coordinating sticker sheets.  The matching cards and envelopes  have small and large cards that fit the 3″ x 4″ and 4″ x 6″ cards perfectly.  One side is Night of Navy and the inside is white.  The envelopes are white and have Night of Navy stripes along the inside flap.

These are perfect for when you need a card but are short on time or just starting out with paper crafting and have limited supplies.  There is no stamping needed just attach one of the pre-printed cards to the front of the matching card and voila, a card ready to use!!  You can leave them as is or step them up a notch adding some embellishments such as stickers from the card pack or from the suite.

img_2396

This is a perfect example of just attaching the card to the front of a little notecard like the card on the left.  It looks great as it is, the saying is already pre-printed and has a coordinating border.  If you have a few more minutes go ahead and step it up a bit.  I added a few enamel dots to the center of several flowers,  then I punched a matching flower using one of the Bitty Blooms mini punches and Lovely Lipstick cardstock.  I added an enamel dot to match the ones on the card and raised it with a mini dimensional.

img_2394

For these two I added “Time to Celebrate”, one of the stickers from the card pack, to the Congratulations card with mini dimesionals and a few enamel dots here and there.  On the little Love and Laughter notecard, I kept it simple with just a small Pineapple Punch 1/8″ grosgrain ribbon bow.

img_2393

On these two I added stickers from the card pack to both cards.  Everything is so beautifully coordinated it really makes these cards easy.  To give them a little dimension the flowers were raised with mini dimensionals.

img_2393

These two were very simple.  Since the backgrounds were so pretty I only wanted add a small embellishment.  To each I added flower stickers from the card pack and to make them pop some a little enamel dot in the center.

img_2395

To the Thinking of You card on the left I added the little strand of  circles, another sticker from the pack and three sizes of enamel dots.  To the Love & Happiness card I colored two of the small Epoxy Heart Droplets with a Dark Flirty Flamingo Blend.  Since the marker is alcohol based you can color these embellishments to match your project or leave as is and it won’t wipe off.

img_2403

These two cards I stepped up a little bit more.  For the Happy Birthday card I punched the small flowers from a sheet in the Happiness Blooms DSP pack and added enamel dots to the center of each.  Then each was attached to the card with a mini dimensional and I  added a bow made from two pieces of Night of Navy Baker’s Twine.  The notecard on the right uses stickers from the pack including “Thank You”, flowers and leaves.  Again they were attached to the card using mini dimensionals.

img_2397

This last card really steps it up.  I used one of the specialty cards from the pack that is embossed.  It’s really hard to see the embossed flowers in this picture but the one below really shows how shiny they are.

img_2398

Instead of using the coordinating cards from the suite I used a Lovely Lipstick cardbase and a layer of Night of Navy behind the embossed flower card. I cut an oval piece from the center of the floral panel before attaching to the Night of Navy panel since this will be covered by the saying. This really gives you more out of your specialty paper. From the piece I cut out, I punched the little flowers out using one of the Bitty Blooms punches.  To get the leaves I cut a small narrow strip from one of the other specialty cards that had embossed Call Me Clover circles and punched little leaves using the leaf punch from the Bitty Blooms punch pack. The saying is from Part of My Story and I stamped it in Night of Navy ink on a large scallop of Whisper White cardstock.   This was mounted to an oval of Night of Navy and attached to the card using dimensionals.

I hope you have as much fun with this set as I did this weekend!

If you purchase the entire suite, add a pack of mini dimensionals and a roll of ribbon you will get to $100.00 giving you both the Foil Sheets and the Part of My Story stamp set for FREE!

To learn about Sale-A-Bration and see other products you can earn CLICK HERE.

Products Used:


If you would like to get a notification each time I post a project share, specials from Stampin’ Up! or myself, class schedules or video tutorials, please make sure you click “Follow By Email” at the top of this post.  That way you won’t miss a thing!

As always, please feel free to share any post on Pinterest or Facebook! If you are interested in attending classes or any of my all day events be sure to visit my events page for a current schedule.

Happy Stamping!

~Jo

Making the world a happier place, one card at a time!!!

Time for a change – Part 1 – The Color Revamp

“Don’t be afraid of change. You may lose something good  but you may gain something even better.”                                                                                                      ~ Unknown

I love change, whether a new hair style or color, moving furniture in my house or reorganizing things in my office or house.  But I know some people are resistant to change they like things to always stay the same.  No matter which category you are in,  I guarantee you are going to LOVE the new colors that Stampin’ Up! is introducing in the new 2018-2019 catalog!  I know I will miss a few of the retiring colors but the new fresh colors taking their place are so stunning I cannot wait to start creating with them!!  And not only are we getting new colors but the ink pads have been redesigned!!

First off let me explain what is happening with our exclusive color collection.  Each year five In-Colors are introduced and five In-Colors are retired.  These colors are around for two years so this year the colors from the 2016-2018 grouping will leave us and the 2018-2020 colors will be introduced.  That is usually it, but this year Stampin’ Up is doing a complete color revamp!  They are retiring thirteen colors and not only bringing back six previously retired colors but they are introducing ten brand new colors, for a total of sixteen new colors!!!  The collections have been reconfigured and they have added a Basics collection consisting of Whisper White, Very Vanilla and Basic Black.  The last time a complete color overhaul took place like this was in 2010!  We did have a refresh in 2013 where several retired colors were brought back but there were no new colors  (other than the In Colors) introduced.

Now for the ink pad redesign.  We are all used to the push and flip method of opening the pads, now all you have to do is open the pad like a compact and slide the lid into place.  In addition to this the ink has been reformulated to reduce bubbles so you will get exceptional ink coverage.  All this in a flatter pad that stacks to save space and a sticker that gets placed inside so you can always see the color at a glance!

Since there is so much information I want to share with you, this post will be two-parts.  Be sure check back later this week for Part 2, an up close look at the new ink pad design, including several tips on using them!

And without further ado, let’s see the retiring In-Colors, the new group and the five from 2017-2019 that are staying for one more year!

2018 In Colors

And here are the thirteen retiring colors and sixteen new colors…..

2018 Color Revamp - cropped 2

As I mentioned there are now 5 color collections to choose from they are:

Basics – the foundation for your projects:

  • Whisper White
  • Very Vanilla
  • Basic Black

Neutrals – colors designed to go well with everything:

  • Merry Merlot **
  • Early Espresso
  • Soft Suede
  • Crumb Cake
  • Sahara Sand
  • Gray Granite **
  • Smoky Slate
  • Basic Gray
  • Mossy Meadow *
  • Night of Navy

Brights – vibrant happy colors:

  • Poppy Parade *
  • Melon Mambo
  • Flirty Flamingo *
  • Mango Melody **
  • Daffodil Delight
  • Granny Apple Green **
  • Coastal Cabana *
  • Bermuda Bay
  • Pacific Point
  • Gorgeous Grape **

Subtles – soft soothing colors:

  • Blushing Bride
  • Calypso Coral
  • Petal Pink **
  • So Saffron
  • Soft Sea Foam **
  • Pear Pizzaz
  • Mint Macaron *
  • Pool Party
  • Balmy Blue **
  • Highland Heather **

Regals – rich deep jewel tone colors:

  • Real Red
  • Cherry Cobbler
  • Cajun Craze
  • Pumpkin Pie
  • Crushed Curry
  • Old Olive
  • Garden Green
  • Shaded Spruce **
  • Blackberry Bliss *
  • Rich Razzleberry

* denotes a retired color returning      ** denotes a BRAND new color

I hope you are as excited about this color change as I am!!

If you want to stock up on the retiring colors don’t delay, once the stock has been depleted they will be gone forever!!!  If buying ink pads don’t forget a reinker!

SHOP NOW FOR RETIRING COLORS

b78451ae2c7de48e7f0b0db503304669

As always, please feel free to share any post on Pinterest or Facebook! If you are interested in attending classes or any of my all day events be sure to visit my events page for a current schedule.

Happy Stamping!

~Jo

Making the world a happier place, one card at a time!


CPC December 2017 Bonus Project* – Eastern Beauty Purse & Card Set!

I am so excited to have been asked to be a guest designer for Craft Project Central for December 2017.  My project was featured on December 17, 2017 and here is the next project for the December and it is by Christy Fulk.

This tutorial includes a purse that holds six cards and envelopes. The cards can be given to men and women alike. When the cards are gone, the purse can be used as a special gift bag. There are three card designs, each using the Eastern Medallions Thinlits Dies in different ways. It doesn’t look like it, but only one ink pad was used to make everything! Make two of each card, and your purse is full. This would make a great product-based card class, too.

Eastern Beauty Purse & Card Set

If you would like to learn how to make this project, you’ll want to subscribe for the month of December. With your subscription, you’ll get illustrated, step-by-step instructions for five wonderful projects for only $10! You can find out how to gain access to a bonus sixth project over at Craft Project Central.

*Bonus projects can be obtained by subscribing to any of the three, six or 12 month subscription packages, that include the month for which you would like the bonus. 

Be sure to check back during the month to see the other great projects featured!

If you would like to get a notification each time I post a project share, specials from Stampin’ Up! or myself, class schedules or video tutorials, please make sure you click “Follow By Email” at the top of this post.  That way you won’t miss a thing!

As always, please feel free to share any post on Pinterest or Facebook! If you are interested in attending classes or any of my all day events be sure to visit my events page for a current schedule.

Happy Stamping!
~Jo
Making the world a happier place, one card at a time!