
Welcome back to the final installment of my five part series featuring the Adoring Hearts Bundle and the Thoughtful Moments Embossing folder!! As promised I decided to really change up the Valentine’s Day/Love theme and go in a completely different direction. Embracing my Celtic heritage, I wanted to make a St. Patrick’s Day card This really shows how you can get a lot of mileage out of this set.
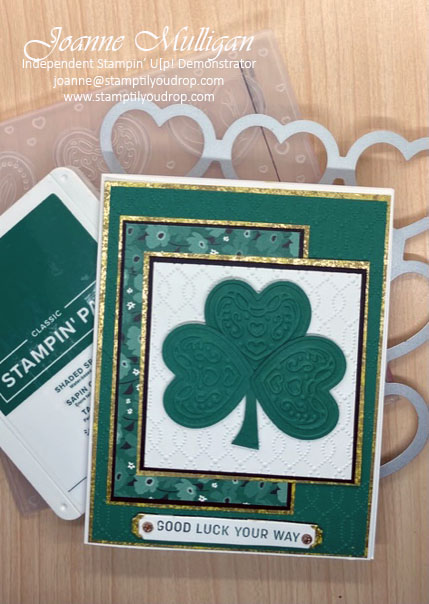
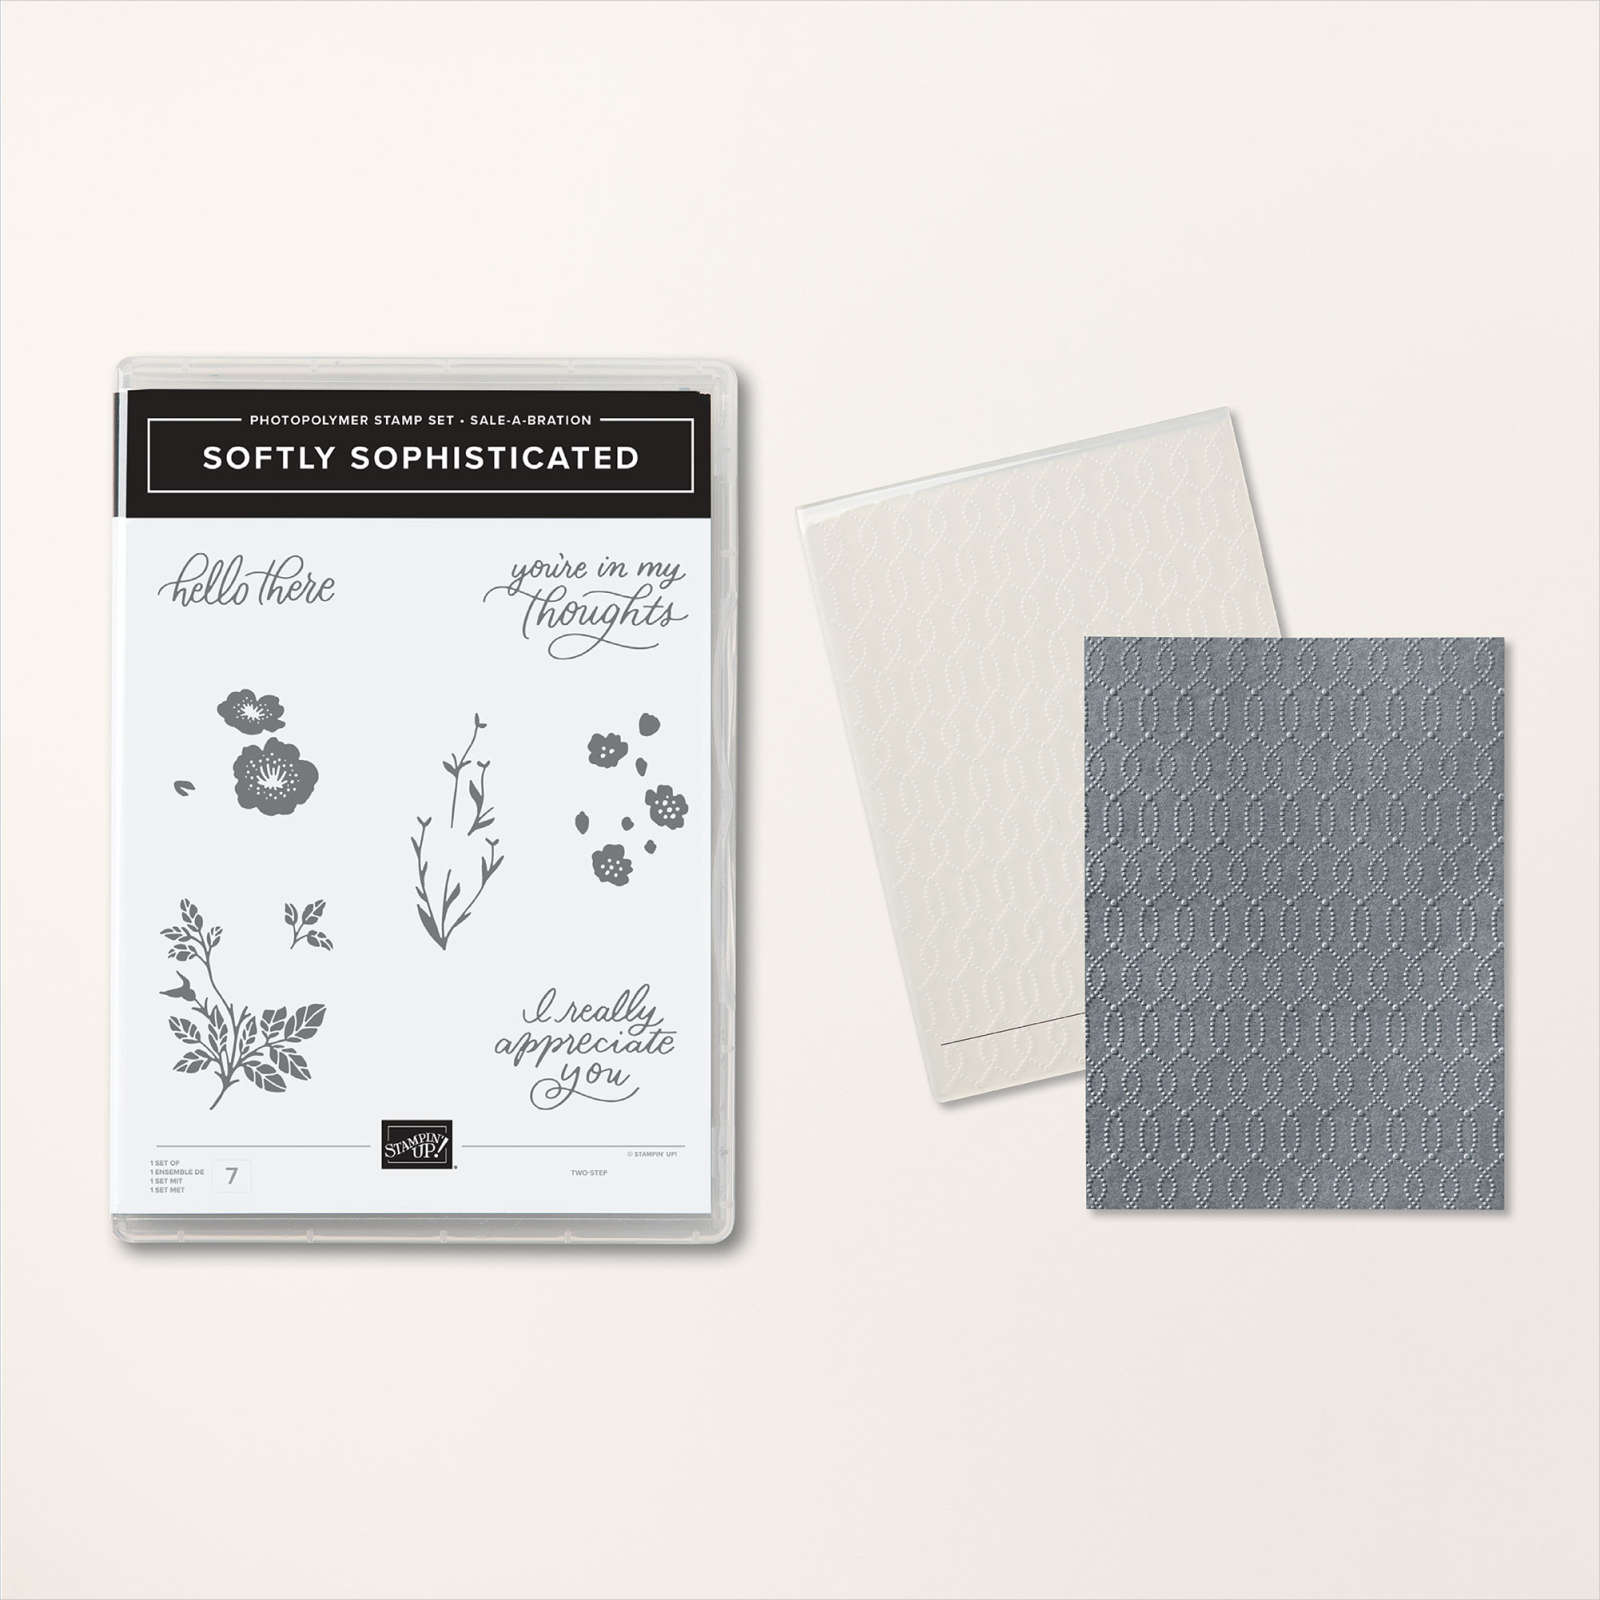
Featuring white, green and gold this card is a fun way to show your Irish pride. After all,isn’t everyone Irish on St. Patrick’s Day? This card is perfect for an intermediate to advanced stamper. I used the Sunny Days DSP and the Softly Sophisticated embossing folder from Sale-A-Bration and the Adoring Hearts Hybrid Folder for the Shamrock.
Bonus: You can get this paper for FREE if you purchase the Adoring Hearts Bundle during Sale-A Bration. Retail amount $53.00 USD Item #162570. If you love the folder it can be yours with a $100 purchase. You will get the Softly Sophisticated stamp set and embossing folder for FREE.
Supplies Used:


New releases for Sale-A-Bration! As if you don’t have great product choices already, Stampin’ Up! has give you more products to choose from!

Let me know if you have any questions!
Happy Stamping!
Joanne

~Making the world a happier place, one card at a time!
Share this:

Love is in the Air Part Four!
Welcome back to my five part series featuring the Adoring Hearts Bundle and the Thoughtful Moments Embossing folder!! Be sure to check back this weekend for a very special card!!
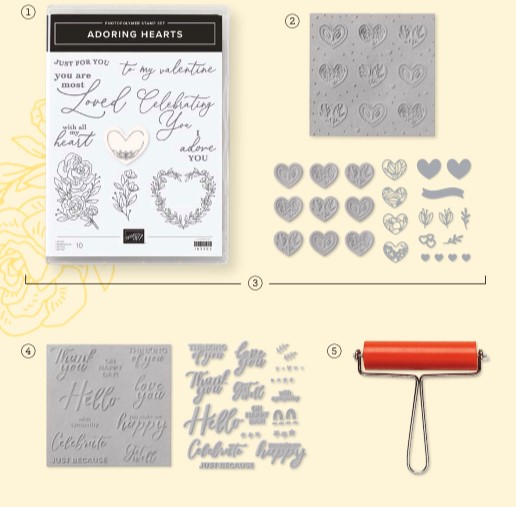
Today’s card showcases all the products shown below plus the Most Adored Designer Series Paper (“DSP”). I have to tell you that I am absolutely in LOVE with the hybrid embossing folders!!
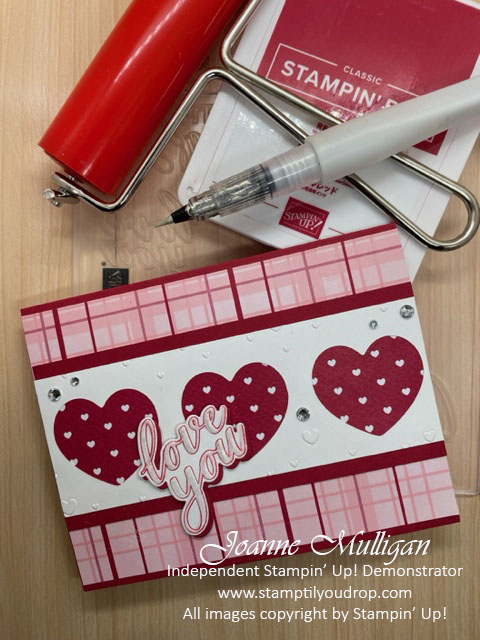
This card is perfect for an intermediate to advanced stamper. I used the Real Red DSP with little white hearts as a peek-a-boo effect with the cut-out hearts and the pretty plaid DSP . Of course there is some bling with Wink of Stella and a few rhinestones.
Bonus: You can get this paper for FREE if you purchase the Adoring Hearts Bundle during Sale-A Bration. Retail amount $53.00 USD Item #162570.
Now how did I create this adorable card? Well here you go………
Hope you enjoyed the video, it’s the first one I’ve done in quite a few years. I am having a lot of fun getting back into my website and sharing my cards and videos. Thank you for coming on this journey with me!!
Supplies Used:


New releases for Sale-A-Bration! As if you don’t have great product choices already, Stampin’ Up! has give you more products to choose from!
Let me know if you have any questions!
Happy Stamping!
Joanne
~Making the world a happier place, one card at a time!
Share this:

Love is in the Air Part Three!
Only 10 more days until Valentine’s Day so another card idea using the Adoring Hearts stamp set and Hybrid Embossing Folder plus the Most Adored Designer Series Paper. Check back later in the week when I have a video showing how to use the brayer, Adoring Hearts Bundle and the Thoughtful Moments Hybrid Embossing Folder.
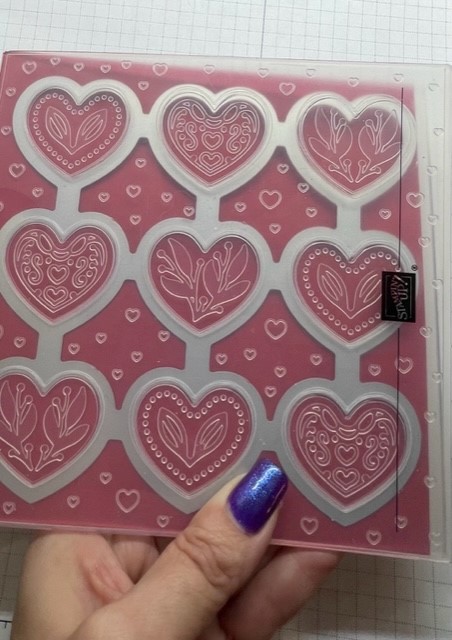
Today’s card showcases the Adoring Hearts Embossing folder. I really love how you can quickly cut and emboss at the same time. Bonus if you are only using a few hearts, you will have several already cut to use on future projects. TIP: I keep all my extra die cuts I haven’t used in a large plastic container and my scraps in a plastic shoe box. When I need an extra doodad or a small piece of cardstock for a saying I will have one already cut.
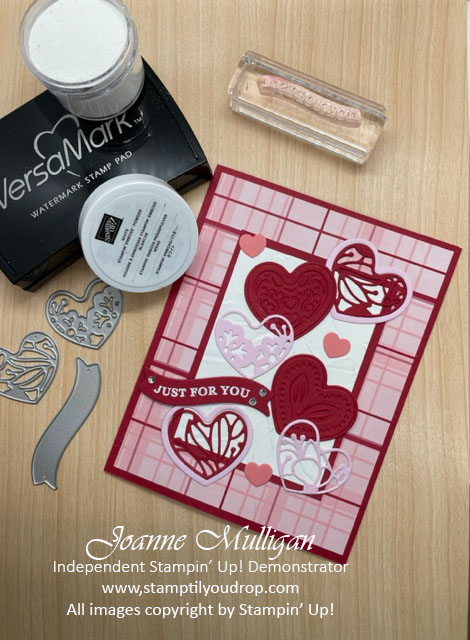
This card is perfect for an advanced stamper. I used the pretty plaid for the Most Adored Designer Series Paper. I then cut several hearts using the Hybrid Embossing Folder and other dies in the bundle. It is in Bubble Bath, Real Red and white which are traditional Valentine’s Day colors.
Bonus: You can get this paper for FREE if you purchase the Adoring Hearts Bundle during Sale-A Bration. Retail amount $53.00 USD Item #162570.
Now how did I create the cut embossed hearts and the pretty filigree hearts with heart frames? I will be happy to share it with you my friends, and it all revolves around the hybrid folder!
First you want to place the nine heart die inside the embossing folder. You will notice how the die fits right over the hearts and kind of “locks” in place
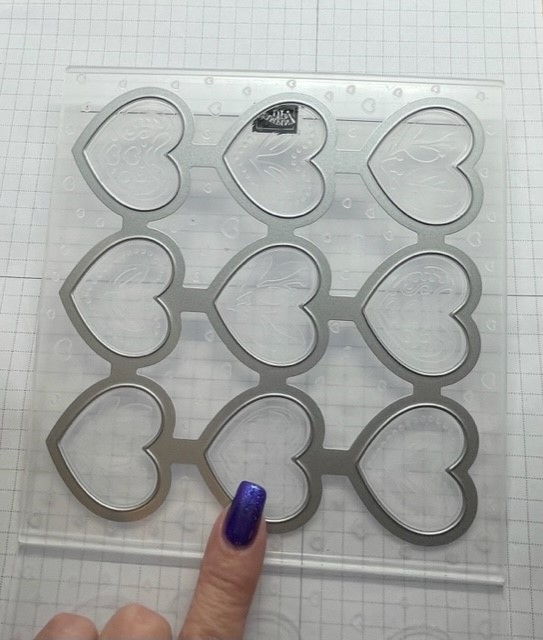
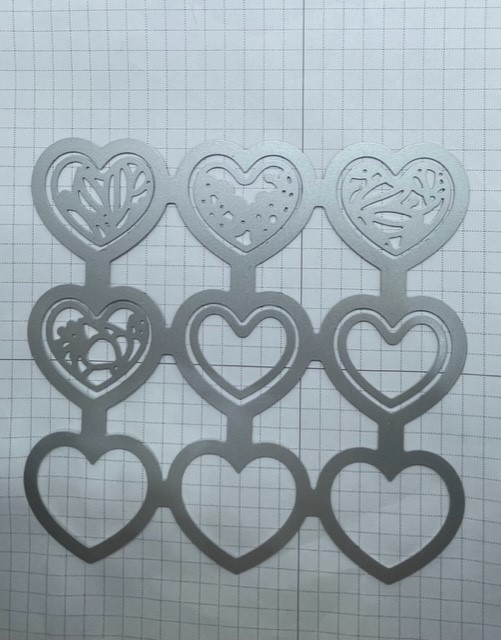
Next you will add your cardstock. I cut mine in a 6″ x 6″ square so I have extras. Now run it through your die cut machine. Bonus: Not only will you have nine little embossed hearts but if you look closely at folder you will have nine open hearts with tiny embossed hearts all around. Later in the week I will show you what you can do with this extra piece! The sandwich for the folder is base plate, embossing folder and the gray plate – same as when using a 3D embossing folder.
Once you have cut out your embossed hearts its time to cut the little hearts and frames. So break out that nine piece heart die. Place the small filigree hearts and smaller hearts inside the open hearts as shown and run through your die cut machine. Guess what? More hearts to use on future cards!
Supplies Used:


New releases for Sale-A-Bration! As if you don’t have great product choices already, Stampin’ Up! has give you more products to choose from!
Let me know if you have any questions!
Happy Stamping!
Joanne
~Making the world a happier place, one card at a time!
Share this:

Love is in the Air Part Two!
Here are some more ideas using the Adoring Hearts Hybrid Embossing Folder and the Most Adored Designer Series Paper. Check back all week when I will be showcasing different cards using various techniques for different levels of stampers.
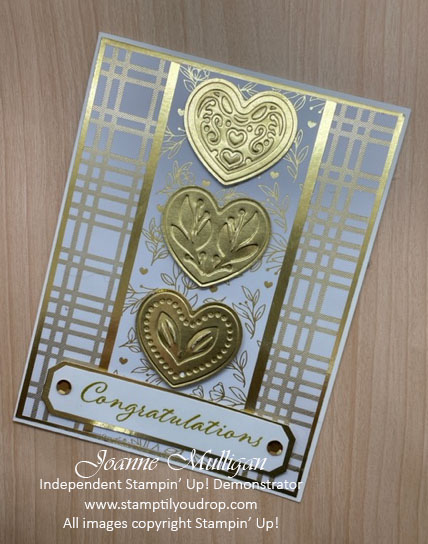
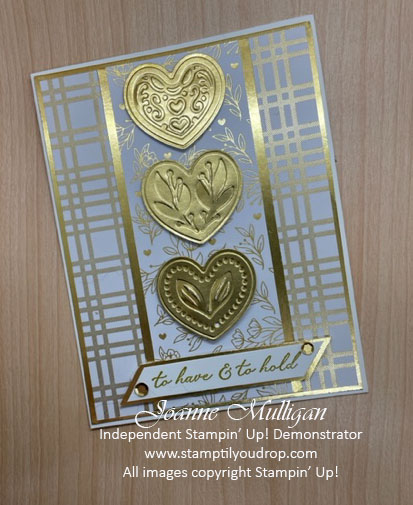
Like I said in my weekend post this stamp set and coordinating hybrid embossing folder aren’t just for Valentine’s Day, they can be used for wedding, anniversary, and more! Today I’m going to use a different layout and showcase three cards using the same design but changing the words for different occasions.
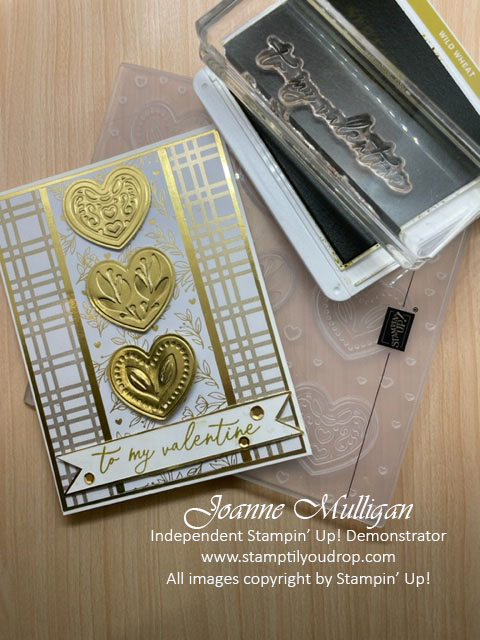
This card is perfect for an intermediate to advanced stamper. It features the a white and gold theme that is extremely elegant and perfect for your favorite valentine! The card really showcases the beautiful Most Adored Designer Series Paper with the shiny gold accents. Bonus: You can get this paper for FREE if you purchase the Adoring Hearts Bundle during Sale-A Bration. Retail amount $53.00 USD Item #162570.
Some of you may be asking what exactly is a hybrid embossing folder. Well let me fill you in on this fun little accessory. It is a 3D embossing folder but is also comes with a large die that fits ever so nicely into the folder so you can cut and emboss at the same time! When that happens you get the little gold hearts that I placed on my card. Such a cool stamping trick!
Later on this week I will be showing you how to use a hybrid folder with ink and a brayer, so stay tuned!!
Here are a few other ideas for using this versatile set to get more bang for your stamping dollar!
Now what couple wouldn’t love these cards, whether they are just starting out or hitting a milestone anniversary!
Supplies Used:


Let me know if you have any questions!
Happy Stamping!
Joanne
~Making the world a happier place, one card at a time!
Share this:

Love is in the Air!
I have been having a lot of fun creating Valentine’s cards using the innovative hybrid embossing folders; Adoring Hearts and Thoughtful Moments with the stamp set Adoring Hearts. Check back all week when I will be showcasing four different cards using various techniques for different levels of stampers.
Not only are these great stamps for Valentine’s Day but they can be used for wedding, anniversary, birthdays and more!

This card is perfect for any level stamper. It features the wreath from the Adoring Hearts set colored with Flirty Flamingo and Soft Seafoam blends, a few rhinestones and a little Flirty Flamingo bow. The side panel shows off a piece of Mostly Adored Designer Series Paper that you can earn when you spend $50 or more during Sale-A-Bration.
If you are a beginner just starting out and haven’t invested in a die cut machine, the pieces can easily be cut instead of using dies. It is also an easy layout that you will use again and again!
Supplies Used:


Oh Bee-Hive!

One of my favorite sets in the 2020 January – June Mini Catalog is Honey Bee. It coordinates with the Detailed Bees dies and will be one of the sets retiring on June 2, 2020. The Golden Honey DSP was a Sale-A-Bration gift at the $50 level and is no longer available but there is still a way to receive a pack of this gorgeous paper. See the contest below for all the details!
I didn’t stamp too much on this card because I wanted the detail in the DSP to showcase the card. Also I didn’t use the dies so it is perfect for a beginning or casual stamper. To step it up you could die cut the bee on the front and attach with dimensionals to give it some depth.

For the card base I didn’t use a full piece of cardstock. When closed it gives the illusion of a full card but when you open the flap you have the greeting hiding behind the bee and another layer of DSP with ribbon so the inside is as pretty as the front.

Card Dimensions:
- Basic Black cardstock – 5 1/2″ x 6 3/8″, score at 4 1/4″
- Whisper White cardstock 2 1/2″ x 2 1/2″ – cut two
- Gold Foil – 2″ x 5 3/8″ and 2 5/8″ x 2 5/8″
- Black Foil – 2 5/8″ x 2 5/8″
- Black & Gold Honeycomb DSP 1 7/8″ x 5 1/4″
- Bee and flower DSP 4″ x 5 1/4″
- Gold metallic-edge ribbon 5″
Directions:
- Stamp the bee on a small Whisper White square using Black Stazon ink with the greeting above. Color the bee body with a Crushed Curry Stampin’ Write marker. Add some shimmer to the wings with Wink of Stella.
- Stamp the flowers on the other Whisper White square again using the Stazon ink. Color with the Crushed Curry marker.
- To create the coordinating black ribbon, lay the ribbon on your grid paper, place a sheet of cardboard behind it. Taking a Basic Black blend color the Gold Edged ribbon, set aside to dry. Since the Blends are alcohol based they dry pretty quick. This works for any light colored ribbon, using this technique you can always have ribbon to match your projects!
- Attach the honeycomb DSP to the gold foil panel and then place on the flap on the left of the card front
- Attach the bee panel to the gold foil square then attach to the flap in the center as shown, taking care to only put adhesive on the RIGHT side. That way the card will open.
- Wrap the ribbon around the bee and floral DSP attaching to the panel in the back. Attach entire panel to the inside of the card.
- Adhere the inside greeting to the black foil square then to the center of the card, making sure the outer greeting completely covers this panel. This will hide the “surprise” for the recipient.
Try using the ribbon technique and fold with other stamp sets and Designer Series Paper, I would love to see what you come up with! Send me your creations and I will display them in my customer gallery!
Supplies Used:


Additional Supplies:


How to win a package of the Golden Honey DSP
- purchase the Honey Bee Bundle or the Honey Bee Stamp Set and
- use Hostess code DJPSQ474 when placing your order and
- you will be placed into a drawing to win a package of Golden Honey DSP!
BONUS: When using the Hostess Code DJPQ474 and placing an order $35 or more you will receive a DSP sampler pack as a free gift as a thank you for supporting my business!
The winner will be announced on June 3rd and the DSP pack will be shipped to the address on your order. Be sure to place your order soon, retiring products are only available until June 2, 2020 or while supplies last.

SHOP WITH JO
If you have any questions on the project featured, please let me know. I would be happy to help!
Happy stamping!
Jo
~Making the world a happier place, one card at a time
Share this:

2019 OnStage Hartford, CT – Parisian Blossoms Presentation

I have been a demonstrator for quite some time and have attended quite a few Stampin’ Up! events but I never imagined getting a phone call from Stampin’ Up! asking me to present at an OnStage event! I was so honored and excited to be chosen; it was something I never dreamed would ever happen to me.
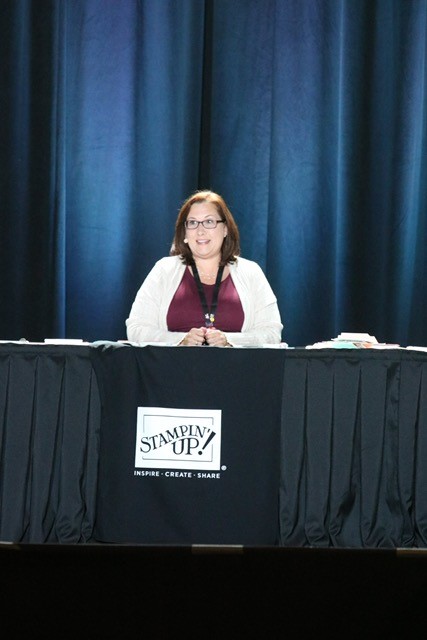
One of the greatest joys of being a Stampin’ Up! Demonstrator is getting together with other demonstrators to share ideas and get inspired by each others creativity at a Stampin’ Up! sponsored event! Of course getting to see the new catalogs and products before anyone else is another big plus! I was at the Hartford, CT OnStage Event with approx 1,000 demonstrators in attendance. I had so much fun sharing with everyone I never even gave it a thought that there were that many of you there, I just felt like I was talking to 1,000 of my closest friends!!
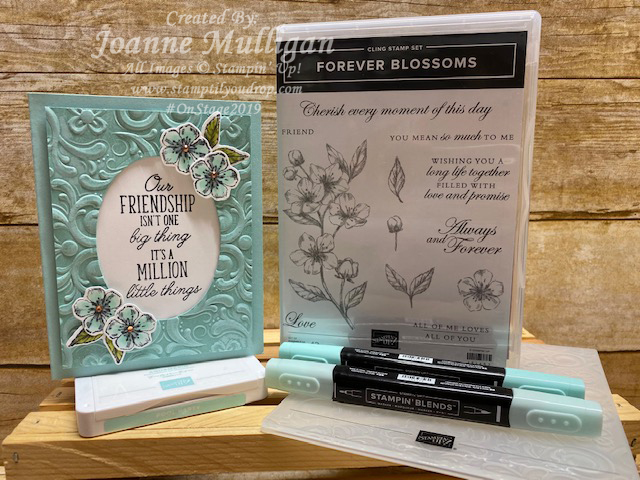
I was given the Parisian Blossoms Suite which will be available in the 2020 Mini/Occasions Catalog. This suite features two stamp sets with coordinating dies, DSP in Cherry Cobbler, Petal Pink and Pool Party with Champagne Foil accents, Petal Pink satin ribbon with Champagne metallic edging, a 3D embossing folder and Champagne Rhinestones. Everything in the suite not only coordinates beautifully together but they will work with so many stamp sets from the annual catalog making it a perfect companion to items you may already own. The set is aptly named, since Paris is the City of Love, and the suite centers on love. Making it perfect for weddings, anniversaries and Valentine’s Day but it will also work beautifully when paired with other sentiments from the Annual Catalog for just about any occasion.
My assignment was to create three projects focused on the beginner stamper, the casual stamper and the avid stamper. As many of you know I love to embellish, layer and add ribbon. The simple cards were quite the challenge to say the least.

First up for the beginner stamper is a card perfect for someone who is just starting out and won’t have a lot of supplies yet but still wants to make a card they can be proud of. The card uses Whisper White cardstock, Pool Party and Memento Black ink. I stamped a simple background using Parisian Beauty and added the Eiffel Tower on top. A quick sentiment and you are done. If you want to add a little something extra you can color in the Eiffel Tower with Wink of Stella to give it a little sparkle. This is a great tool for a beginner. It’s very simple; you just color! There is no artistic skill involved and it yields beautiful results every time!

Next up is a card for the casual stamper. This stamper wants simple designs that they won’t get frustrated by but they also want the cards to have a little bit more detail such as DSP or ribbon. I built on the beginner design substituting the stamped background for DSP. This gorgeous paper features the script in Champagne Foil on Petal Pink. I then stamped the Eiffel Tower and saying in Smoky Slate for a softer effect. I again used Wink of Stella for a little shimmer. Both pieces were mounted on Pool Party then attached to the card with dimensionals to step it up a bit.


Finally for the avid stamper, that person who has to have it all and loves to craft all the time….a Double Z Fold card! I used a bit of everything from all the items in the suite, which came together perfectly.
The card was designed for a wedding and I know any happy couple would love to receive this. I used Petal Pink for both the card base and the insert. I added DSP to each panel of the card base and set that aside. Next, for the insert I used Pool Party cardstock. The first panel was run through the 3D Parisian Flourish embossing folder, the second panel I stamped the saying from the beginner card and the third panel was stamped with the large floral stamp from Forever Blossoms using Pool Party ink for both. Before attaching to the insert I wrapped the last panel with the Petal Pink ribbon securing in the back.
Now for the accent pieces. The Eiffel Tower was stamped in Smoky Slate and “Amour” was cut from Basic Black cardstock both using the Parisian Dies. I stamped the large floral spray, the smaller flowers and the leaves in Smoky Slate and colored with Petal Pink and Soft Seafoam Blends then they were cut out using the Cherry Blossoms Dies. The saying was stamped in Smoky Slate and punched out using the Label Me Fancy punch (available in the 2020 January – June Mini catalog, it is not part of this suite). All accent pieces were attached to the insert using dimensionals and “Amour” with Multipurpose Liquid Glue.
Below is my entire presentation including how to assemble the Double Z Fold Card.
For a PDF of the card dimensions [CLICK HERE]
Additional project ideas using this suite and sets from the 2019-2020 Annual Catalog:


To see details on how to make this sampler including a PDF Template to download [CLICK HERE]
If you have any questions on any of the projects shown above, feel free to contact me!! And don’t forget to subscribe to my YouTube channel. There will be some videos coming your way based around this awesome suite! 😉
Interested in joining the fun by attending a Stampin’ Up! sponsored event? The only requirement is that you are an active demonstrator. As a demonstrator you will receive a discount on your stamping supplies, get to see the new catalogs before anyone else and be part of an amazing community of stampers. I think stampers are some of the most caring people out there, don’t you! There are so many types of demonstrators; those that only want to get their stamps and accessories at a discount, some want a way to earn money on a part-time basis around their family’s’ busy schedule and some want to make it a full-time career. It’s your business to do as you would like, I will support you any way I can to help YOU achieve YOUR goals. If you would like more information about what it means to be a demonstrator or about joining my team, Stampers of DistINKtion [CLICK HERE].
This suite will be available January 4, 2020. If you would like a copy of the catalog please send me an email and I will get one out to you when they are available!
Happy stamping!
Jo
~Making the world a happier place, one card at a time!
Share this:

Online Extravaganza Event!

Get ready for three days of savings with the Stampin’ Up! Online Extravaganza! Be sure to stock up on your favorites!!
For three days only, you can get these deals:
15% off Ink pads and Cardstock in:
- Neutrals Collection – single packs or pads
- Regals Collection – single packs or pads
- 2018–2020 In Colors – single packs or pads
- 2019–2021 In Colors (except Purple Posy) – single packs or pads
Take Additional 5% off the original 10% discount:
- 8 bundles
- Neutrals Classic Stampin’ Pads Assortment
- Regals Classic Stampin’ Pads Assortment
- 2018–2020 In Colors Classic Stampin’ Pads Assortment
Bundles on Sale:


Happy Stamping!!
Jo
~Making the world a better place one card at a time!
Share this:

Featured Stamp Set – Coffee Cafe

Anyone who knows me really well, knows that I LOVE coffee! There is nothing like the first sip in the morning it makes me instantly happy. I do have a few coffee rules; only hot coffee in the morning no matter the weather and in the afternoon hot if the temperature is below 50 and iced if it is over. There is a slight variation on this if it is raining I have hot in the afternoon no matter the temperature. I know it’s a little quirky but that’s how I roll in the coffee department.
It was no surprise that as soon as I saw the Coffee Cafe stamp set, and the entire Coffee Break Suite it was a must have for me! I really like the sayings as well as the Designer Series Paper (“DSP”) and the super adorable Corrugated Elements.
The colors are very earthy which play nicely on the coffee theme.

It was the first set I chose to really play with when my first order arrived. Here is what I came up with.

First up a little gate fold card. The card base is Pear Pizzazz cardstock 5 1/2″ x 8 1/2″ score at 2 1/8″ and 6 3/8″). I used the polka dot DSP on the front of each panel (1 7/8 x 5 1/4″). Then I stamped the large cup and lid using Early Espresso and the oval saying with Pear Pizzazz on Whisper White cardstock, then each image was cut out using the Coffee Cups Framelits. I also cut the coffee collar from Early Espresso cardstock using the fluted framelit. Next I attached the lid and coffee collar to the cup with a small amount of Multipurpose Liquid Glue. The oval saying was adhered to the oval Corrugated Element and attached using a dimensional. I tied a strand of linen thread around the top then into a small bow. The coffee cup gets attached to the left side only, make sure you only apply adhesive to that side so the card can open and close.
I will be having a video how to on this card once my editor can help me with it. And by editor I mean my daughter. She is a tad busy the next few weeks moving into her first house, they closed on it this past week and are busy cleaning and painting. They thought it best to get this done before all the furniture was moved in. So production is on hold for a little while until she is settled in .

Next I wanted to continue with the polka dot DSP but add a few new elements. The Coffee Cups Framelits come with a teeny tiny coffee cup that fits perfectly on the cups of another sheet paper from the Coffee Break DSP pack. I thought it would be fun having them stacked on top of one anther going along the inside of the card. The card front is slightly smaller than the back allowing the cups to peek through. The Soft Sky card base is 5 1/2″ x 7 1/2″, score at 4 1/4″. I added a strip of the polka dots to the front panel (3″ x 5 1/4″. Next I stamped the cup and lid in Early Espresso on Whisper White cardstock and the saying in Soft Sky, it fits perfectly in the cup! They were cut out using the framelits and attached as in the first card. I took a small strip of burlap ribbon and attached using Tear & Tape adhesive, then the cup was attached on top using dimensionals. Next I cut 5 little cups from the DSP and glued along inside of the card using Multipurpose Liquid Glue. I always try to use odd numbers in my “works of heart”. In high school my art teacher always told us odd numbers are more pleasing to the eye and that rule has stuck with me all these years.

I decided to change-up the DSP for this card. This time I used Early Espresso for the card base (5 1/2 x 8 1/2″ score at 4 1/4), with a Crumb Cake panel (4″ x 5 1/4″) on top of this. I cut the DSP into 2 strips 1 3/4″ x 5″ with a small Early Espresso Strip 1/4″ x 5″, these were attached to the Crumb Cake panel then attached to the card base. I stamped the cup and lid again in Early Espresso but this time on Soft Sky cardstock and cut out with the framelits. The coffee collar was cut this time using the plain framelit not the fluted one. The cup was assembled as done previously and the heart Corrugated Element was added with a dimensional. I stamped the saying on Whisper White cardstock in Crumb Cake then stamped the hearts in Soft Sky using the outline heart stamp and coloring in with the matching Stampin’ Write marker. I added a touch of clear Wink of Stella for some sheen. This was cut out using the Layering Ovals framelits and I cut a matching oval the next size up in Early Espresso, then attached to the card using dimensionals.

I do love the occasional iced latte with whipped cream so that is what inspired this card. I used Garden Green for the card base, standard size 5 1/2″ x 8 1/2″ score at 4 1/4″. I took a Crumb Cake panel (4″ x 5 1/4″) and stamped it using the Burlap Background Stamp in Crumb Cake ink then attached to the card base. Then I took a 2 1/2″ x 4″ piece of DSP and tore the edges. To get the white inside to show tear the paper toward you not away. This was attached to the Crumb Cake panel. Next I stamped the saying on Whisper White using Garden Green ink. I tore the saying out then using a sponge dauber I inked the edges with Soft Suede, this was attached to the DSP using dimensionals. The cup was cut from Crumb Cake and sponged with Soft Suede. I stamped the straw using the small striped stamp on a scrap of Whisper White using Garden Green. With the photopolymer stamps you can line up each section with ease to create one long strip which was then cut with the framelit. The whipped cream was stamped using Crumb Cake and cut out along with the coffee collar in the matching DSP. To give the whipped cream a little something extra I added a little Wink of Stella in clear. After assembling the coffee cup, it was attached to the card with dimensionals.
This card will be featured in a video, as it has many elements that people always ask me about such as getting a clear image with a background stamp and tearing to get those nice feathered edges.

Now to show you the versatility of this set, I made a birthday card with a cupcake using the coffee collar and whipped cream. I also played with my other must have the Embossing Paste! The card base is Early Espresso, 4 1/4″ x 11″ scored at 5 1/2″, on top of this I added a Pear Pizzazz panel (4″ x 5 1/4″). I took a piece of striped DSP (3 3/4″ x 5″) and cut the center using the largest oval framelit from Layering Ovals. I cut another oval from the polka dot DSP, (I told you I loved the polka dot DSP!) and inserted it in the center of the striped panel. Now comes the fun part….I cut whipped cream out of a piece of thick Whisper White cardstock. I took a small amount of the Embossing Paste and put it on my Silicone Craft Sheet with a palette knife. I added a few drops of Early Espresso reinker and mixed it up to make the yummy chocolate frosting, I swear it looked just like real frosting I was very impressed! Then I frosted the little whipped cream piece, just like a real cupcake. While the embossing paste dries pretty quick when used in a thin layer, since this was so thick I hit it with a hairdryer on low to speed drying time. Then using Crumb Cake card stock I cut my cupcake using the fluted coffee collar. I found it a little large so I trimmed it down with my Paper Snips to a perfect cupcake size. The edges were sponged with Soft Suede and a dauber. I cut out the banners using the Duet Banner punch after I stamped the sayings from the Happy Birthday Gorgeous set in Early Espresso ink. These edges were also sponged with Soft Suede ink. Then the banners and cupcake were attached with dimensionals.
Supplies Used:


I hope you enjoyed these projects using the Coffee Break Suite. If you have any questions about any of the featured cards, please let me know I would be happy to help!
If you would like to get a notification each time I post a project share, specials from Stampin’ Up! or myself, class schedules or video tutorials, please make sure you click “Follow By Email” at the top of this post. That way you won’t miss a thing! As always, please feel free to share any post on Pinterest or Facebook!
Share this:

I’m so excited and I just can’t hide it!
 Nothing is more exciting than placing that first order from the new catalog. After looking at it every night for a month before going to bed (as you know that assures visions of stamps and ink dancing around in your head). Not to mention all the drooling over the new stamps, toys and my personal weakness; ribbon. Then on June 1st we get the green light to order anything from the catalog. Of course the first order is never easy. I have written my list of must haves and changed it so many time I have lost count. And I as was placing that first order I had to keep shifting things around to get the most bang for my buck.
Then comes the hard part, waiting for my box of happiness to arrive. I did pay extra for 2 day shipping since I just couldn’t wait over a week for it. I got the message yesterday morning from UPS alerting me that it will arrive tomorrow and I had to do a little happy dance in the privacy of my office.

Doin’ a happy dance, it’s on the way!!
So all day Sunday I started to design cards in my head and I kept thinking to myself; I cannot wait to get my hands on that embossing paste! And the stamp sets. And all the ribbon that will be taking over my stamp room. And who could forget about the glossy paper. Be still my heart! This was one of my favorite products I am so happy it is back. There are so many techniques that I haven’t done in a while and I can’t wait to share them with you. I had to write down all my ideas in a notebook because my brain was on overload and I didn’t want to forget them when I’m released to the wild of my stamp room.
I went to work today and all I could think about was getting home and spending the night with my new goodies. But what to play with first…that is the million dollar question! I am thinking I will put my planner together first then play with that embossing paste!

So home I go to wait for the familiar rumble of the UPS truck coming down the street. I saw this meme the other day and that is how I feel when I am waiting for my new stuff to arrive. I can remember when my children were little how they would listen for the music and then get so excited waiting for it to stop in front of the house. That is now me and my ice cream truck is brown (too bad he doesn’t play some music to alert me he is coming). Then it happens….the dog jumps on the love seat in the window and starts barking to let me know that the big brown truck has stopped in front of the house. I guess I really don’t need music when my 100 lb German Shepherd is on duty. I maintain my composure and wait for him to ring the bell and get back in the truck before I open the door and snatch the box off the front porch. Then I walk rather quickly to my stamp room to open THE BOX.

Now comes the fun part unpacking all my goodies! And away we go…….

Now what did I get? I have sets and suites and accessories oh my! But one of the great things about being a demonstrator is the discount! After my discount, Stampin’ Rewards earned, one 50% off item and the extra $35 in rewards I received almost $600 worth of product and paid only $370, that’s a savings of $230 and I didn’t have to cut any coupons! Wowza!


Now to put away all my new toys and start playing!! I can’t wait to share all my new projects and videos. I will be shooting videos this weekend so be sure to check back soon!
If you would like to get a notification each time I post a project share, specials from Stampin’ Up! or myself, class schedules or video tutorials, please make sure you click “Follow By Email” at the top of this post. That way you won’t miss a thing! As always, please feel free to share any post on Pinterest or Facebook!

