
Welcome back to the final installment of my five part series featuring the Adoring Hearts Bundle and the Thoughtful Moments Embossing folder!! As promised I decided to really change up the Valentine’s Day/Love theme and go in a completely different direction. Embracing my Celtic heritage, I wanted to make a St. Patrick’s Day card This really shows how you can get a lot of mileage out of this set.
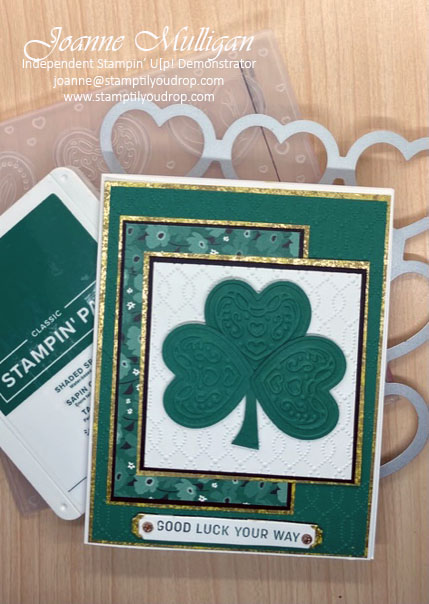
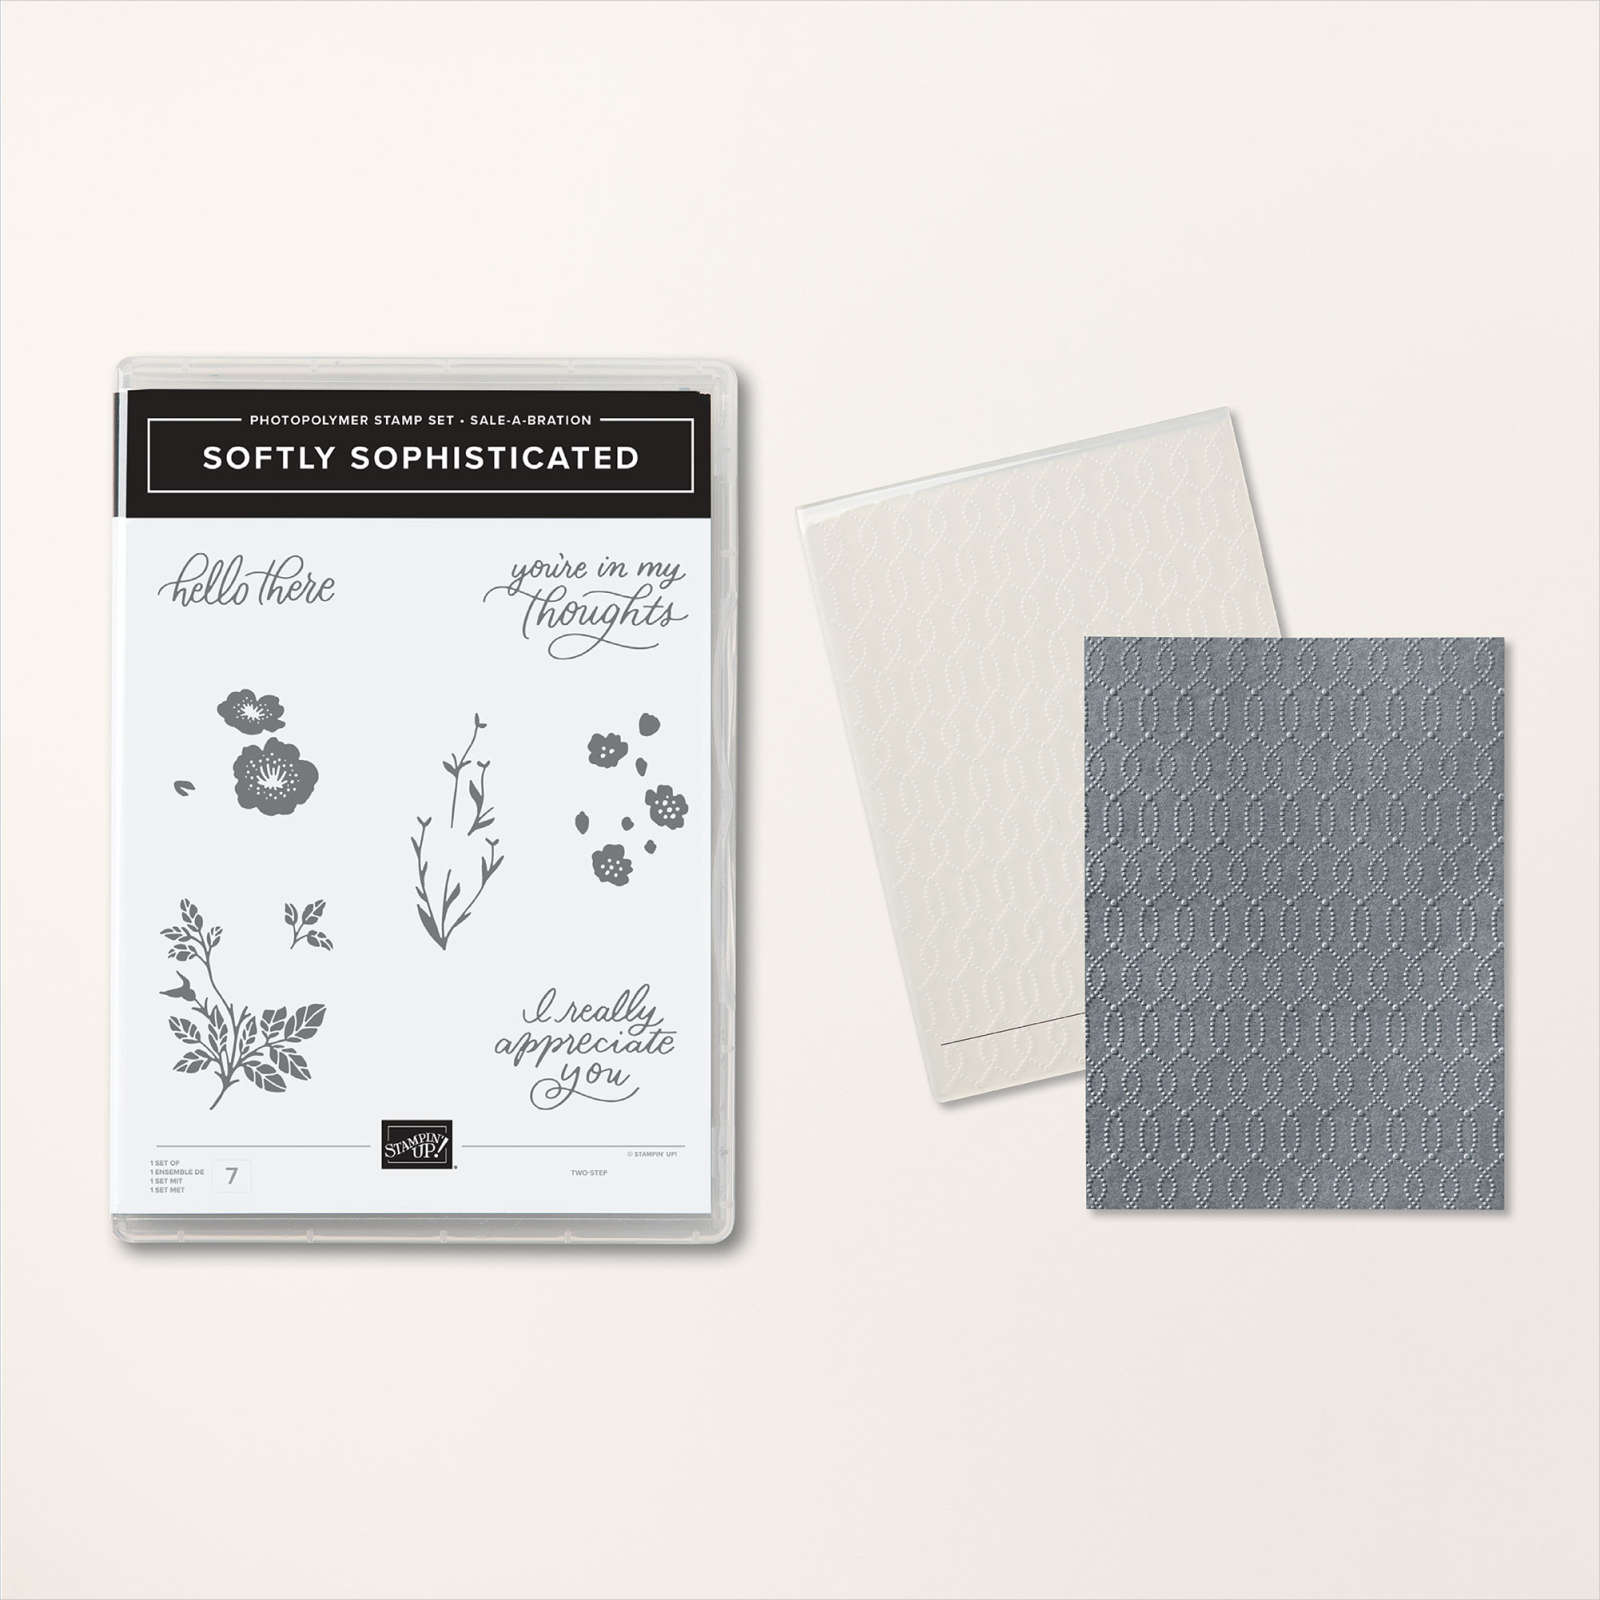
Featuring white, green and gold this card is a fun way to show your Irish pride. After all,isn’t everyone Irish on St. Patrick’s Day? This card is perfect for an intermediate to advanced stamper. I used the Sunny Days DSP and the Softly Sophisticated embossing folder from Sale-A-Bration and the Adoring Hearts Hybrid Folder for the Shamrock.
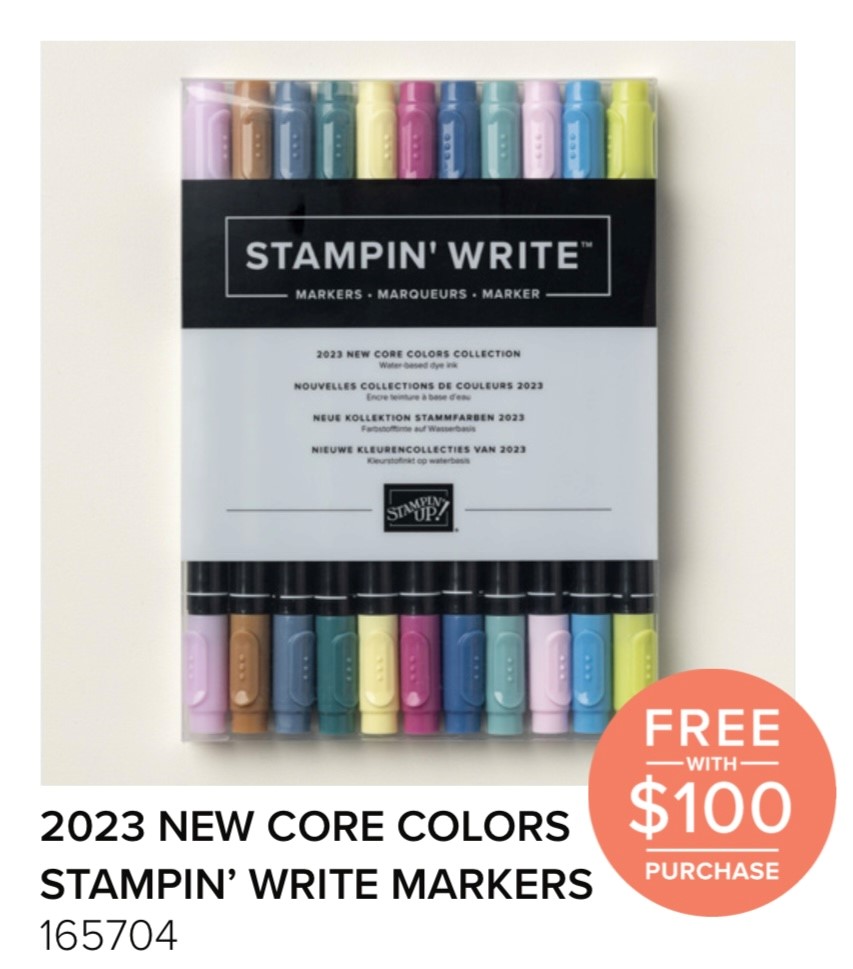
Bonus: You can get this paper for FREE if you purchase the Adoring Hearts Bundle during Sale-A Bration. Retail amount $53.00 USD Item #162570. If you love the folder it can be yours with a $100 purchase. You will get the Softly Sophisticated stamp set and embossing folder for FREE.
Supplies Used:


New releases for Sale-A-Bration! As if you don’t have great product choices already, Stampin’ Up! has give you more products to choose from!

Let me know if you have any questions!
Happy Stamping!
Joanne

~Making the world a happier place, one card at a time!
Share this:

Love is in the Air Part Four!
Welcome back to my five part series featuring the Adoring Hearts Bundle and the Thoughtful Moments Embossing folder!! Be sure to check back this weekend for a very special card!!
Today’s card showcases all the products shown below plus the Most Adored Designer Series Paper (“DSP”). I have to tell you that I am absolutely in LOVE with the hybrid embossing folders!!
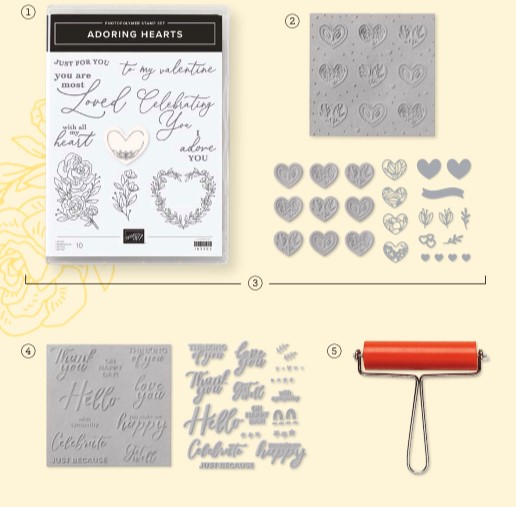
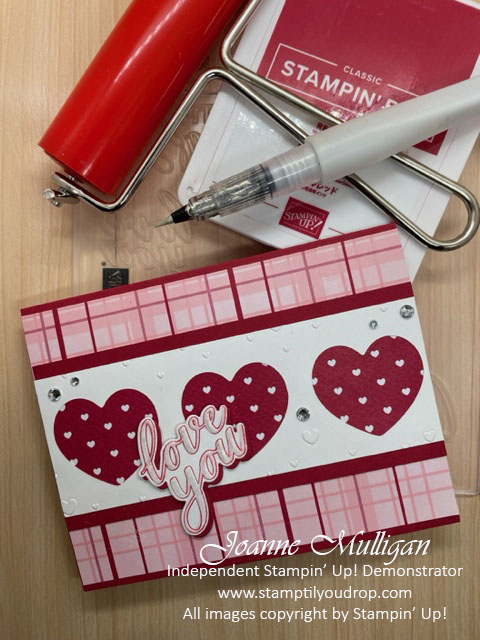
This card is perfect for an intermediate to advanced stamper. I used the Real Red DSP with little white hearts as a peek-a-boo effect with the cut-out hearts and the pretty plaid DSP . Of course there is some bling with Wink of Stella and a few rhinestones.
Bonus: You can get this paper for FREE if you purchase the Adoring Hearts Bundle during Sale-A Bration. Retail amount $53.00 USD Item #162570.
Now how did I create this adorable card? Well here you go………
Hope you enjoyed the video, it’s the first one I’ve done in quite a few years. I am having a lot of fun getting back into my website and sharing my cards and videos. Thank you for coming on this journey with me!!
Supplies Used:


New releases for Sale-A-Bration! As if you don’t have great product choices already, Stampin’ Up! has give you more products to choose from!
Let me know if you have any questions!
Happy Stamping!
Joanne
~Making the world a happier place, one card at a time!
Share this:

Love is in the Air Part Three!
Only 10 more days until Valentine’s Day so another card idea using the Adoring Hearts stamp set and Hybrid Embossing Folder plus the Most Adored Designer Series Paper. Check back later in the week when I have a video showing how to use the brayer, Adoring Hearts Bundle and the Thoughtful Moments Hybrid Embossing Folder.
Today’s card showcases the Adoring Hearts Embossing folder. I really love how you can quickly cut and emboss at the same time. Bonus if you are only using a few hearts, you will have several already cut to use on future projects. TIP: I keep all my extra die cuts I haven’t used in a large plastic container and my scraps in a plastic shoe box. When I need an extra doodad or a small piece of cardstock for a saying I will have one already cut.
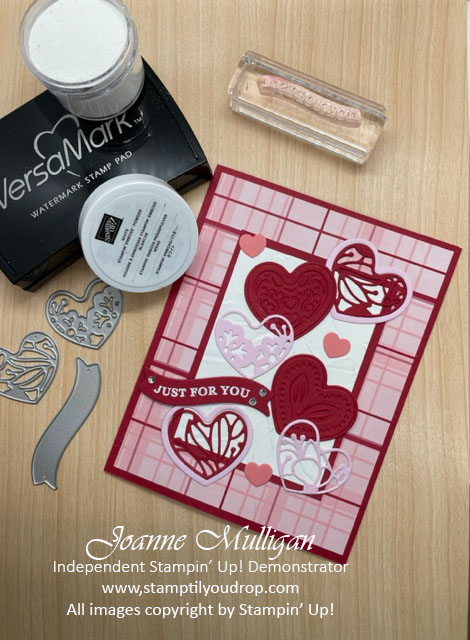
This card is perfect for an advanced stamper. I used the pretty plaid for the Most Adored Designer Series Paper. I then cut several hearts using the Hybrid Embossing Folder and other dies in the bundle. It is in Bubble Bath, Real Red and white which are traditional Valentine’s Day colors.
Bonus: You can get this paper for FREE if you purchase the Adoring Hearts Bundle during Sale-A Bration. Retail amount $53.00 USD Item #162570.
Now how did I create the cut embossed hearts and the pretty filigree hearts with heart frames? I will be happy to share it with you my friends, and it all revolves around the hybrid folder!
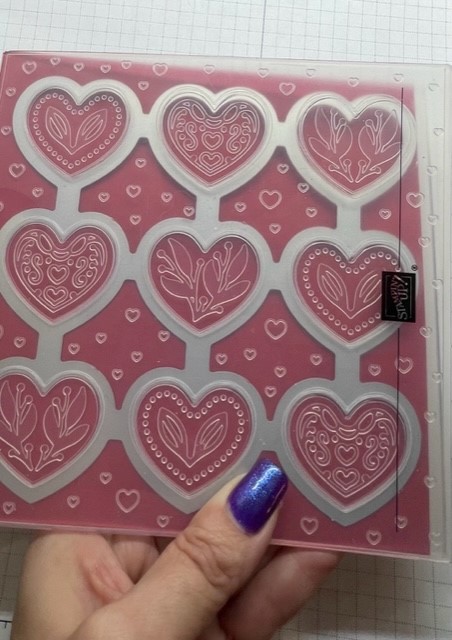
First you want to place the nine heart die inside the embossing folder. You will notice how the die fits right over the hearts and kind of “locks” in place
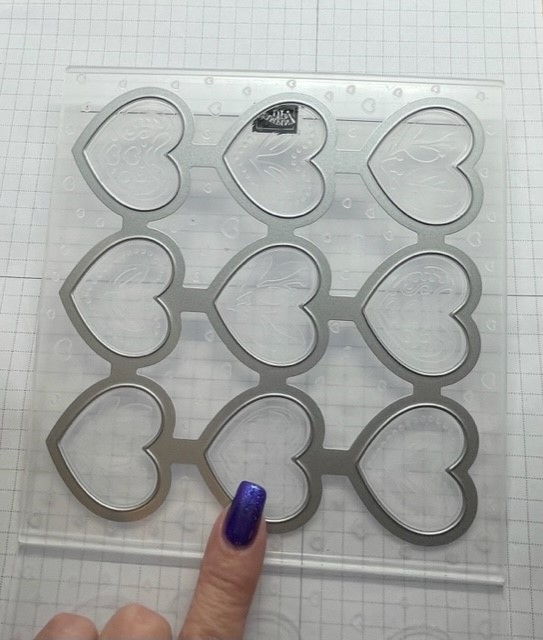
Next you will add your cardstock. I cut mine in a 6″ x 6″ square so I have extras. Now run it through your die cut machine. Bonus: Not only will you have nine little embossed hearts but if you look closely at folder you will have nine open hearts with tiny embossed hearts all around. Later in the week I will show you what you can do with this extra piece! The sandwich for the folder is base plate, embossing folder and the gray plate – same as when using a 3D embossing folder.
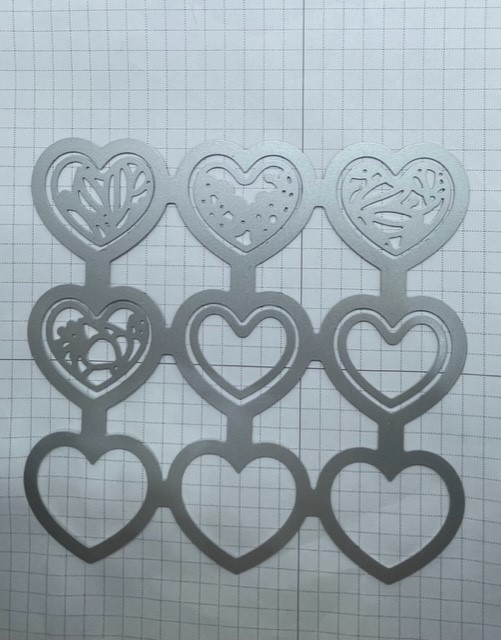
Once you have cut out your embossed hearts its time to cut the little hearts and frames. So break out that nine piece heart die. Place the small filigree hearts and smaller hearts inside the open hearts as shown and run through your die cut machine. Guess what? More hearts to use on future cards!
Supplies Used:


New releases for Sale-A-Bration! As if you don’t have great product choices already, Stampin’ Up! has give you more products to choose from!
Let me know if you have any questions!
Happy Stamping!
Joanne
~Making the world a happier place, one card at a time!
Share this:

Love is in the Air Part Two!
Here are some more ideas using the Adoring Hearts Hybrid Embossing Folder and the Most Adored Designer Series Paper. Check back all week when I will be showcasing different cards using various techniques for different levels of stampers.
Like I said in my weekend post this stamp set and coordinating hybrid embossing folder aren’t just for Valentine’s Day, they can be used for wedding, anniversary, and more! Today I’m going to use a different layout and showcase three cards using the same design but changing the words for different occasions.
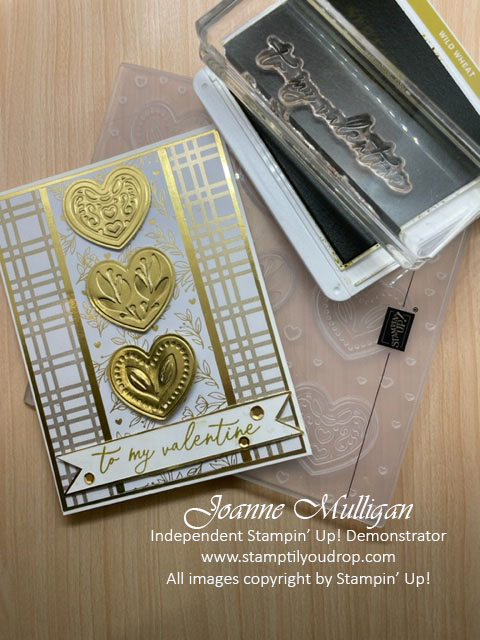
This card is perfect for an intermediate to advanced stamper. It features the a white and gold theme that is extremely elegant and perfect for your favorite valentine! The card really showcases the beautiful Most Adored Designer Series Paper with the shiny gold accents. Bonus: You can get this paper for FREE if you purchase the Adoring Hearts Bundle during Sale-A Bration. Retail amount $53.00 USD Item #162570.
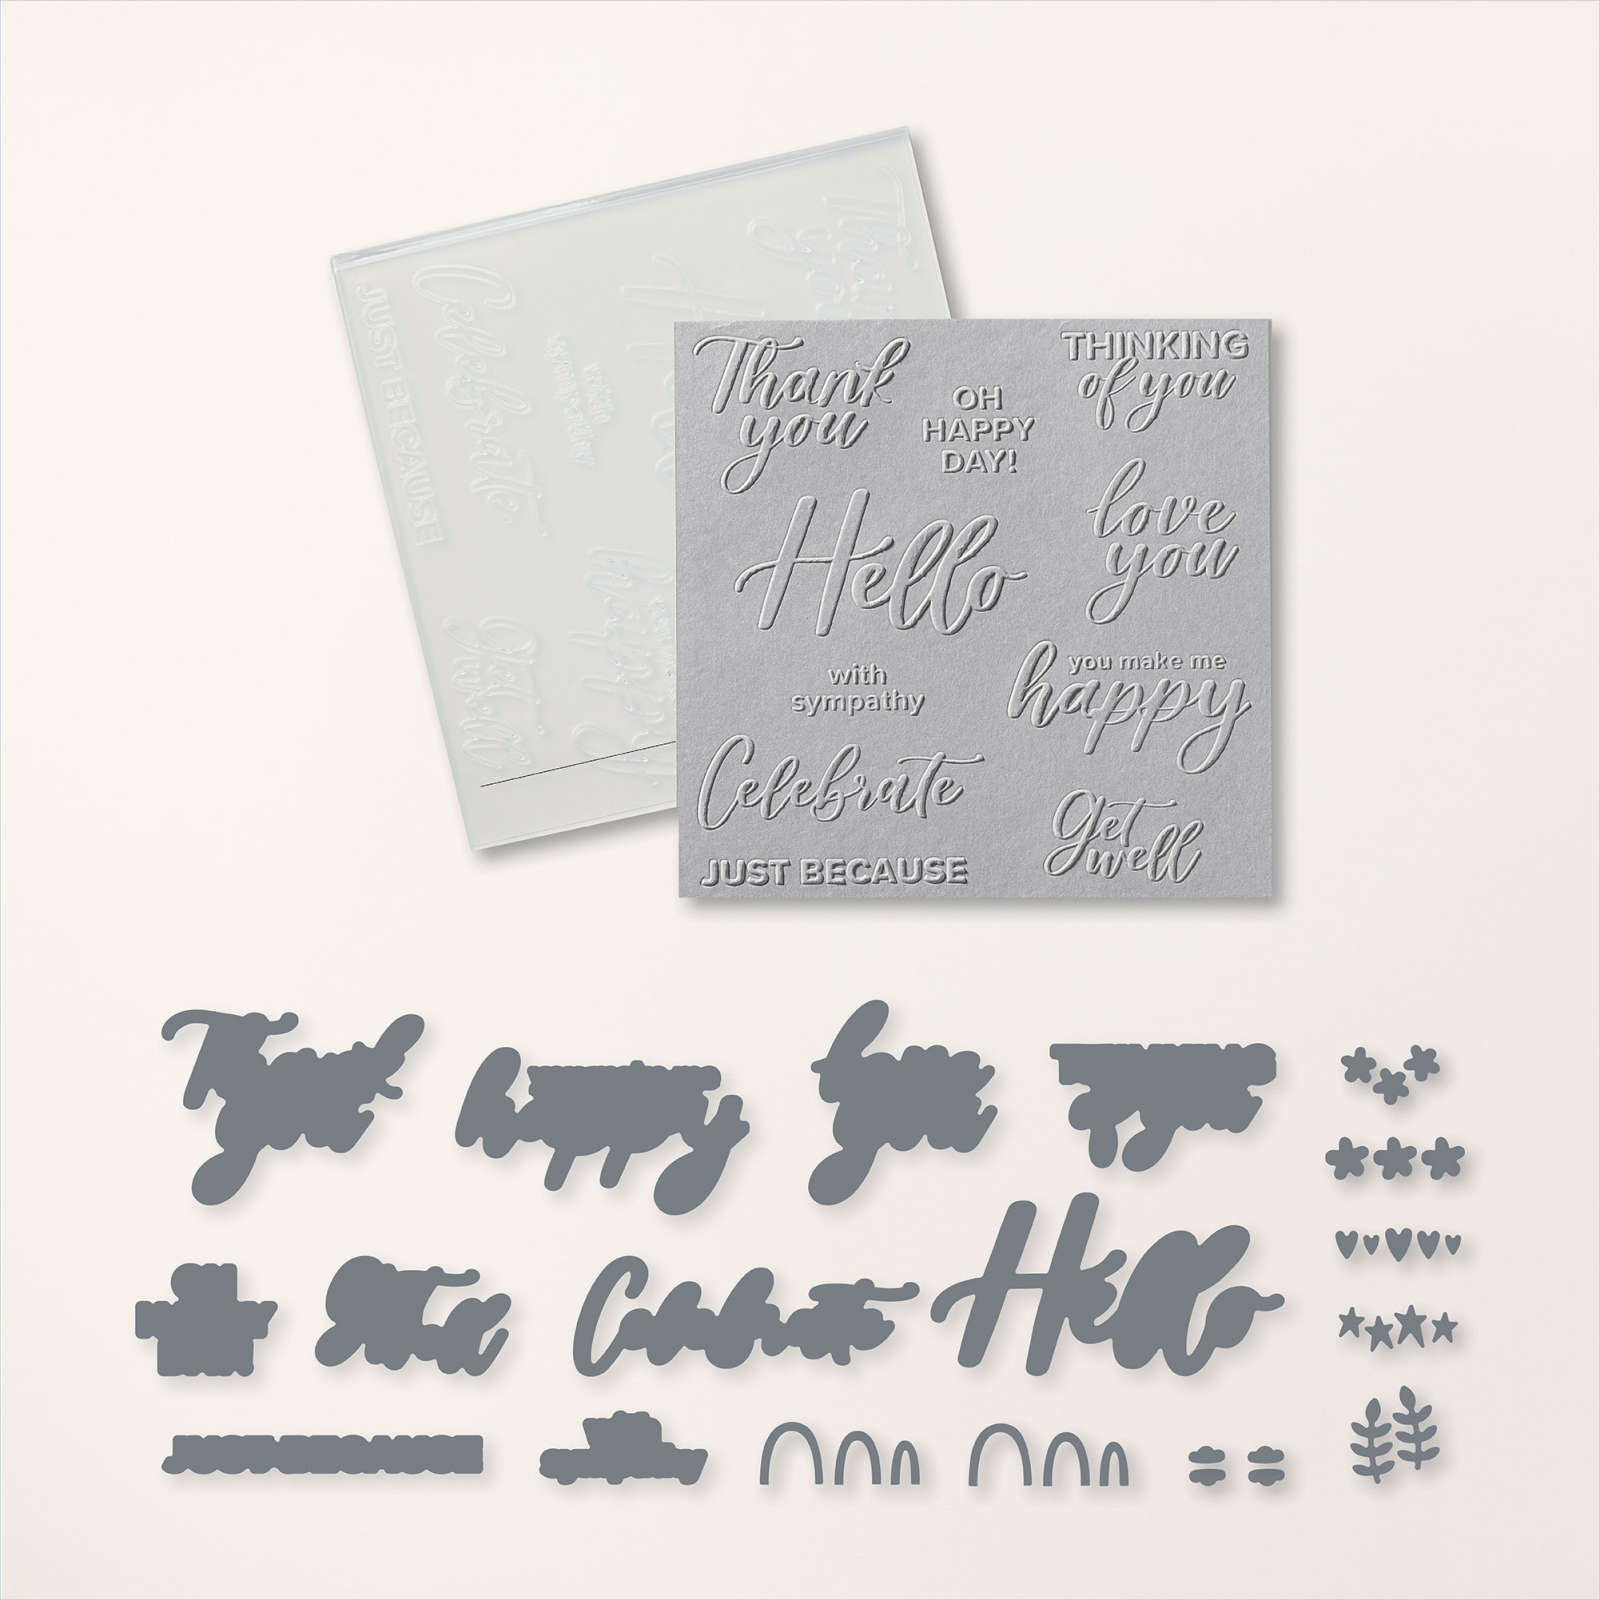
Some of you may be asking what exactly is a hybrid embossing folder. Well let me fill you in on this fun little accessory. It is a 3D embossing folder but is also comes with a large die that fits ever so nicely into the folder so you can cut and emboss at the same time! When that happens you get the little gold hearts that I placed on my card. Such a cool stamping trick!
Later on this week I will be showing you how to use a hybrid folder with ink and a brayer, so stay tuned!!
Here are a few other ideas for using this versatile set to get more bang for your stamping dollar!
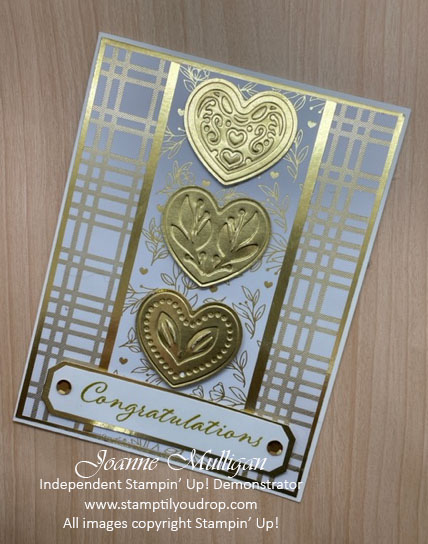
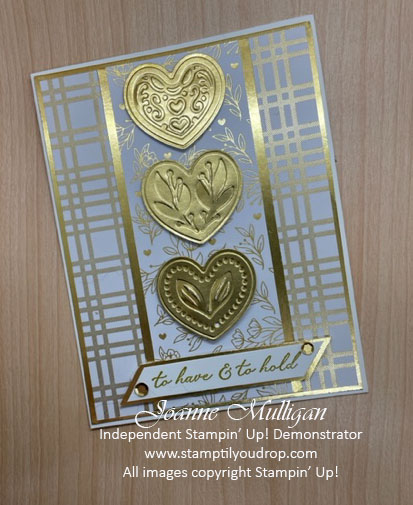
Now what couple wouldn’t love these cards, whether they are just starting out or hitting a milestone anniversary!
Supplies Used:


Let me know if you have any questions!
Happy Stamping!
Joanne
~Making the world a happier place, one card at a time!
Share this:

Love is in the Air!
I have been having a lot of fun creating Valentine’s cards using the innovative hybrid embossing folders; Adoring Hearts and Thoughtful Moments with the stamp set Adoring Hearts. Check back all week when I will be showcasing four different cards using various techniques for different levels of stampers.
Not only are these great stamps for Valentine’s Day but they can be used for wedding, anniversary, birthdays and more!

This card is perfect for any level stamper. It features the wreath from the Adoring Hearts set colored with Flirty Flamingo and Soft Seafoam blends, a few rhinestones and a little Flirty Flamingo bow. The side panel shows off a piece of Mostly Adored Designer Series Paper that you can earn when you spend $50 or more during Sale-A-Bration.
If you are a beginner just starting out and haven’t invested in a die cut machine, the pieces can easily be cut instead of using dies. It is also an easy layout that you will use again and again!
Supplies Used:


Bye..Bye..Bye

With the anticipation of the new Spring Mini Catalog also comes the sadness of saying good bye to some of our favorites from the Fall/Winter Mini Catalog. If there are any items on the retired list that have been on your wish list, now is the time to get them before they are gone!
Between November 21, 2023 and January 3, 2024 you can order products on the retired list with some discounted as much as 60%!!
Promotion Details:
- Not all items on the Last Chance Products List will be discounted.
- All products are available while supplies last, and there are no purchase limits.
- Discounted items can be added to a Starter Kit and redeemed as a 50% off item or with Stampin’ Rewards.
- Stamp sets are not guaranteed during this promotion and are while supplies last.
- Discounts are automatically applied when sale items are added to any order, including Starter Kits.
SHOP NOW
If you have any questions please reach out. I am here to help!
Happy Stamping!
Joanne
~Making the world a happier place one card at a time
Share this:

Time to stock up on holiday crafting essentials during the Annual Seasonal Sale!!!

Create more by spending less during the Annual Seasonal Sale! Between November 14–16, you can get select products from the 2023–2024 Annual Catalog up to 20% off. Have your eye on something from the new color collection? Don’t miss your opportunity to shop the colors you’ve been craving during this phenomenal sale!
You can stock up on supplies for all your upcoming handmade projects or embrace the season of giving and buy something for your fellow crafting enthusiasts. Make sure to act quickly on this limited time only deal!
PROMOTION PERIOD: November 14th – November 16th 2023
PROMOTION DETAILS:
- 10% off ribbons and trims.
- 15% off inks, including pads, refills, markers, and Blends. Bundles are not included.
- 20% off papers, including cardstock, specialty paper, and Designer Series Paper.
- Shop online to see the full selection of discounted products available. This is a limited time offer.
- Discounts are automatically applied when sale items are added to any order, including Starter Kits.
- Please keep in mind that due to the high volume of orders, the distribution center may fall behind typical shipping time frames. Stampin’ Up! will do everything they can to return to our regular service levels as quickly as possible.
Please note: Some items may sell out due to high demand. The discount will automatically be applied to qualifying items that are in stock. Per our updated policy, backorders are not available.
Be sure to use the Host Code XAUJ7X69 when placing your order if your total is under $150. If over $150, DO NOT use the Host code because you will qualify for Stampin’ Rewards good for free items!
All who place an order of $75 or more during this promotion period and use the Host Code or spend over $150 on their own will be entered into a drawing to win a special gift bag filled with a stamp set and accessories – retail value will be $75 or more!!

Happy Stamping!
Joanne
~making the world a happier place, one card at a time
Share this:

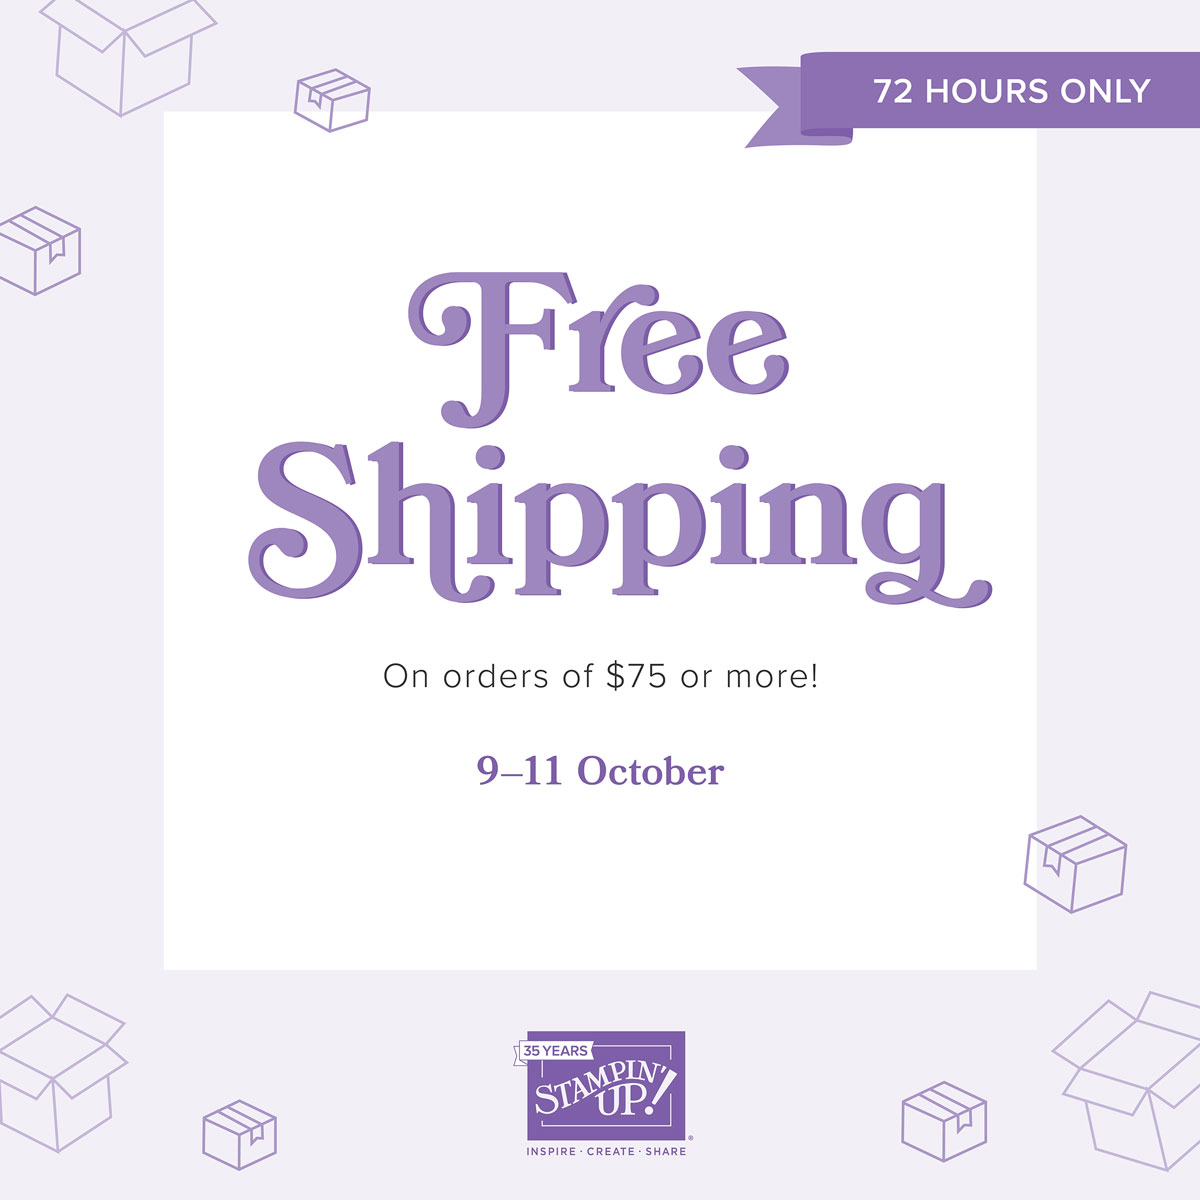
FREE SHIPPING 72 HOURS ONLY!!
TIME TO STOCK UP!!
FREE SHIPPING 72 HOURS ONLY
Be sure to take advantage by stocking up on your favorite paper crafting supplies!!
PROMOTION PERIOD:
October 9th – October 11th 2023
Promotion Details:
- Free shipping applies after the qualifying amount has been met.
- The minimum qualifying amount to receive free shipping is $75 USD or more (before tax).
- Free shipping only applies during the 72-hour period the promotion
- With the exception of month-to-month Paper Pumpkin subscriptions, all Stampin’ Up! products qualify for the promotion.
- Prepaid Paper Pumpkin subscriptions are eligible for FREE shipping under the same rules as all other Stampin’ Up! items during the promotion.
- The free shipping promotion does not cover any additional costs for expedited shipping.
Be sure to use the Host Code XDDKXYNS when placing your order if your total is under $150. If over $150, DO NOT use the Host code because you will qualify for Stampin’ rewards good for free items!
All who place an order during this promotion period and use either the Host code or spend over $150 on their own will be entered into a drawing to win a special gift bag filled with a special stamp set and fun accessories – retail value will be $75 or more!!
Let me know if you have any questions!
Happy Stamping!!
Joanne
~Making the world a happier place one card at a time!
Share this:

Hello Autumn!
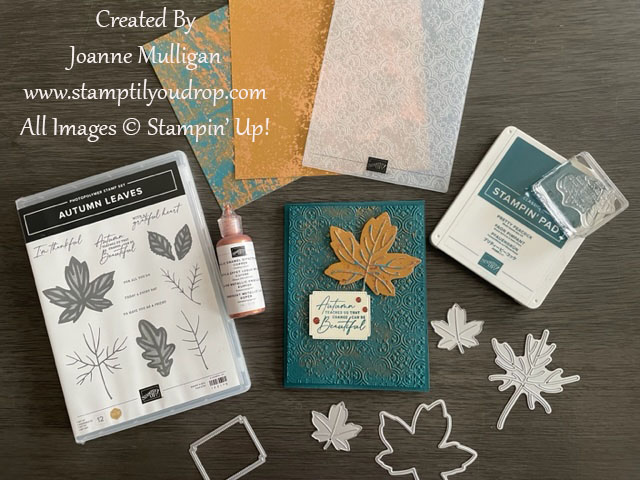
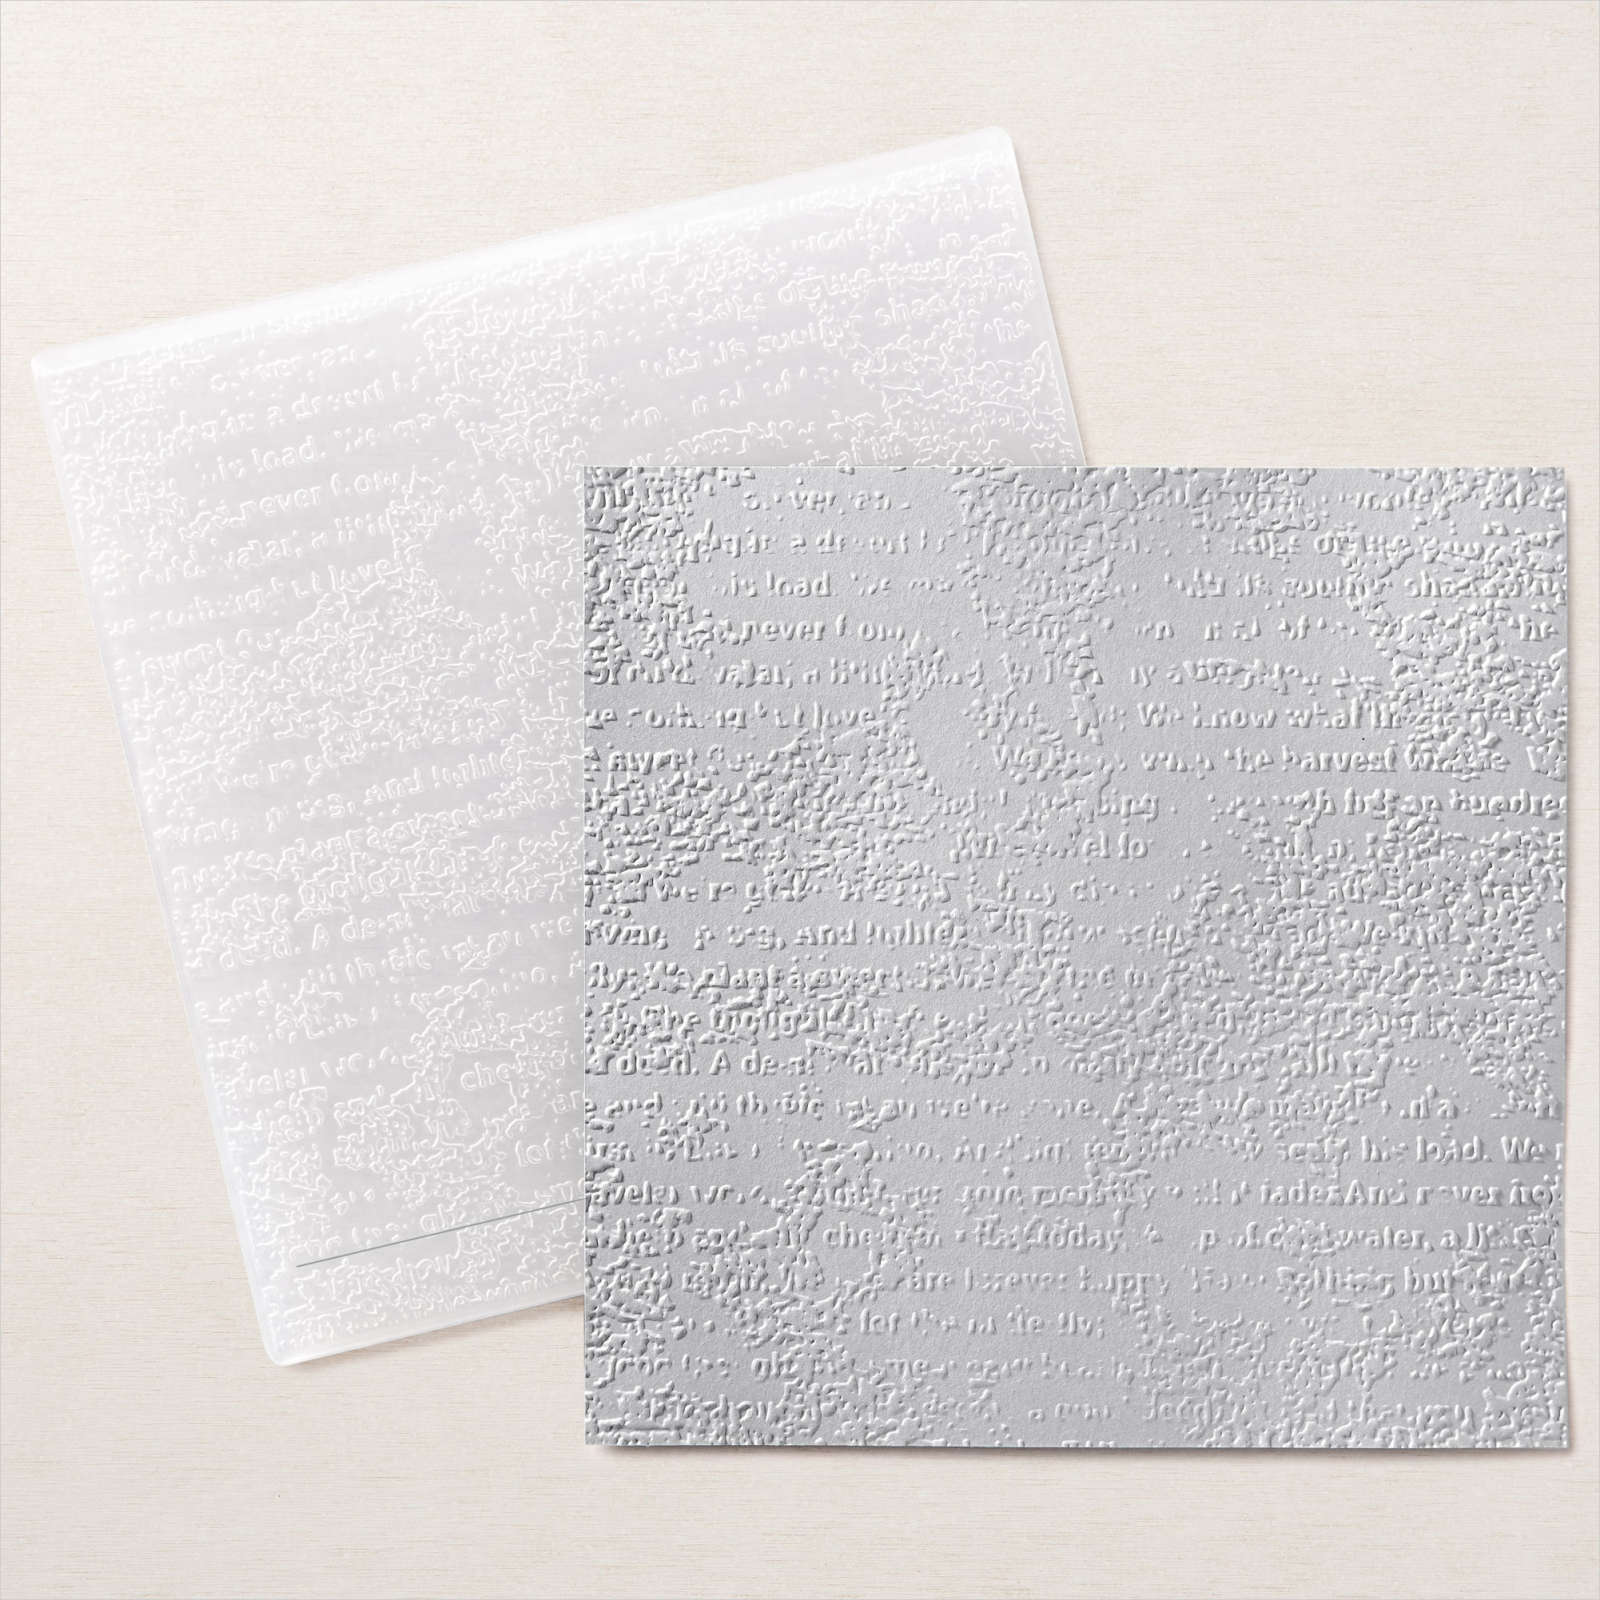
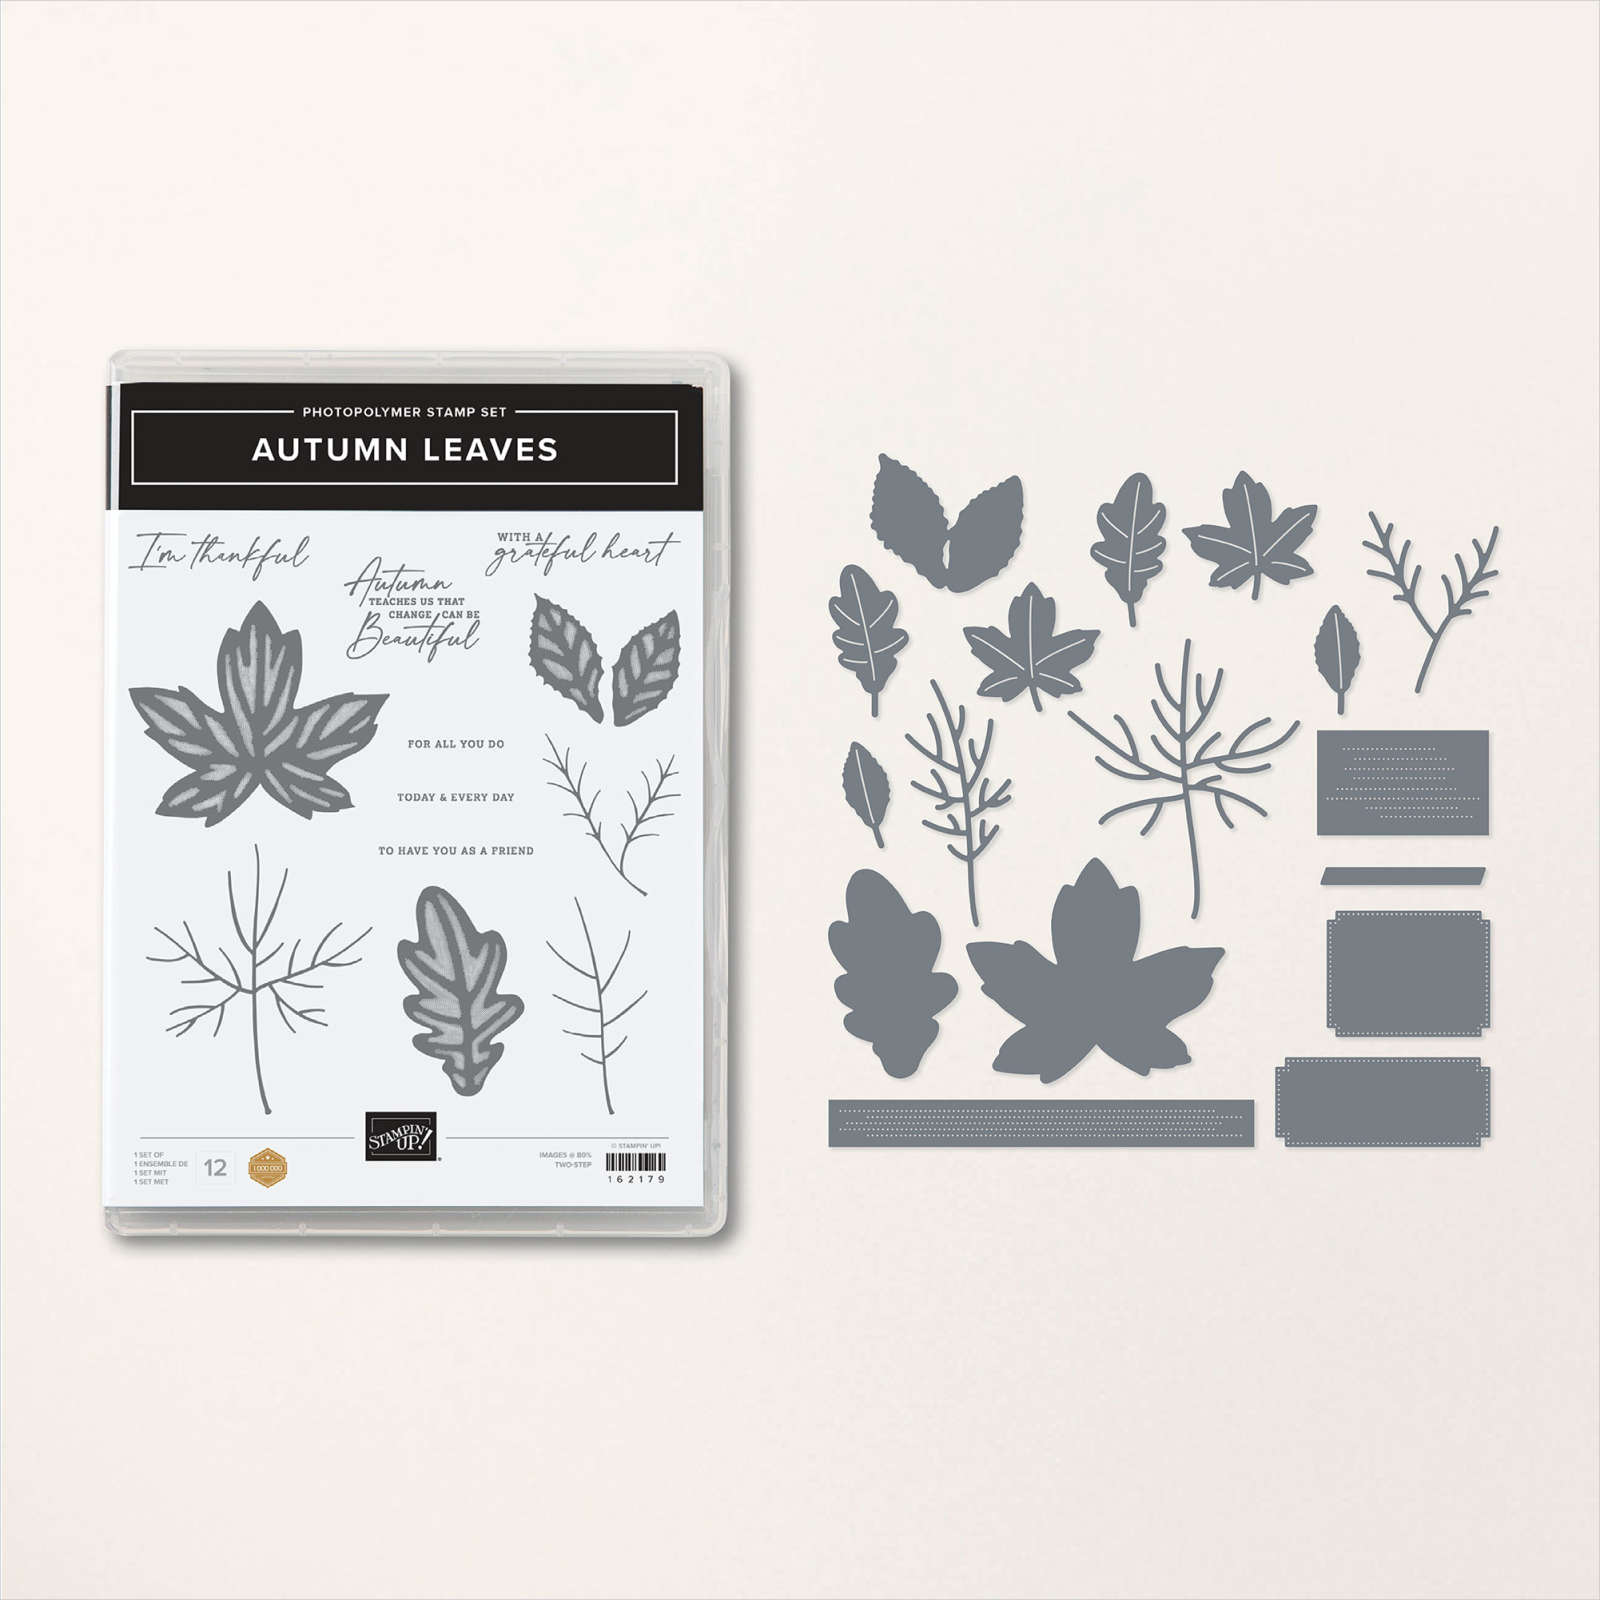
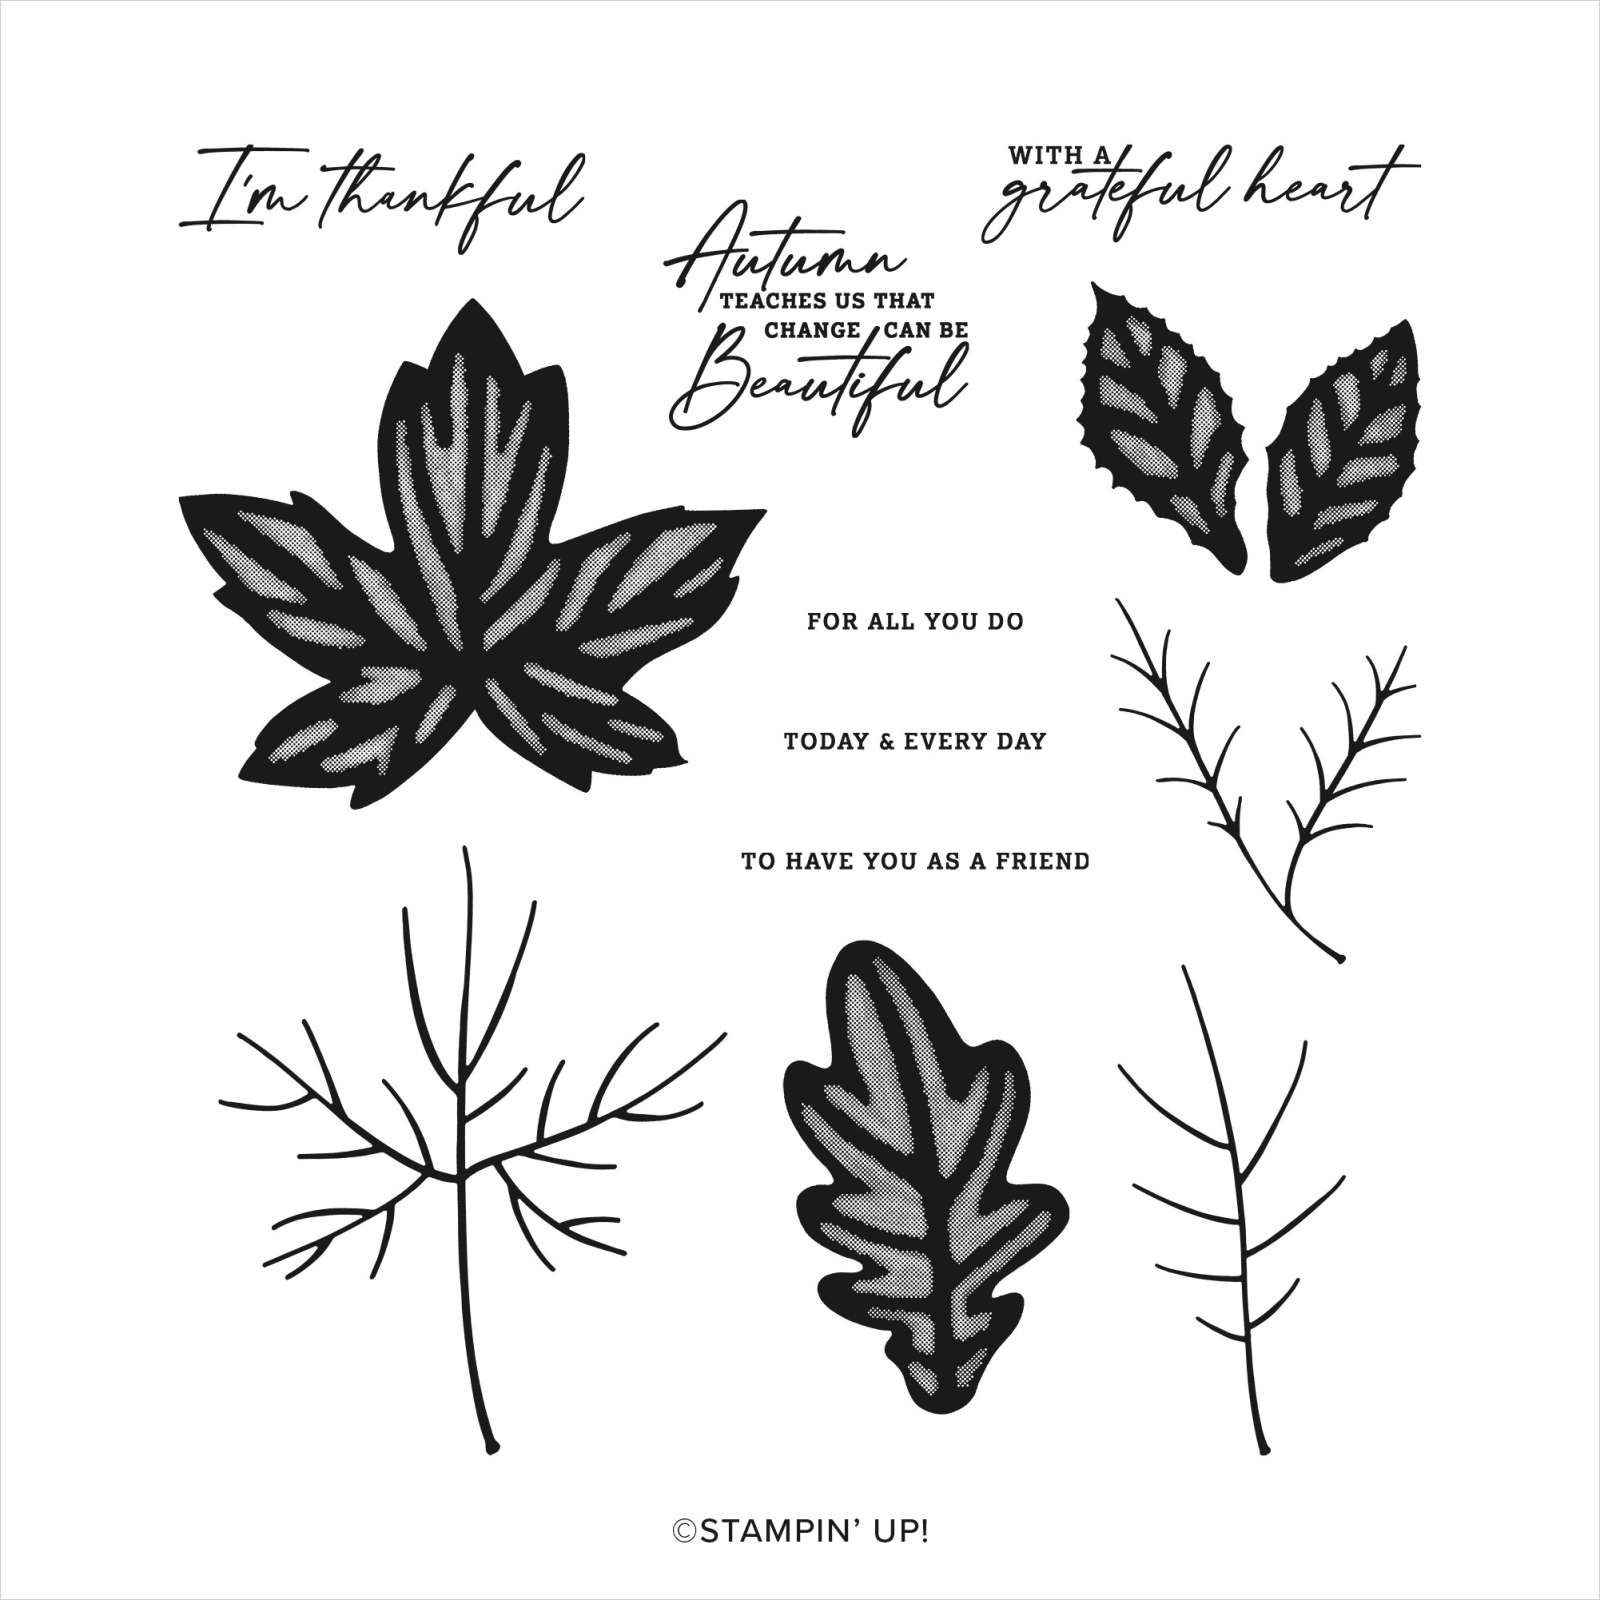
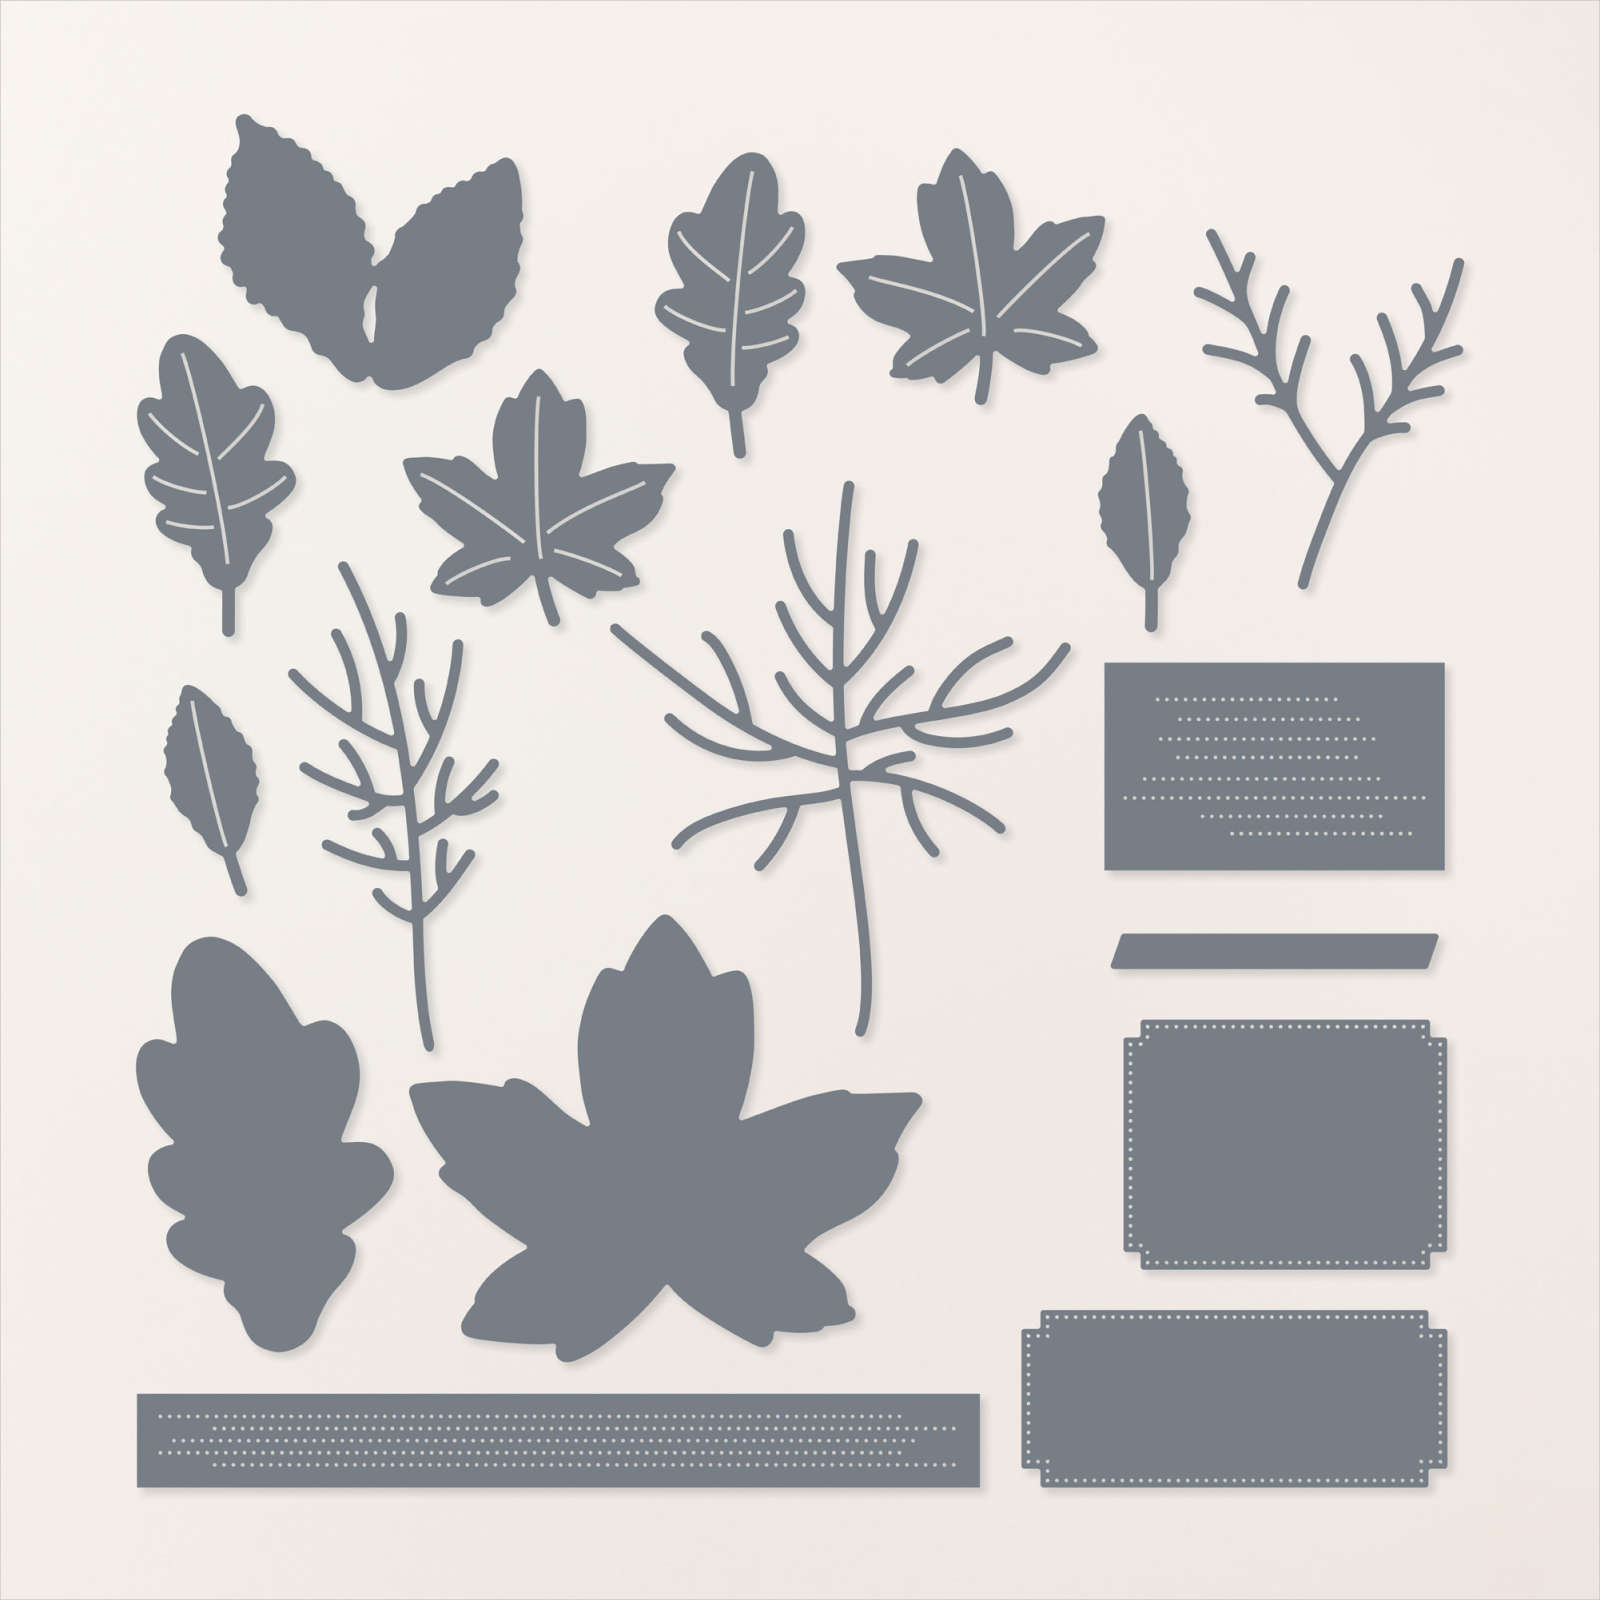
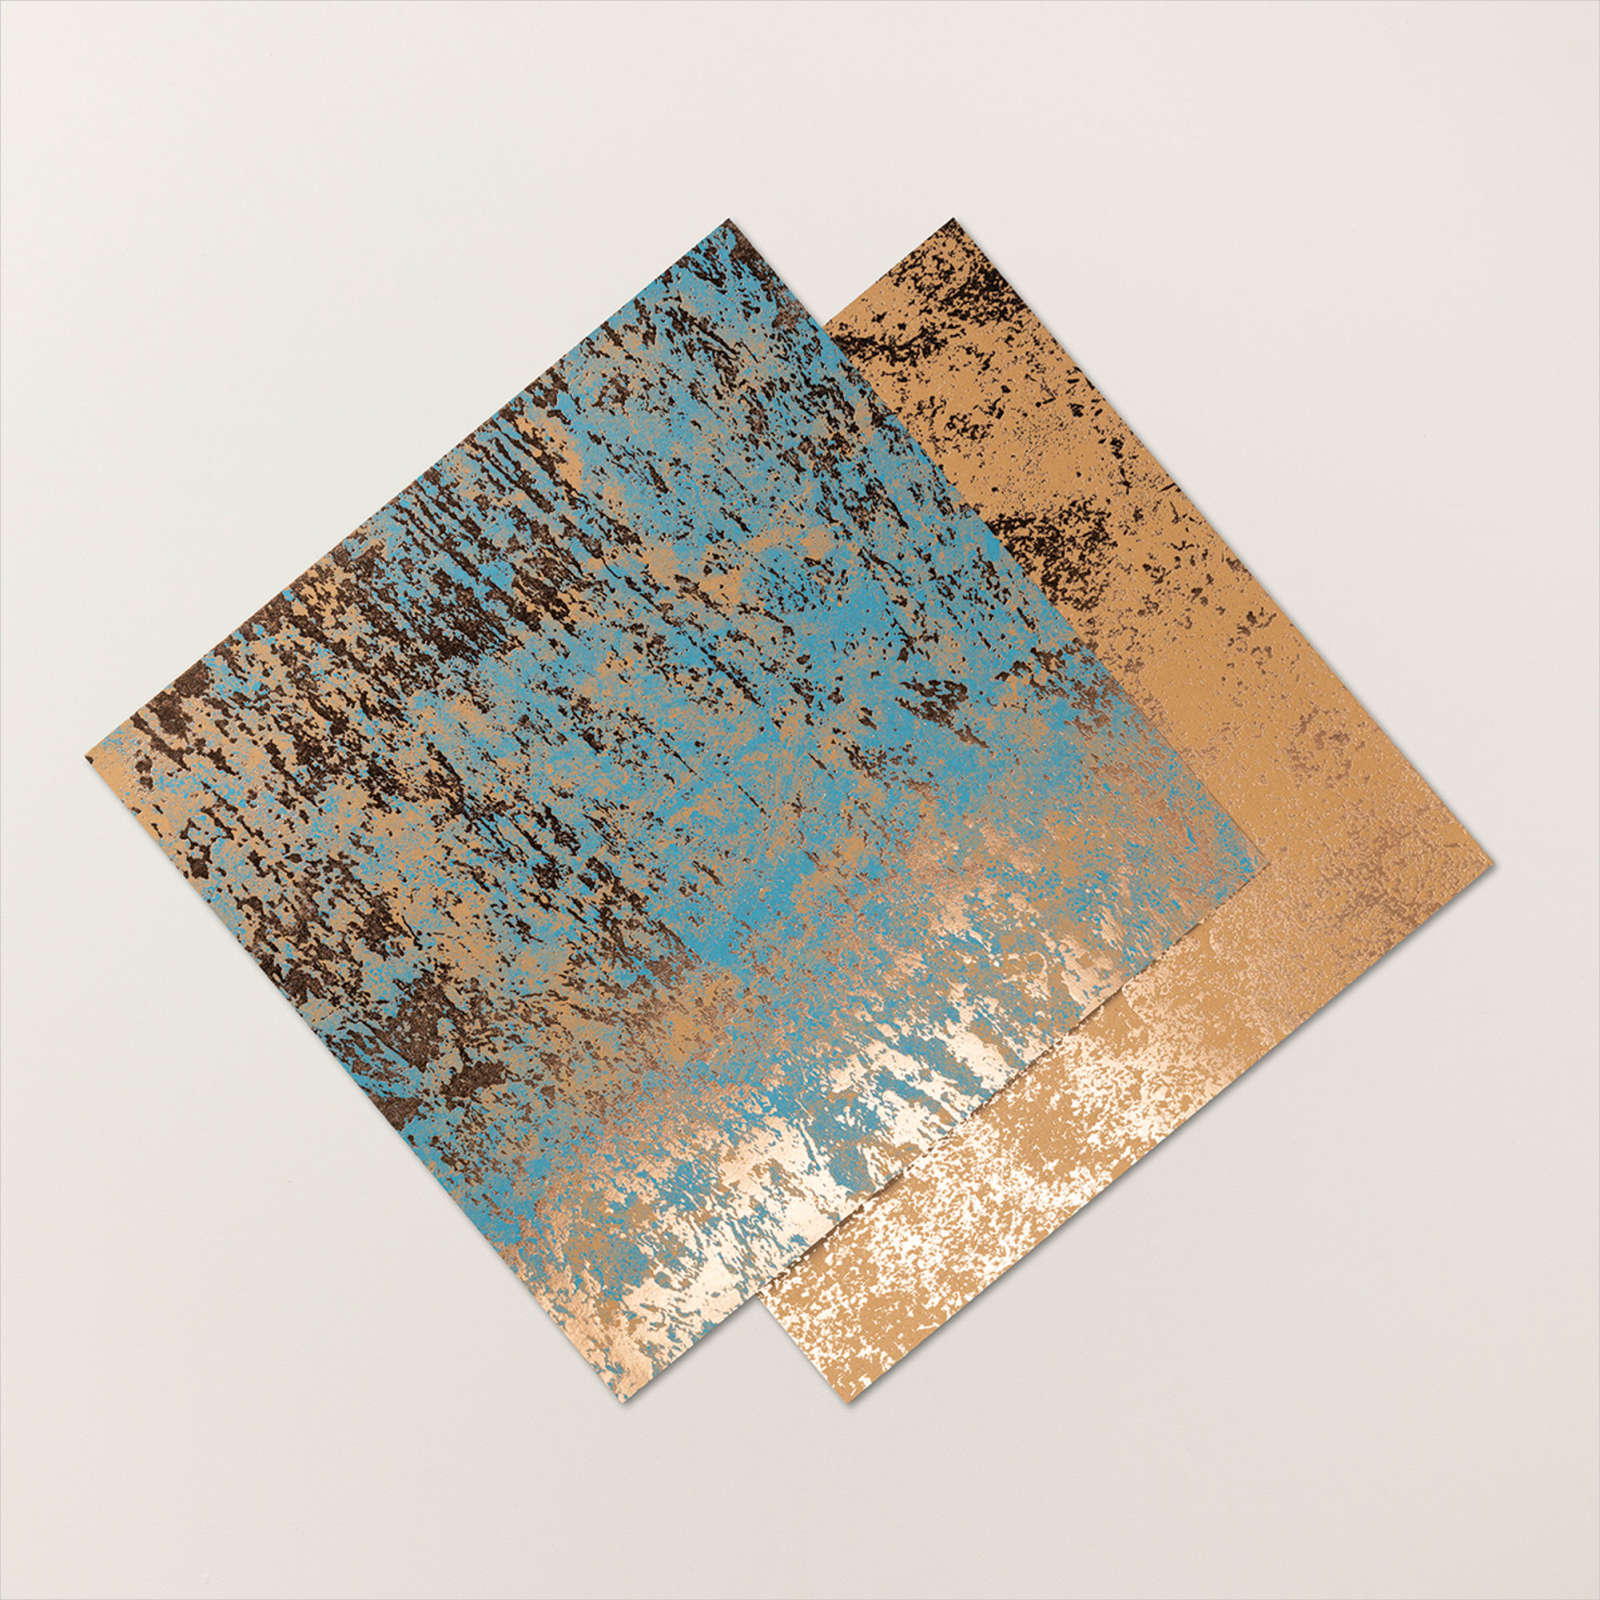
One of my favorite suites in the September – December Mini Catalog is the All About Autumn Sweet (#162193 $105.75 USD). Fall is my favorite season so it’s no surprise I was drawn to this suite. It features the Autumn Leaves stamp set, matching dies, copper and natural ribbon combo pack, Distressed Tile 3D embossing folder, Oxidized Copper 12 x 12 Designer Series Paper and All About Autumn 6 x 6 Designer Series Paper (all products can be purchased separately).
I had so much fun creating with this suite, and this is one card that gets a lot of compliments.
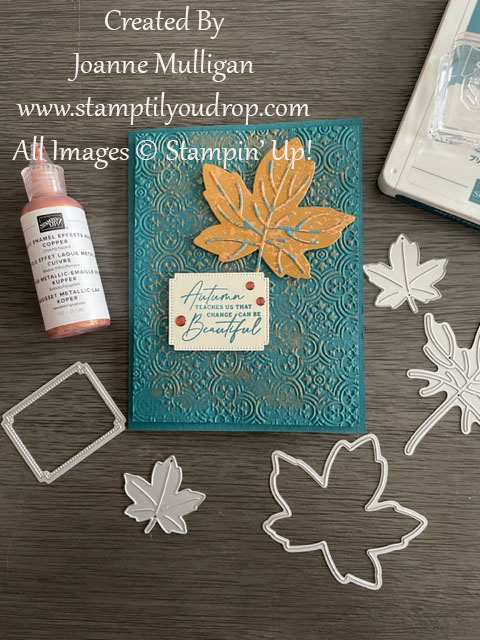
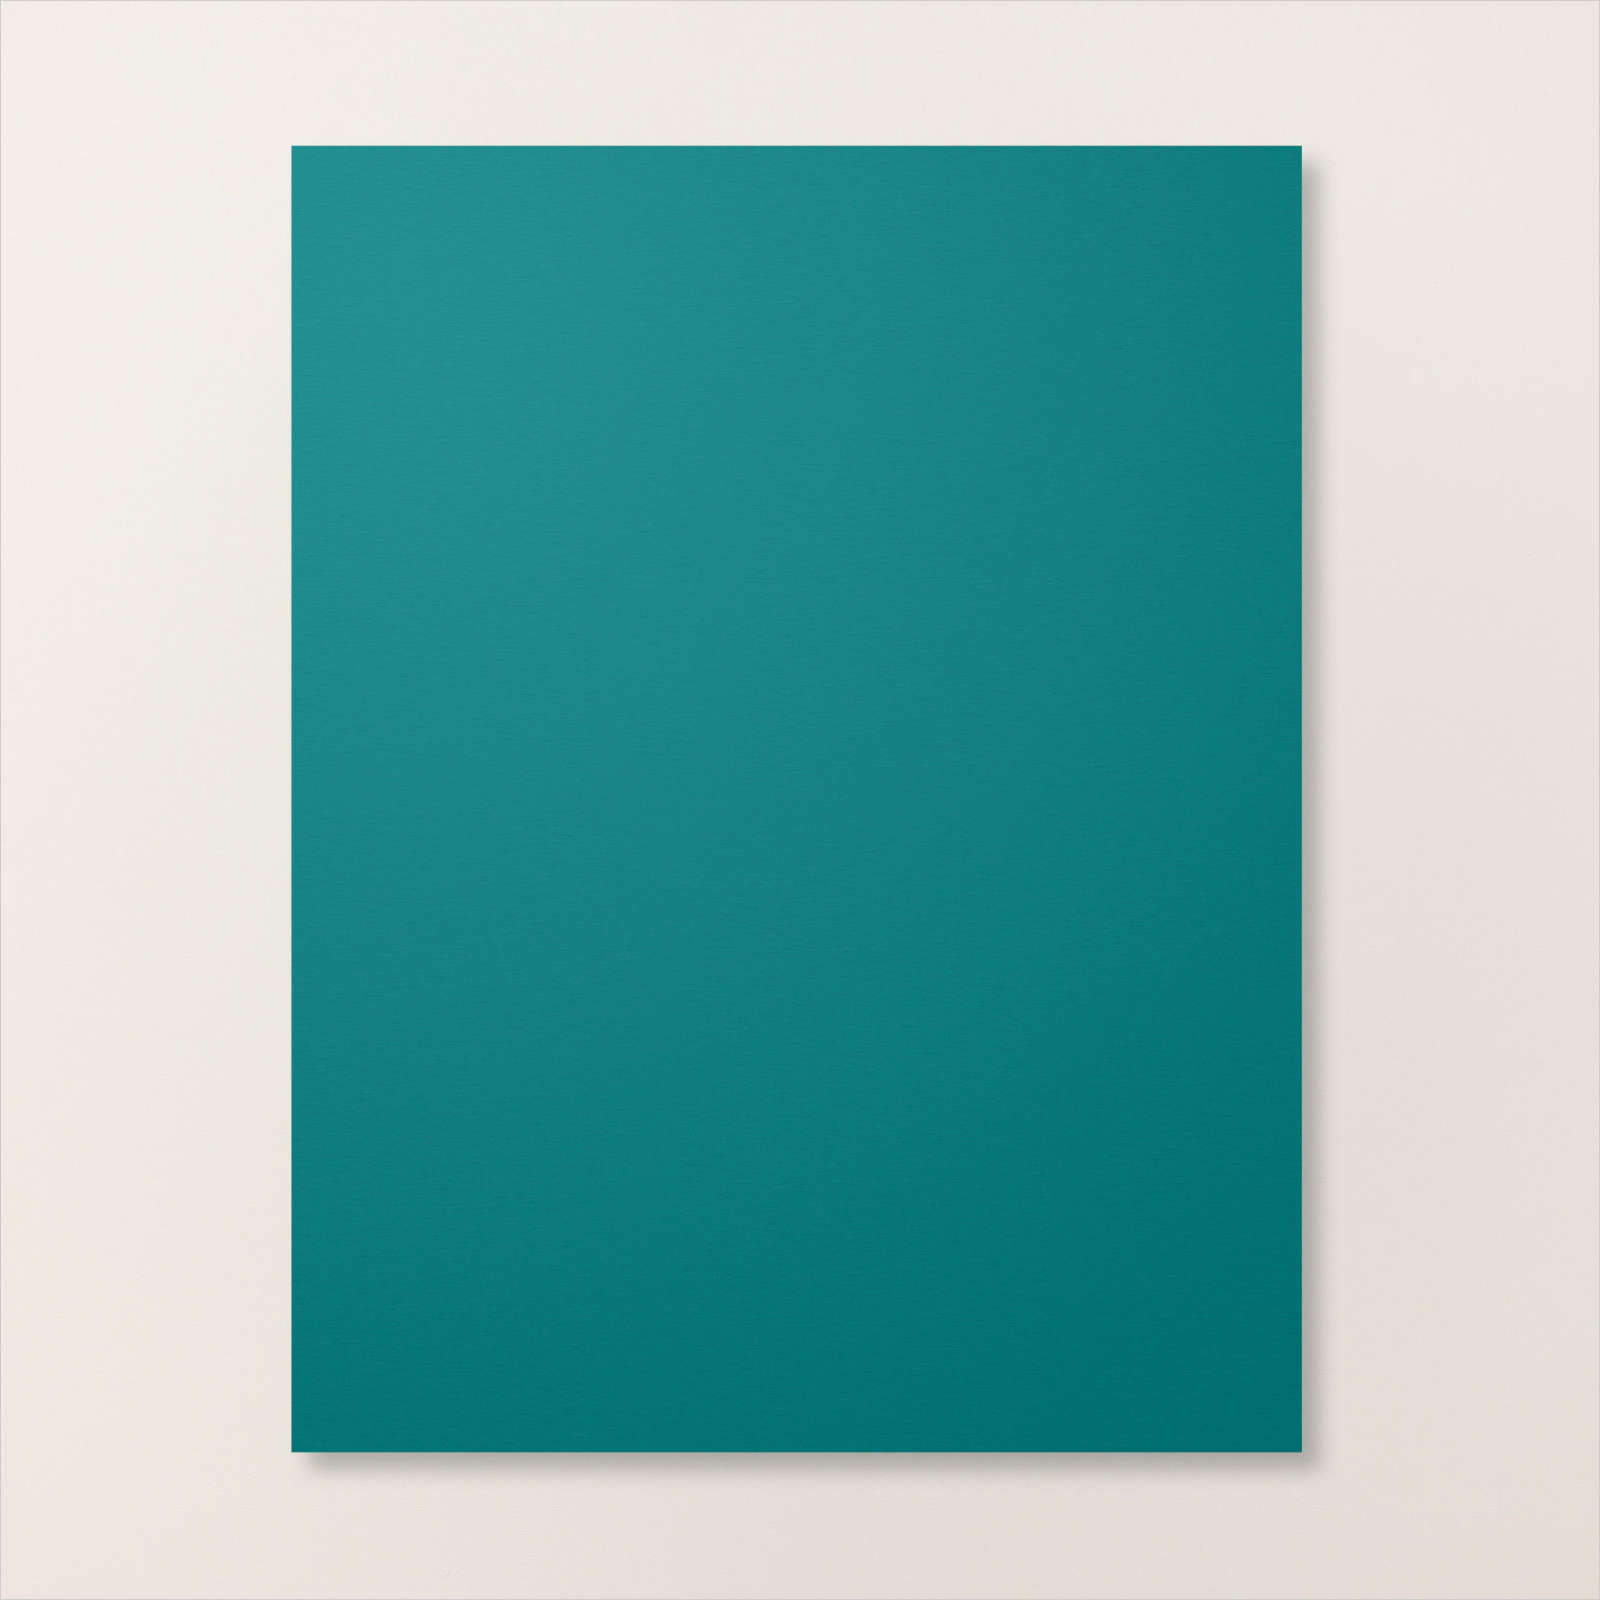
I used Pretty Peacock for the card base with the same color panel embossed with the Distressed TIle 3D embossing file. To get the emphasize the distressed look of the embossed panel I used Metallic Copper Enamel Effects. It really brings out the copper in the leaf and veins.
I attached the panel to the main card with dimensionals to make it pop a bit. Then from the Distressed Oxidized Copper DSP I cut one large leaf and two mall leaves and the veins from the Pretty Peacock and Copper DSP. After attaching the veins with mono glue I added it to the card front again with dimensionals. The saying “Autumn teaches us that change can be beautiful” was stamped on Very Vanilla cardstock using Pretty Peacock ink, then cut out using the frame in the Autumn Leaves dies. To add a little sparkle I used 2023 – 2025 In Color Dots on the saying.

For the inside I stamped “I’m Thankful” on Very Vanilla using Pretty Peacock. I added the two remaining leaves to tie it all together.
Cutting Directions:
- Pretty Peacock card stock – cut 5 1/2″ x 8 1/2″, score at 4 1/4″
- Pretty Peacock card stock – cut 4″ x 5 1/4″
- Very Vanilla – cut 4″ x 5 1/4″
- Copper Oxidized DSP – cut 3 1/4″ x 5″ (the large leaf and two small leaves can fit on this piece)
- Pretty Peacock & Copper Oxidized DSP – cut 3″ x 4″
- Scrap piece Very Vanilla at least 1 1/2″ x 2″
Supplies Used:


Please let me know any questions you may have!
Happy Stamping!
Joanne
~making the world a happier place one card at a time
Email: joanne@stamptilyoudrop.com
Share this:
Designer Series Paper Sale – ONLY 12 DAYS LEFT!!
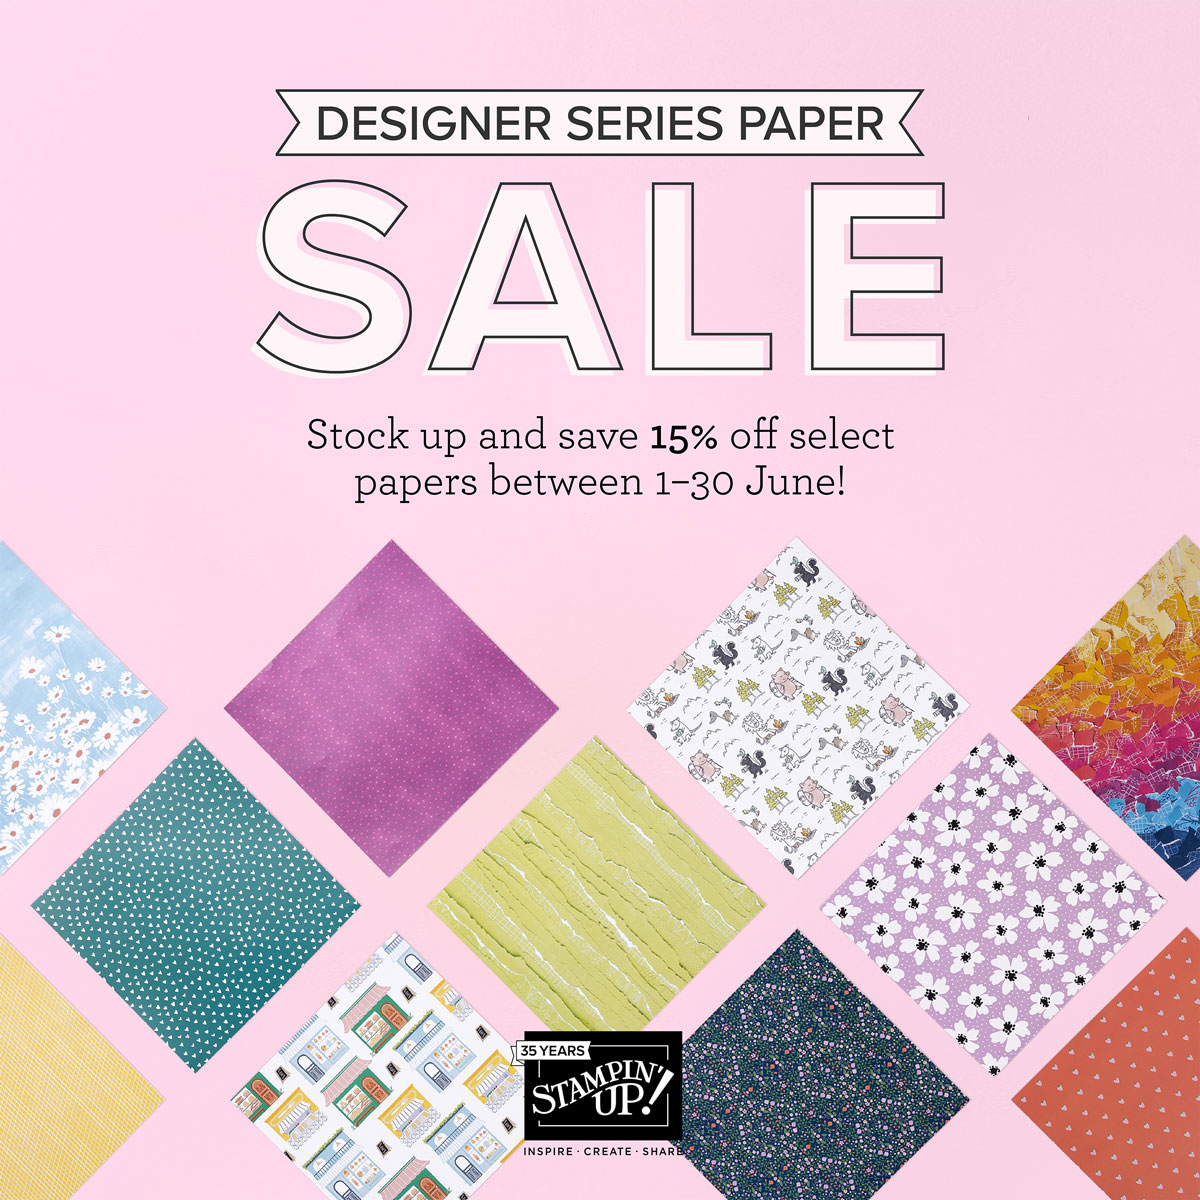
From June 1, 2023 through June 30, 2023 stock up on your favorite Designer Series Papers at 15% off! Hurry and take advantage of this offer before it expires!
Details of promotion:
- There is no limit to how many packages of Designer Series Paper may be purchased during this promotion.
- Only select Designer Series Papers are available at a 15% discount during this promotion. Please reference flyer to see the papers included in the sale.
- Orders must be placed—and closed—during the promotion period for the 15% discount to apply.
- Designer Series Paper ordered as part of a Starter Kit or with Stampin’ Rewards qualify for the 15% discount.
- Designer Series Papers are from the new 2023–2024 Annual Catalog (p. 129–132) and Online Exclusives.
Let me know if you have any questions on any products or this promotion!
Happy Stamping!
Joanne
~Making the world a happier place, one card at a time!

