
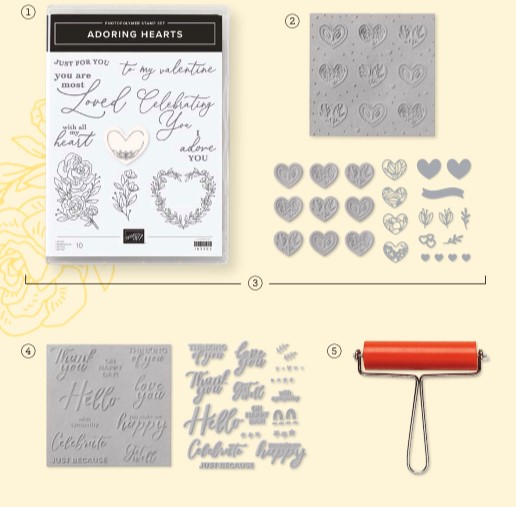
Welcome back to the final installment of my five part series featuring the Adoring Hearts Bundle and the Thoughtful Moments Embossing folder!! As promised I decided to really change up the Valentine’s Day/Love theme and go in a completely different direction. Embracing my Celtic heritage, I wanted to make a St. Patrick’s Day card This really shows how you can get a lot of mileage out of this set.
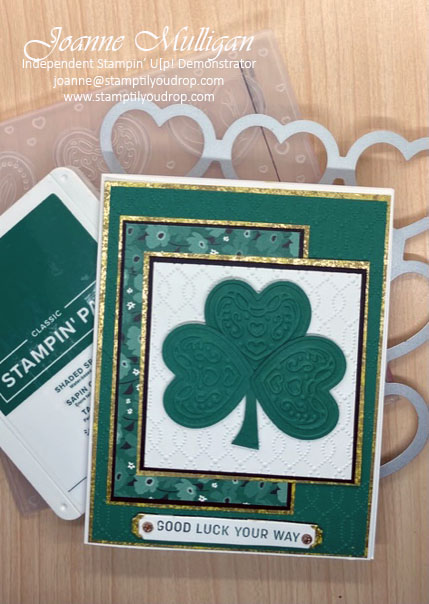
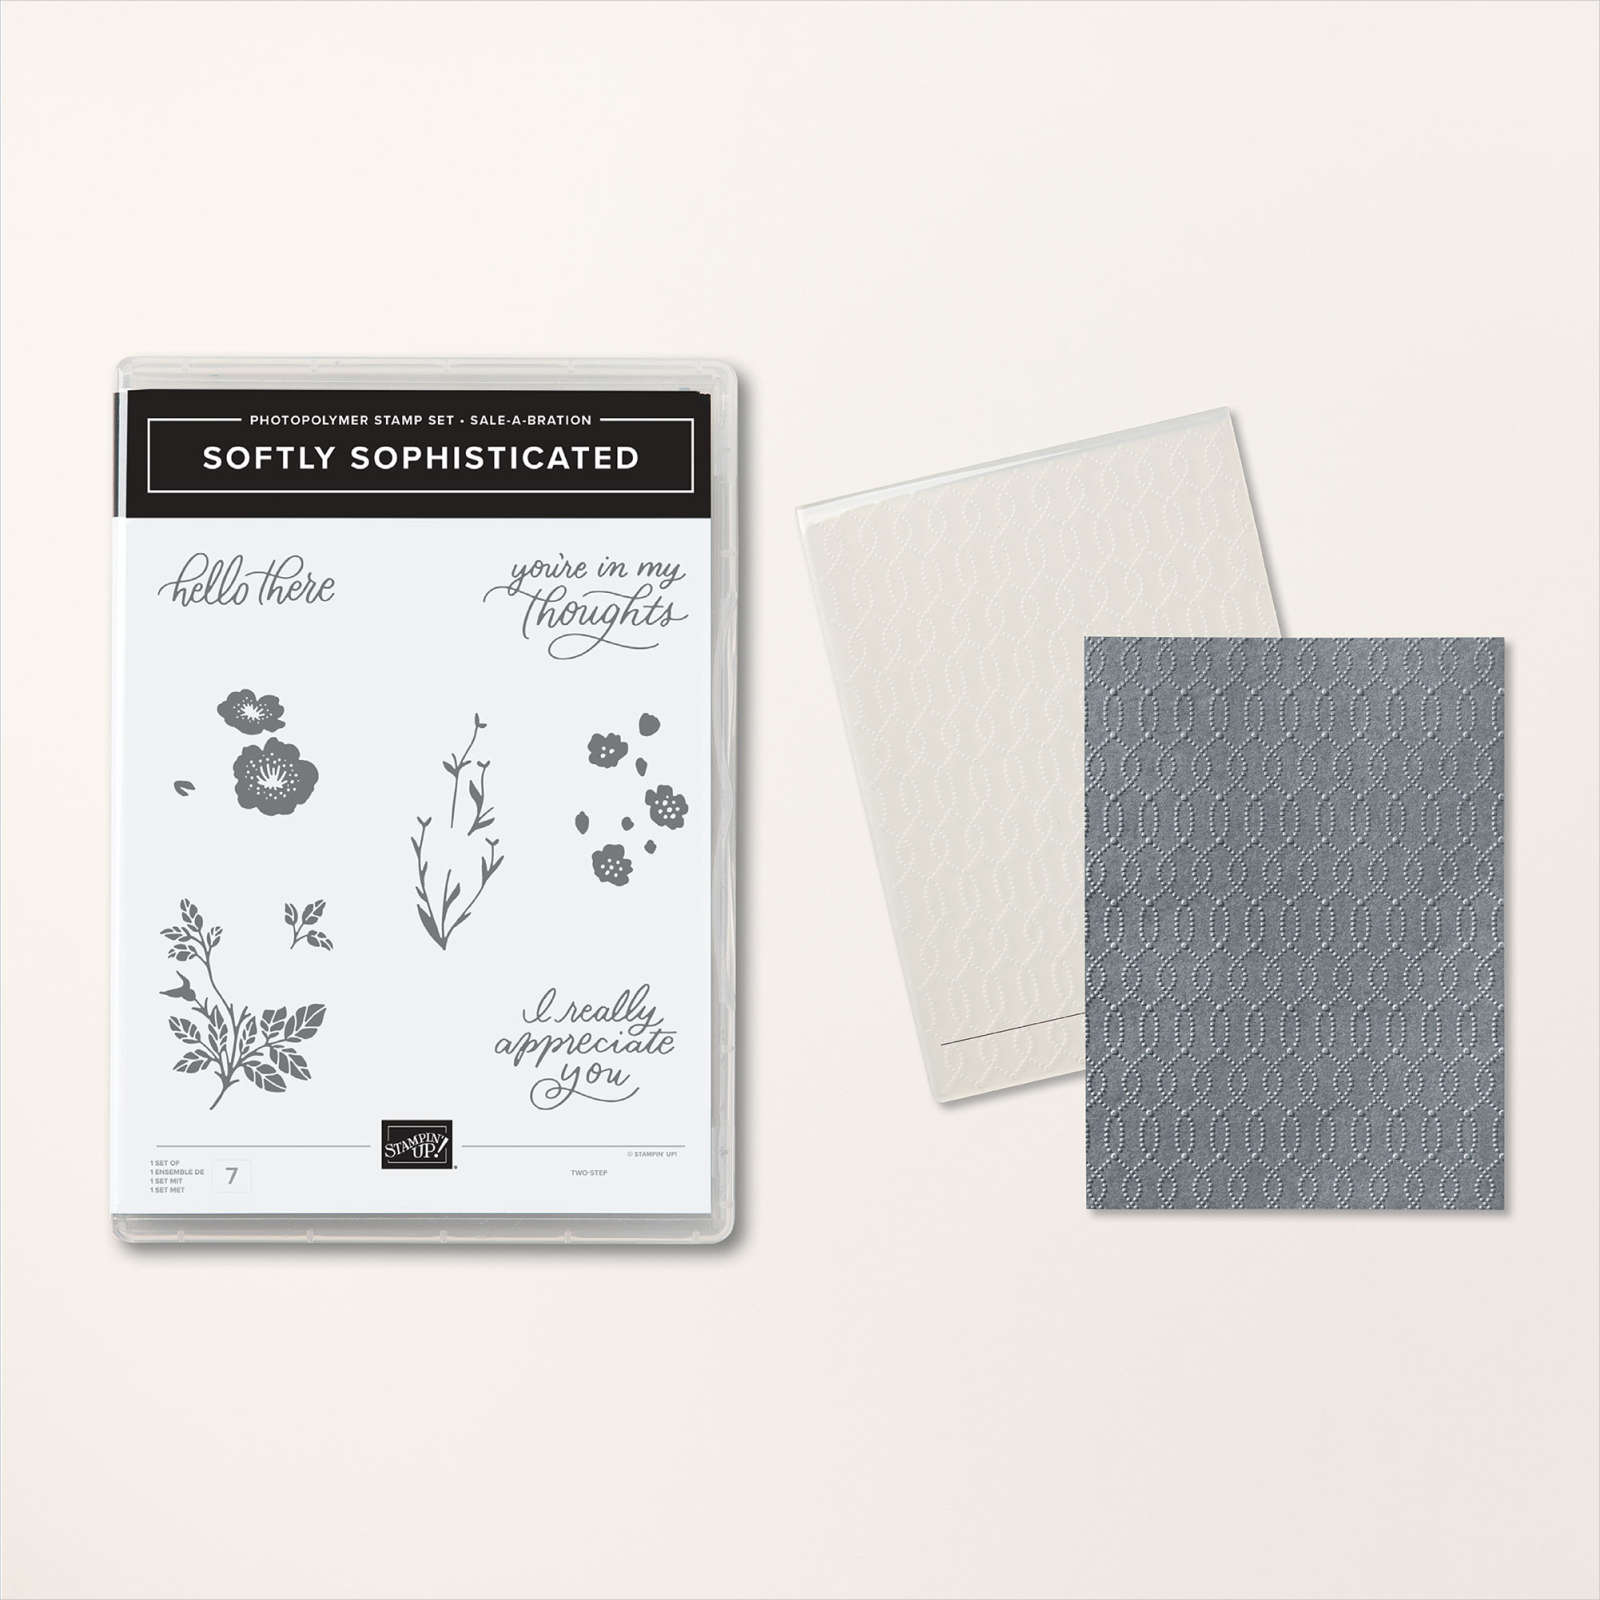
Featuring white, green and gold this card is a fun way to show your Irish pride. After all,isn’t everyone Irish on St. Patrick’s Day? This card is perfect for an intermediate to advanced stamper. I used the Sunny Days DSP and the Softly Sophisticated embossing folder from Sale-A-Bration and the Adoring Hearts Hybrid Folder for the Shamrock.
Bonus: You can get this paper for FREE if you purchase the Adoring Hearts Bundle during Sale-A Bration. Retail amount $53.00 USD Item #162570. If you love the folder it can be yours with a $100 purchase. You will get the Softly Sophisticated stamp set and embossing folder for FREE.
Supplies Used:


New releases for Sale-A-Bration! As if you don’t have great product choices already, Stampin’ Up! has give you more products to choose from!

Let me know if you have any questions!
Happy Stamping!
Joanne

~Making the world a happier place, one card at a time!
Share this:

Love is in the Air Part Four!
Welcome back to my five part series featuring the Adoring Hearts Bundle and the Thoughtful Moments Embossing folder!! Be sure to check back this weekend for a very special card!!
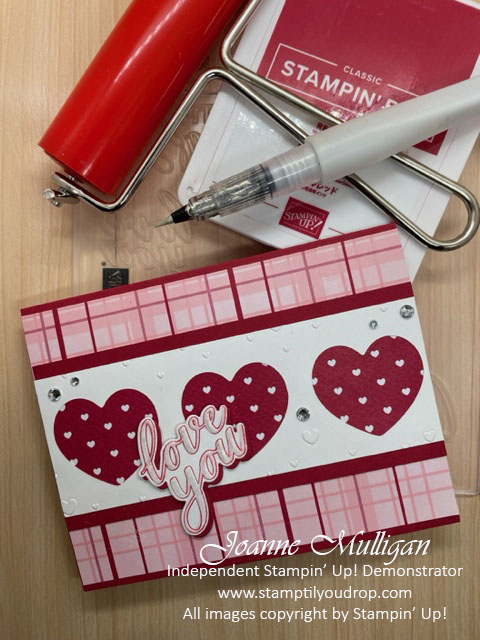
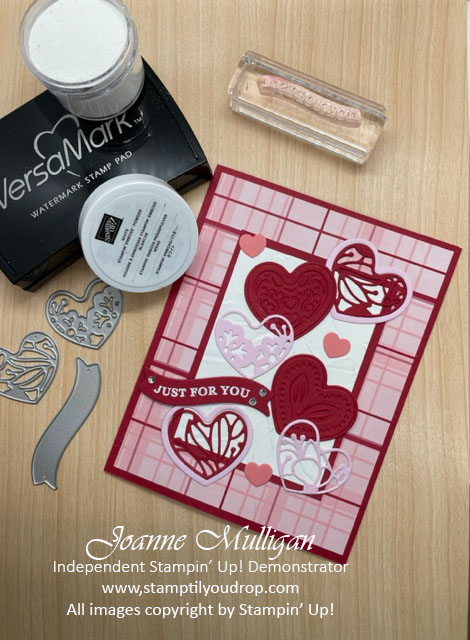
Today’s card showcases all the products shown below plus the Most Adored Designer Series Paper (“DSP”). I have to tell you that I am absolutely in LOVE with the hybrid embossing folders!!
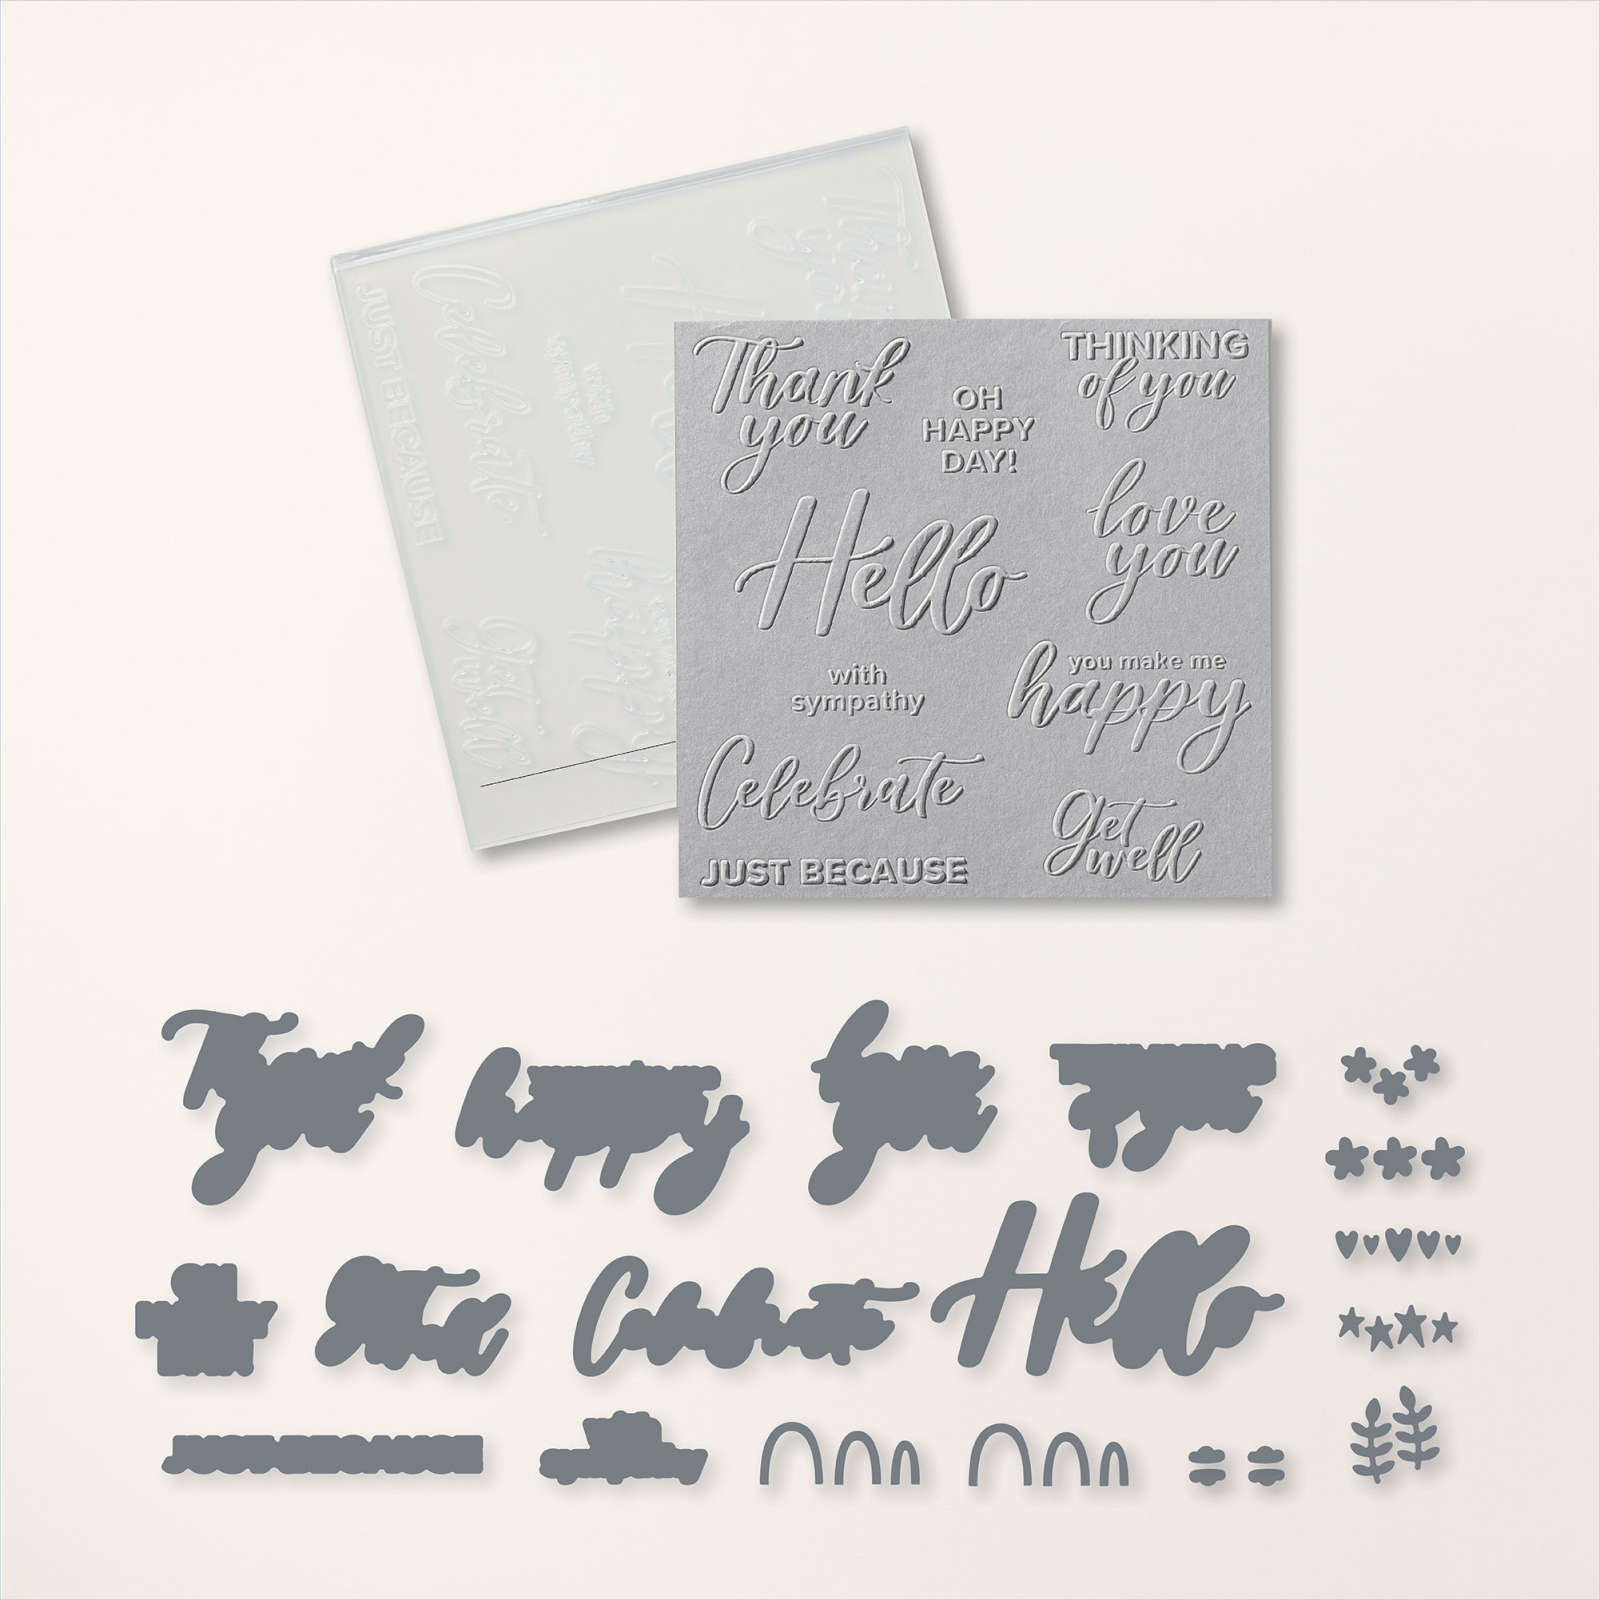
This card is perfect for an intermediate to advanced stamper. I used the Real Red DSP with little white hearts as a peek-a-boo effect with the cut-out hearts and the pretty plaid DSP . Of course there is some bling with Wink of Stella and a few rhinestones.
Bonus: You can get this paper for FREE if you purchase the Adoring Hearts Bundle during Sale-A Bration. Retail amount $53.00 USD Item #162570.
Now how did I create this adorable card? Well here you go………
Hope you enjoyed the video, it’s the first one I’ve done in quite a few years. I am having a lot of fun getting back into my website and sharing my cards and videos. Thank you for coming on this journey with me!!
Supplies Used:


New releases for Sale-A-Bration! As if you don’t have great product choices already, Stampin’ Up! has give you more products to choose from!
Let me know if you have any questions!
Happy Stamping!
Joanne
~Making the world a happier place, one card at a time!
Share this:

Love is in the Air Part Three!
Only 10 more days until Valentine’s Day so another card idea using the Adoring Hearts stamp set and Hybrid Embossing Folder plus the Most Adored Designer Series Paper. Check back later in the week when I have a video showing how to use the brayer, Adoring Hearts Bundle and the Thoughtful Moments Hybrid Embossing Folder.
Today’s card showcases the Adoring Hearts Embossing folder. I really love how you can quickly cut and emboss at the same time. Bonus if you are only using a few hearts, you will have several already cut to use on future projects. TIP: I keep all my extra die cuts I haven’t used in a large plastic container and my scraps in a plastic shoe box. When I need an extra doodad or a small piece of cardstock for a saying I will have one already cut.
This card is perfect for an advanced stamper. I used the pretty plaid for the Most Adored Designer Series Paper. I then cut several hearts using the Hybrid Embossing Folder and other dies in the bundle. It is in Bubble Bath, Real Red and white which are traditional Valentine’s Day colors.
Bonus: You can get this paper for FREE if you purchase the Adoring Hearts Bundle during Sale-A Bration. Retail amount $53.00 USD Item #162570.
Now how did I create the cut embossed hearts and the pretty filigree hearts with heart frames? I will be happy to share it with you my friends, and it all revolves around the hybrid folder!
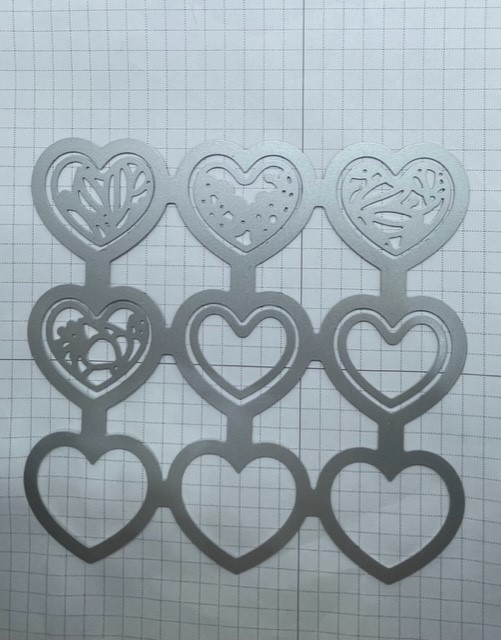
First you want to place the nine heart die inside the embossing folder. You will notice how the die fits right over the hearts and kind of “locks” in place
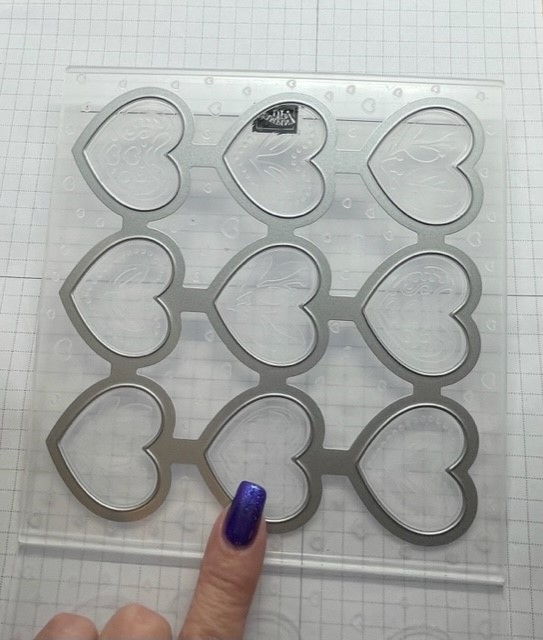
Next you will add your cardstock. I cut mine in a 6″ x 6″ square so I have extras. Now run it through your die cut machine. Bonus: Not only will you have nine little embossed hearts but if you look closely at folder you will have nine open hearts with tiny embossed hearts all around. Later in the week I will show you what you can do with this extra piece! The sandwich for the folder is base plate, embossing folder and the gray plate – same as when using a 3D embossing folder.
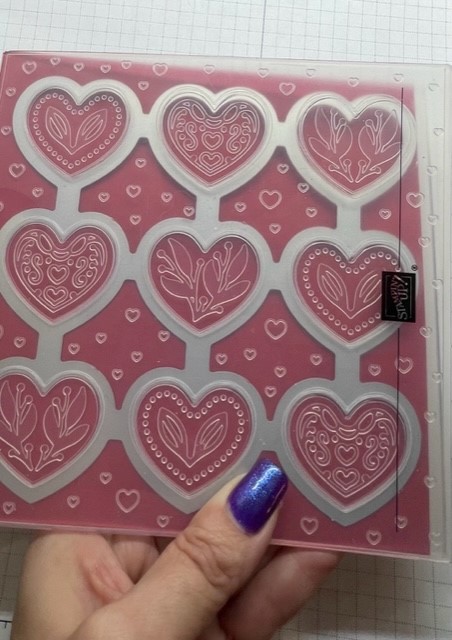
Once you have cut out your embossed hearts its time to cut the little hearts and frames. So break out that nine piece heart die. Place the small filigree hearts and smaller hearts inside the open hearts as shown and run through your die cut machine. Guess what? More hearts to use on future cards!
Supplies Used:


New releases for Sale-A-Bration! As if you don’t have great product choices already, Stampin’ Up! has give you more products to choose from!
Let me know if you have any questions!
Happy Stamping!
Joanne
~Making the world a happier place, one card at a time!
Share this:

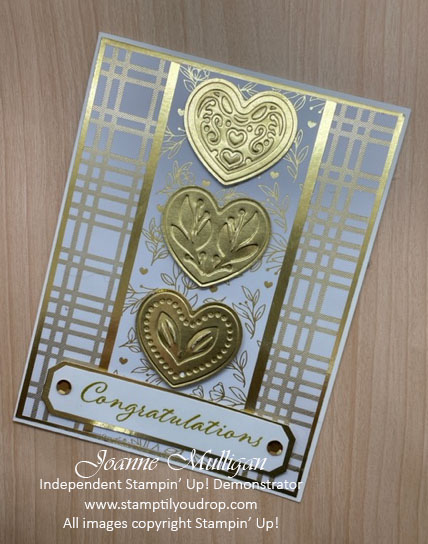
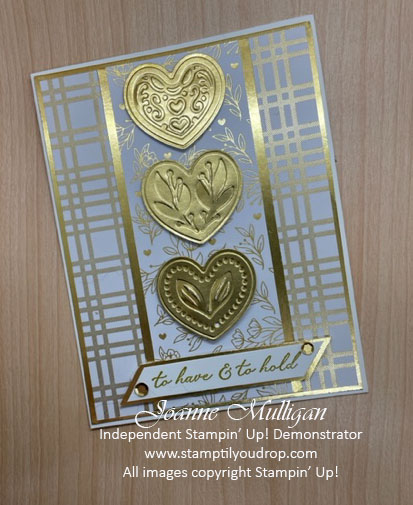
Love is in the Air Part Two!
Here are some more ideas using the Adoring Hearts Hybrid Embossing Folder and the Most Adored Designer Series Paper. Check back all week when I will be showcasing different cards using various techniques for different levels of stampers.
Like I said in my weekend post this stamp set and coordinating hybrid embossing folder aren’t just for Valentine’s Day, they can be used for wedding, anniversary, and more! Today I’m going to use a different layout and showcase three cards using the same design but changing the words for different occasions.
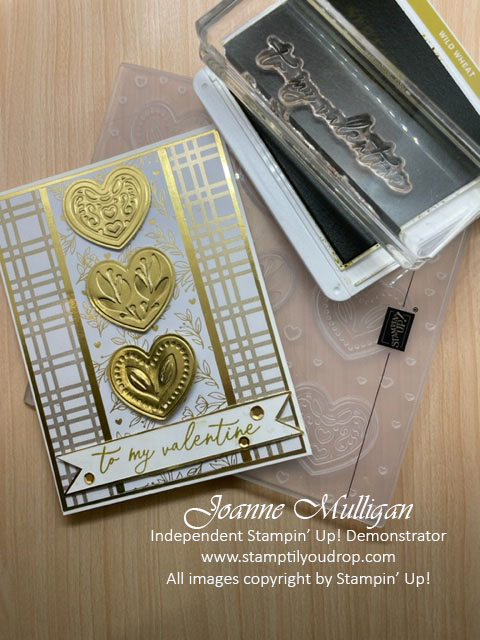
This card is perfect for an intermediate to advanced stamper. It features the a white and gold theme that is extremely elegant and perfect for your favorite valentine! The card really showcases the beautiful Most Adored Designer Series Paper with the shiny gold accents. Bonus: You can get this paper for FREE if you purchase the Adoring Hearts Bundle during Sale-A Bration. Retail amount $53.00 USD Item #162570.
Some of you may be asking what exactly is a hybrid embossing folder. Well let me fill you in on this fun little accessory. It is a 3D embossing folder but is also comes with a large die that fits ever so nicely into the folder so you can cut and emboss at the same time! When that happens you get the little gold hearts that I placed on my card. Such a cool stamping trick!
Later on this week I will be showing you how to use a hybrid folder with ink and a brayer, so stay tuned!!
Here are a few other ideas for using this versatile set to get more bang for your stamping dollar!
Now what couple wouldn’t love these cards, whether they are just starting out or hitting a milestone anniversary!
Supplies Used:


Let me know if you have any questions!
Happy Stamping!
Joanne
~Making the world a happier place, one card at a time!
Share this:

Designer Series Paper Sale – Featuring Magnolia Lane DSP
 There are only a few days left to take advantage of the annual Designer Series Paper Sale (“DSP”)!! It is going on right now and ends on September 30, 2019. For every three packs of select DSP you purchase, you get one pack for FREE. Time to stock up on your favorites and use that gorgeous DSP in all your creations!
Designer Series Paper included in Buy 3, Get 1 Free offer


One of my favorites, Magnolia Lane, is included in this sale.
When I was growing up my mother had the most gorgeous magnolia tree in the yard. I always loved how it would blossom in the spring with the delicate pink and white blooms. She has been gone eighteen years now but when I saw the Magnolia Lane Suite in the catalog it instantly brought back those fond memories and it was number one on my wish list.
The suite consists of; the Good Morning Magnolia stamp set, Magnolia Memory Dies, Magnolia 3D Embossing Folder, Magnolia Lane Designer Series Paper, Magnolia Lane Large Specialty Memories & More cards and envelopes, the Magnolia Lane Memories & More card pack, Magnolia Lane Ribbon Combo pack, Magnolia Lane Cork Embellishments, and So Saffron Stampin’ Blends combo pack.
All these items can be purchased separately, the stamp set and dies as a bundle (save 10%) or new this year get the entire suite with just one item number and still save 10% on the stamp set and dies!


Don’t forget the sale ends on Monday September 30th!
Additional Supplies Used:


Share this:

Color Your Season!!

During the month of August, Stampin’ Up! is offering a limited edition stamp set, framelits and watercolor pencils in ten new colors!!
The stamp set Blended Season, has beautiful line images perfect for coloring and will take you from season to season to meet all your card and project needs! Now step it up and add the gorgeous Stitched Season framelits featuring three sizes of stitched frames, flowers, leaves, a cute ribbon and cut outs for the bell. Now add in the ten watercolor pencils now available in several of the new colors and you will be on your way to creating beautiful cards for every season!
The stamp set and framelits are being offered separately or save 10% and get the bundle. The watercolor pencils are sold separately, and may be in a catalog in the future but the stamp set and framelits are limited edition and avaialble until August 31, 2018 or while supplies last. And to get more for your stamping dollar Stampin’ Up! has their Bonus Days promotion back and to celebrate I am going to double Jo’s Rewards Dollars during August.
See Color Your Season details here.
Learn about Bonus Days and how you can earn coupons to use in September
Learn about getting double points for Jo’s rewards Dollars
Now on to today’s card share!!

For this card I decided to go a different route with the little bell. It really screams Christmas but I was thinking it would be perfect for a wedding card!
 I love the color purple and so I went with my wedding colors for this card. My bridesmaids wore tea length dresses that were black with beautiful purple hydrangeas on them. Here is a semi-close up of the dress. On a side note my husband Brian and I just celebrated or 25th wedding anniversary on July 24th so I had to add the silver foil paper to the card for that milestone! And of course I always have to add a little glitz to my cards and Wink of Stella is my go to when I want a touch of bling!

Card Directions:
- Run the silver foil through the 3D Dynamic Tufted embossing folder. I love the elegant look of this folder, it’s great for a variety of cards! Then attach to the Basic Black panel and then to the Highland Heather card base.
- Using the Stitched Season medium frame cut the shape from Highland Heather cardstock, then run through the Subtle 3D Dynamic embossing folder. I did it this order so the lines from the embossing wouldn’t flatten out when running through the plates of the Big Shot.
- Cut the smaller stitched frame from Whisper White cardstock and stamp the greeting using Highland Heather ink. Splatter Wink of Stella all over the cut out by hitting it against your hand. This will make a light spray of shimmer! Make sure you put down scrap paper first it does go everywhere!!
- Using Staz-On black ink stamp three bells. Color with Gorgeous Grape, Smoky Slate and Basic Black watercolor pencils. Using a blender pen with a very light touch blend so there are no lines. Go over the top of each using Wink of Stella and add a pearl on the clapper of the bell.
- Cut each bell out using the frame from the Stitched Season framelits and attach to the Whisper White panel as shown using glue dots. Attach Whisper White shape to Highland Heather shape using dimensionals and then to card front again with dimensionals.
- Add Whisper White panel on the inside of the card.
Card Dimensions:
- Highland Heather Cardstock – 5 1/2″ x 8 1/2″, scored at 4 1/4″ for card base
- Highland Heather scrap large enough for medium frame
- Basic Black 3 3/4″ x 5″
- Silver foil 3 5/8″ x 4 7/8″
- Whisper White 4″ x 5 1/4″ (for inside of card)
- Whisper White scrap pieces for bells and small frame
Card Supplies:


If you would like to get a notification each time I post a project share, specials from Stampin’ Up! or myself, class schedules or video tutorials, please make sure you click “Follow By Email” at the top of this post. That way you won’t miss a thing!
As always, please feel free to share any post on Pinterest or Facebook! If you are interested in attending classes or any of my all day events be sure to visit my events page for a current schedule.
Additional Specials for August:
From Stampin’ Up!:

Bonus Days Are back!!
For every $50 you spend you will receive a $5 coupon to use in September! What a great way to get your holiday stamps and accessories!! There is no limit on the number you can earn. Why not stock up on cardstock and inks from the Annual catalog in August then redeem your coupons in September when the NEW Holiday catalog goes live!!
From Jo:

Double Rewards Dollars!!
For every $25 you spend earn $2 towards your FREE set instead of the usual $1. Click here for complete rules and how to redeem your rewards!
Share this:

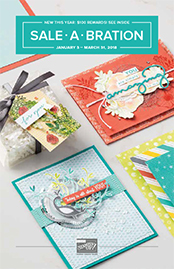
It’s Time to Sale-A-Brate!!

This is my absolute favorite time of the year! Sale-A-Bration is in full swing and as an avid paper crafter I am always excited when I can get more for my stamping dollar. This year Stampin’ Up! went all out, not only can you choose from some awesome stamp sets, there is ribbon, Designer Series Paper, Kits, Thinlits, and a even a Dynamic Textured Embossing Folder! And not only can you get a free item for every $50 you spend you can also choose a few offerings at the $100 level. Such choices…where to start??
First up a new style stamp, photo realistic. It is patent pending and makes such an impressive statement.

For this card I used Calypso Coral, Basic Gray and Whisper White. The little pearls are colored using Calypso Coral and Smoky Slate blends. Such an easy way to color coordinate all your projects!
How about something fun for a birthday? Party Pandas is perfect!

The fun bright colors of Lemon Lime Twist and Melon Mambo make this a card anyone would love! The Melon Mambo balloon is created using the Balloon Bouquet punch then I added some Basic Black bakers twine for a cute little bow. To give the balloon some dimension the edges were sponged using Melon Mambo ink then attached to the card with Stampin’ Dimensionals.
For a quick and easy card try using Beautiful Peacock!

The colors of Lemon Lime Twist and Bermuda Bay go beautifully together, very peacock like don’t you think? This card is done very clean & simple leaving a lot of white space and the set is photopolymer so lining up the peacock is a breeze!
Finally as I mentioned, Stampin’ Up! has added a few items that are available at the $100 level. One of those is the Celebrate You Thinlits and they coordinate with the Amazing You set available at the $50 level. If you have an order of $150 or more not only will you earn Stampin’ Rewards but you can get the set and coordinating thinlits for free!

For this card I used the colors from the stunning Painted with Love Specialty Designer Series paper; Calypso Coral, Melon Mambo, Powder Pink, Rich Razzleberry, Whisper White and accents of Gold Foil. I cut the “YOU” from Melon Mambo and “amazing” from Rich Razzleberry cardstock. The little heart was cut from the Lots to Love Box Framelits Dies using Calypso Coral. I decided to pick up the gold accents and embossed “are simply” with gold embossing powder on Powder Pink cardstock.
The BIGGEST sale of the Stampin’ Up! year is almost over. Did you take advantage and get your FREE stamps and accessories?? If you haven’t there is still time – the sale ends March 31, 2018.

How do you take advantage of this awesome event?? It’s so easy!
Just click here for all the details!

Supplies Used:


As always, please feel free to share any post on Pinterest or Facebook! If you are interested in attending classes or any of my all day events be sure to visit my events page for a current schedule.
Share this:

Embossing Paste, Glitter and Sparkle..Oh My!!

One of the products I was so excited about in the new catalog was Embossing Paste. I couldn’t wait to get my hands on it and play. Today’s share uses the paste and an alternative use of the Happy Birthday thinlit. The idea for this was inspired by a card my daughter made so I need to give her credit for the alternative use of the thinlit. Thank you Sarah!!!
To start I wanted the paste to sparkle so I added Dazzling Diamonds Glitter to it along with Real Red and Night of Navy Re-Inkers. When working with the Embossing Paste you do need to work quickly as it dries very fast. I had all my supplies laid out ahead of time and as soon as the background was stenciled I immediately washed the silicone craft sheet, palette knife and mask. Also make sure you put the lid on the paste as soon as you are done. A little note, when you first open your paste you will notice the jar is not full. The contents will settle in shipping and it is sold by volume not weight. If you stir the paste it will get fluffy and fill up the jar. And a little goes a looooong way.
To get the paste on the cardstock just lay the mask on the cardstock and spread the paste on top, then use your palette knife to scrape it across making sure all the holes get filled. Be very careful not to get it under the mask. If you look in the blue section of my card you can see where some seeped under slightly, if that happens no need to panic you can easily cover it up with an embellishment.
For the saying I cut the “Happy Birthday” twice with the Big Shot; once in Red Red and once in Night of Navy along with the number “4” in Real Red. Simply cut apart so you have the words “Happy” and the “th” from the birthday section. To give it more sparkle I added Wink of Stella on top and then attached to the card with Multipurpose Glue.
Complete Step by Step Directions With Photos Here

Supplies Used:


Share this:

Featured Stamp Set – Coffee Cafe

Anyone who knows me really well, knows that I LOVE coffee! There is nothing like the first sip in the morning it makes me instantly happy. I do have a few coffee rules; only hot coffee in the morning no matter the weather and in the afternoon hot if the temperature is below 50 and iced if it is over. There is a slight variation on this if it is raining I have hot in the afternoon no matter the temperature. I know it’s a little quirky but that’s how I roll in the coffee department.
It was no surprise that as soon as I saw the Coffee Cafe stamp set, and the entire Coffee Break Suite it was a must have for me! I really like the sayings as well as the Designer Series Paper (“DSP”) and the super adorable Corrugated Elements.
The colors are very earthy which play nicely on the coffee theme.

It was the first set I chose to really play with when my first order arrived. Here is what I came up with.

First up a little gate fold card. The card base is Pear Pizzazz cardstock 5 1/2″ x 8 1/2″ score at 2 1/8″ and 6 3/8″). I used the polka dot DSP on the front of each panel (1 7/8 x 5 1/4″). Then I stamped the large cup and lid using Early Espresso and the oval saying with Pear Pizzazz on Whisper White cardstock, then each image was cut out using the Coffee Cups Framelits. I also cut the coffee collar from Early Espresso cardstock using the fluted framelit. Next I attached the lid and coffee collar to the cup with a small amount of Multipurpose Liquid Glue. The oval saying was adhered to the oval Corrugated Element and attached using a dimensional. I tied a strand of linen thread around the top then into a small bow. The coffee cup gets attached to the left side only, make sure you only apply adhesive to that side so the card can open and close.
I will be having a video how to on this card once my editor can help me with it. And by editor I mean my daughter. She is a tad busy the next few weeks moving into her first house, they closed on it this past week and are busy cleaning and painting. They thought it best to get this done before all the furniture was moved in. So production is on hold for a little while until she is settled in .

Next I wanted to continue with the polka dot DSP but add a few new elements. The Coffee Cups Framelits come with a teeny tiny coffee cup that fits perfectly on the cups of another sheet paper from the Coffee Break DSP pack. I thought it would be fun having them stacked on top of one anther going along the inside of the card. The card front is slightly smaller than the back allowing the cups to peek through. The Soft Sky card base is 5 1/2″ x 7 1/2″, score at 4 1/4″. I added a strip of the polka dots to the front panel (3″ x 5 1/4″. Next I stamped the cup and lid in Early Espresso on Whisper White cardstock and the saying in Soft Sky, it fits perfectly in the cup! They were cut out using the framelits and attached as in the first card. I took a small strip of burlap ribbon and attached using Tear & Tape adhesive, then the cup was attached on top using dimensionals. Next I cut 5 little cups from the DSP and glued along inside of the card using Multipurpose Liquid Glue. I always try to use odd numbers in my “works of heart”. In high school my art teacher always told us odd numbers are more pleasing to the eye and that rule has stuck with me all these years.

I decided to change-up the DSP for this card. This time I used Early Espresso for the card base (5 1/2 x 8 1/2″ score at 4 1/4), with a Crumb Cake panel (4″ x 5 1/4″) on top of this. I cut the DSP into 2 strips 1 3/4″ x 5″ with a small Early Espresso Strip 1/4″ x 5″, these were attached to the Crumb Cake panel then attached to the card base. I stamped the cup and lid again in Early Espresso but this time on Soft Sky cardstock and cut out with the framelits. The coffee collar was cut this time using the plain framelit not the fluted one. The cup was assembled as done previously and the heart Corrugated Element was added with a dimensional. I stamped the saying on Whisper White cardstock in Crumb Cake then stamped the hearts in Soft Sky using the outline heart stamp and coloring in with the matching Stampin’ Write marker. I added a touch of clear Wink of Stella for some sheen. This was cut out using the Layering Ovals framelits and I cut a matching oval the next size up in Early Espresso, then attached to the card using dimensionals.

I do love the occasional iced latte with whipped cream so that is what inspired this card. I used Garden Green for the card base, standard size 5 1/2″ x 8 1/2″ score at 4 1/4″. I took a Crumb Cake panel (4″ x 5 1/4″) and stamped it using the Burlap Background Stamp in Crumb Cake ink then attached to the card base. Then I took a 2 1/2″ x 4″ piece of DSP and tore the edges. To get the white inside to show tear the paper toward you not away. This was attached to the Crumb Cake panel. Next I stamped the saying on Whisper White using Garden Green ink. I tore the saying out then using a sponge dauber I inked the edges with Soft Suede, this was attached to the DSP using dimensionals. The cup was cut from Crumb Cake and sponged with Soft Suede. I stamped the straw using the small striped stamp on a scrap of Whisper White using Garden Green. With the photopolymer stamps you can line up each section with ease to create one long strip which was then cut with the framelit. The whipped cream was stamped using Crumb Cake and cut out along with the coffee collar in the matching DSP. To give the whipped cream a little something extra I added a little Wink of Stella in clear. After assembling the coffee cup, it was attached to the card with dimensionals.
This card will be featured in a video, as it has many elements that people always ask me about such as getting a clear image with a background stamp and tearing to get those nice feathered edges.

Now to show you the versatility of this set, I made a birthday card with a cupcake using the coffee collar and whipped cream. I also played with my other must have the Embossing Paste! The card base is Early Espresso, 4 1/4″ x 11″ scored at 5 1/2″, on top of this I added a Pear Pizzazz panel (4″ x 5 1/4″). I took a piece of striped DSP (3 3/4″ x 5″) and cut the center using the largest oval framelit from Layering Ovals. I cut another oval from the polka dot DSP, (I told you I loved the polka dot DSP!) and inserted it in the center of the striped panel. Now comes the fun part….I cut whipped cream out of a piece of thick Whisper White cardstock. I took a small amount of the Embossing Paste and put it on my Silicone Craft Sheet with a palette knife. I added a few drops of Early Espresso reinker and mixed it up to make the yummy chocolate frosting, I swear it looked just like real frosting I was very impressed! Then I frosted the little whipped cream piece, just like a real cupcake. While the embossing paste dries pretty quick when used in a thin layer, since this was so thick I hit it with a hairdryer on low to speed drying time. Then using Crumb Cake card stock I cut my cupcake using the fluted coffee collar. I found it a little large so I trimmed it down with my Paper Snips to a perfect cupcake size. The edges were sponged with Soft Suede and a dauber. I cut out the banners using the Duet Banner punch after I stamped the sayings from the Happy Birthday Gorgeous set in Early Espresso ink. These edges were also sponged with Soft Suede ink. Then the banners and cupcake were attached with dimensionals.
Supplies Used:


I hope you enjoyed these projects using the Coffee Break Suite. If you have any questions about any of the featured cards, please let me know I would be happy to help!
If you would like to get a notification each time I post a project share, specials from Stampin’ Up! or myself, class schedules or video tutorials, please make sure you click “Follow By Email” at the top of this post. That way you won’t miss a thing! As always, please feel free to share any post on Pinterest or Facebook!
Share this:

Featured Stamp Set – Eastern Beauty
Welcome! This is going to be the first installment of my new series that will feature one particular stamp set from any of our current catalogs. I always find there are sets in the catalog I might not like or I just turned the page not giving them a second glance UNTIL I see what others have done with it, then it becomes a must have. Or maybe you have a set that hasn’t been loved in a while, all you might need is a little inspiration to make some fabulous works of heart. I hope you enjoy this series and if you have a particular set you would like me to feature, please send me an email and I will do my best to use it in future posts. Enjoy!

This week’s set is Eastern Beauty and the entire Eastern Palace Suite. When I first saw this set I thought to myself it’s OK, just not my cup of tea. But I knew it was going to be a special for the month of May so I decided to order the bundle. Once I started playing with it all I can say is WOW!! This is one versatile set!

For this card I used the colors Tranquil Tide, Fresh Fig and Very Vanilla. To create the doily in the middle I used the two of the medallion dies and the largest circle from the Layering Circles framelits. The fun thing about the Eastern Medallions Thinlets is how all the parts work together, You can mix and match the rings to make all types of designs.


See how well they fit together! You can run it through your Big Shot using all three at once, just make sure to use the Precision Plate and roll it through several times to get a nice cut.
I stamped a few accents and the greeting then mounted on a large circle of Fresh Fig. Add a strip of Eastern Palace Specialty Designer Series Paper and you are all set!

Next up I decided to used the adorable notecards that are available as a FREE gift with the Eastern Palace Starter Bundle.
I again used the medallions but changed up the middle ring and added a third ring to create delicate cut out on the front of the card. I placed a piece of Lemon Lime Twist DSP and stamped accents in Dapper Denim and Lemon Lime Twist Ink. To give it a little bling , a few small pearl accents were added.

This card is super easy and super quick! There is no stamping involved, instead it uses the new Eastern Gold Vinyl Stickers! All I did was peel and place on the Tranquil Tide card. It creates an elegant look with no effort! So next time you need a card in a hurry reach for these stickers and you can have a card in minutes!


This card uses all the elements I have shown you so far but adds a cute little gold tassel! The colors used are Tranquil Tide, Dapper Denim and Very Vanilla with accents of gold.

For this card I used the new Oh My Stars Textured Embossing Folder (available 6/1/17). Colors used are Fresh Fig, Dapper Denim and Very Vanilla. The border on either side of the center panel was made with Fresh Fig ink to create the tone on tone look.

For the final card I decided to stray slightly from the colors in the suite and use Lemon Lime Twist and another new In Color, Berry Burst. To me this card says summer with the bright color combo!
I just love how every card is different yet uses the same stamps and accessories. The little accent stamps can be used is so many ways, you can sit and play with this set all day long and not run out of ideas! I am so glad I bought this set, it is sure to be one of my favorites and once you play with it I know it will become one of yours too!
For the month of May you can purchase two different bundles, each with a FREE gift from Stampin’ Up! See below for all the details!
Supplies Used:
Oh My Stars TIEF Folder, Tranquil Tide Finely Woven Ribbon, Berry Burst Stampin’ Ink and Cardstock will be available June 1,2017.


May Specials
From Stampin’ Up!:
Out with the old….in with the new!!
Yes it’s that time of year again! While we are always sad to see our favorites go, it is the perfect time to complete your wish list from the 2016-2017 Annual Catalog and the 2017 Occasions Catalog! And as a bonus many items are on sale at reduced prices! What could be better!!!
Be sure to check out the entire list as items are selling out quickly and once they are gone they are gone forever!
To see all the items on sale and shop now at my online store [CLICK HERE]
Eastern Palace Bundle:
During May you will be able to purchase items from the Eastern Palace Suite, a full month before the 2017-2018 Annual catalog goes live! And as an added bonus these bundles offer free items as a thank you! This promotion is only available for the bundle pricing, a la carte items will be available when the catalog goes live in June. This promotion runs May 1, 2017 – May 31, 2017
To view the available bundles please [CLICK HERE]
To shop now at my online store [CLICK HERE]
From Me:
As a thank you for supporting my business, with any order of $35 or more (before shipping and tax) you will receive a FREE Sampler of Designer Series paper!
Just enter the Hostess Code FWYFSKEF when you place your order online. This code is good until May 19, 2017. I will send your gift to the address used for your order. If your order is $150 or more DO NOT enter the code. If you enter the code you won’t get your Stampin’ Rewards for FREE goodies and I wouldn’t want you to lose out on those! I will automatically send your gift when the order is placed.

