
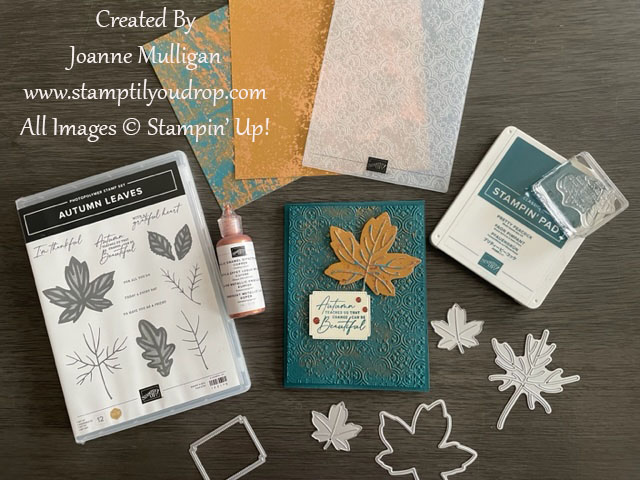
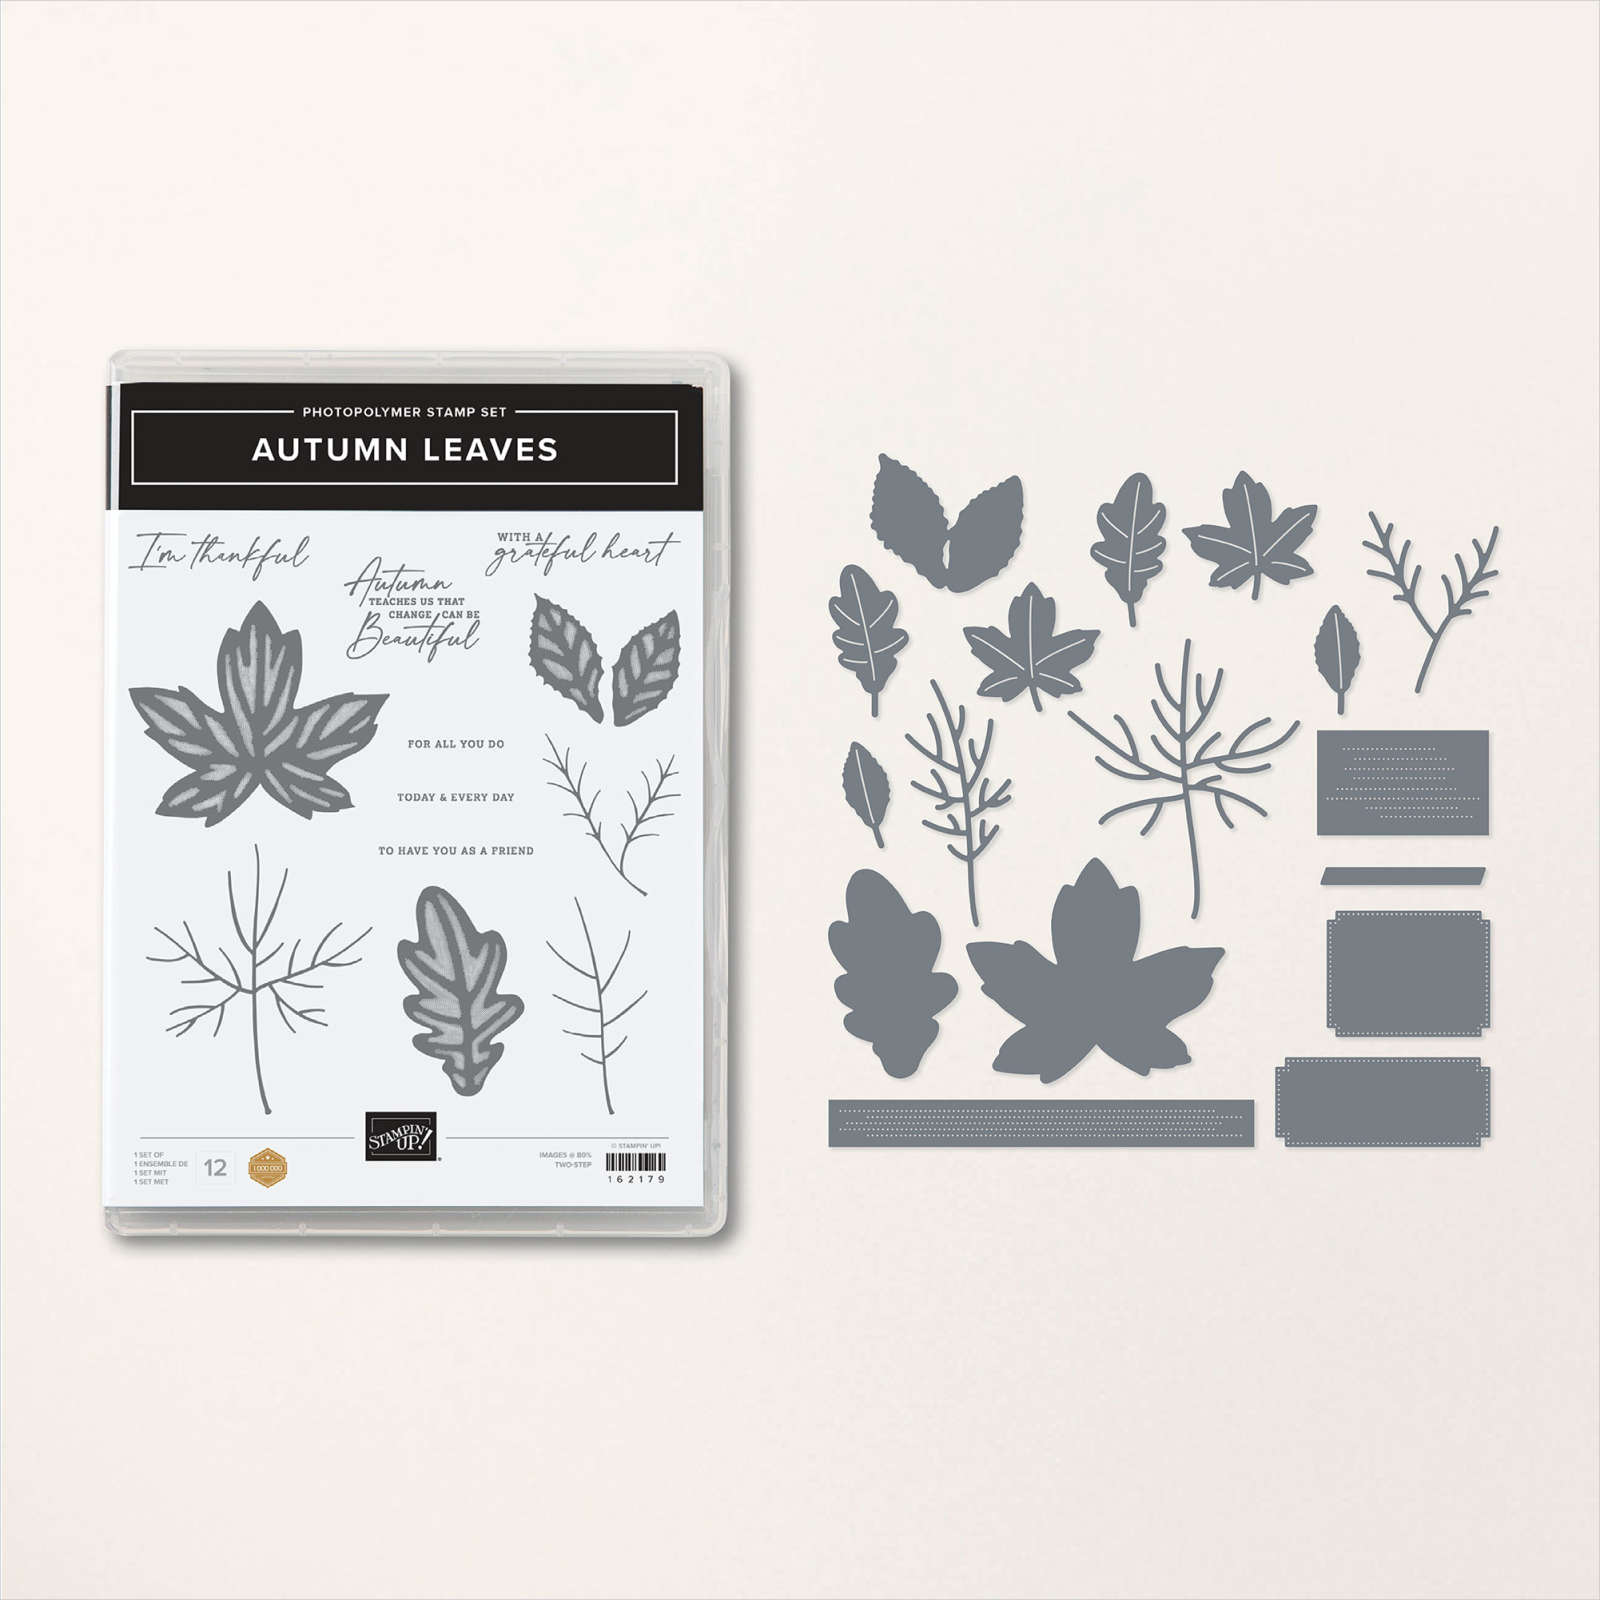
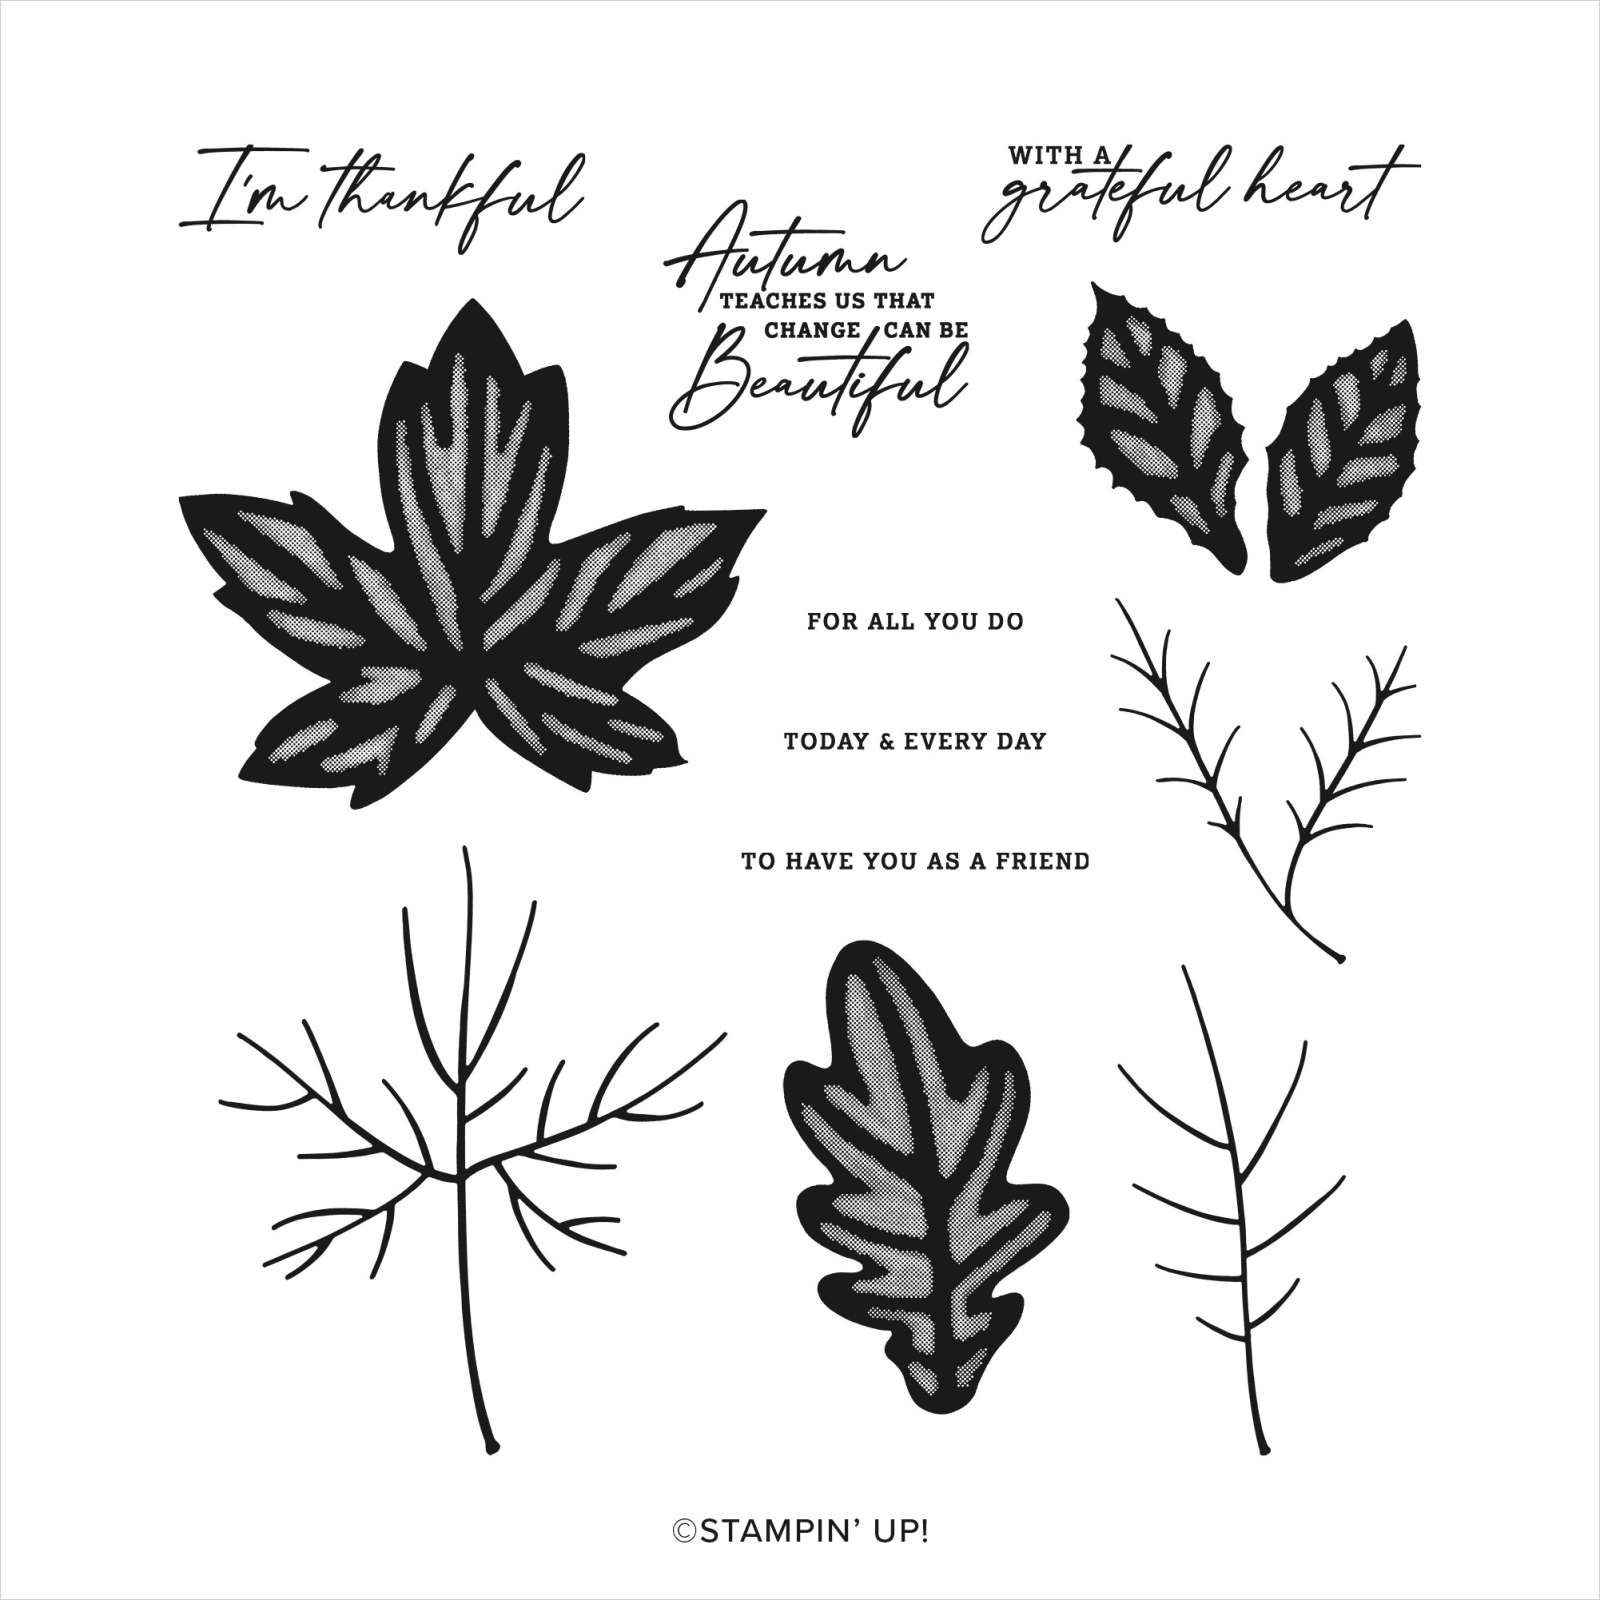
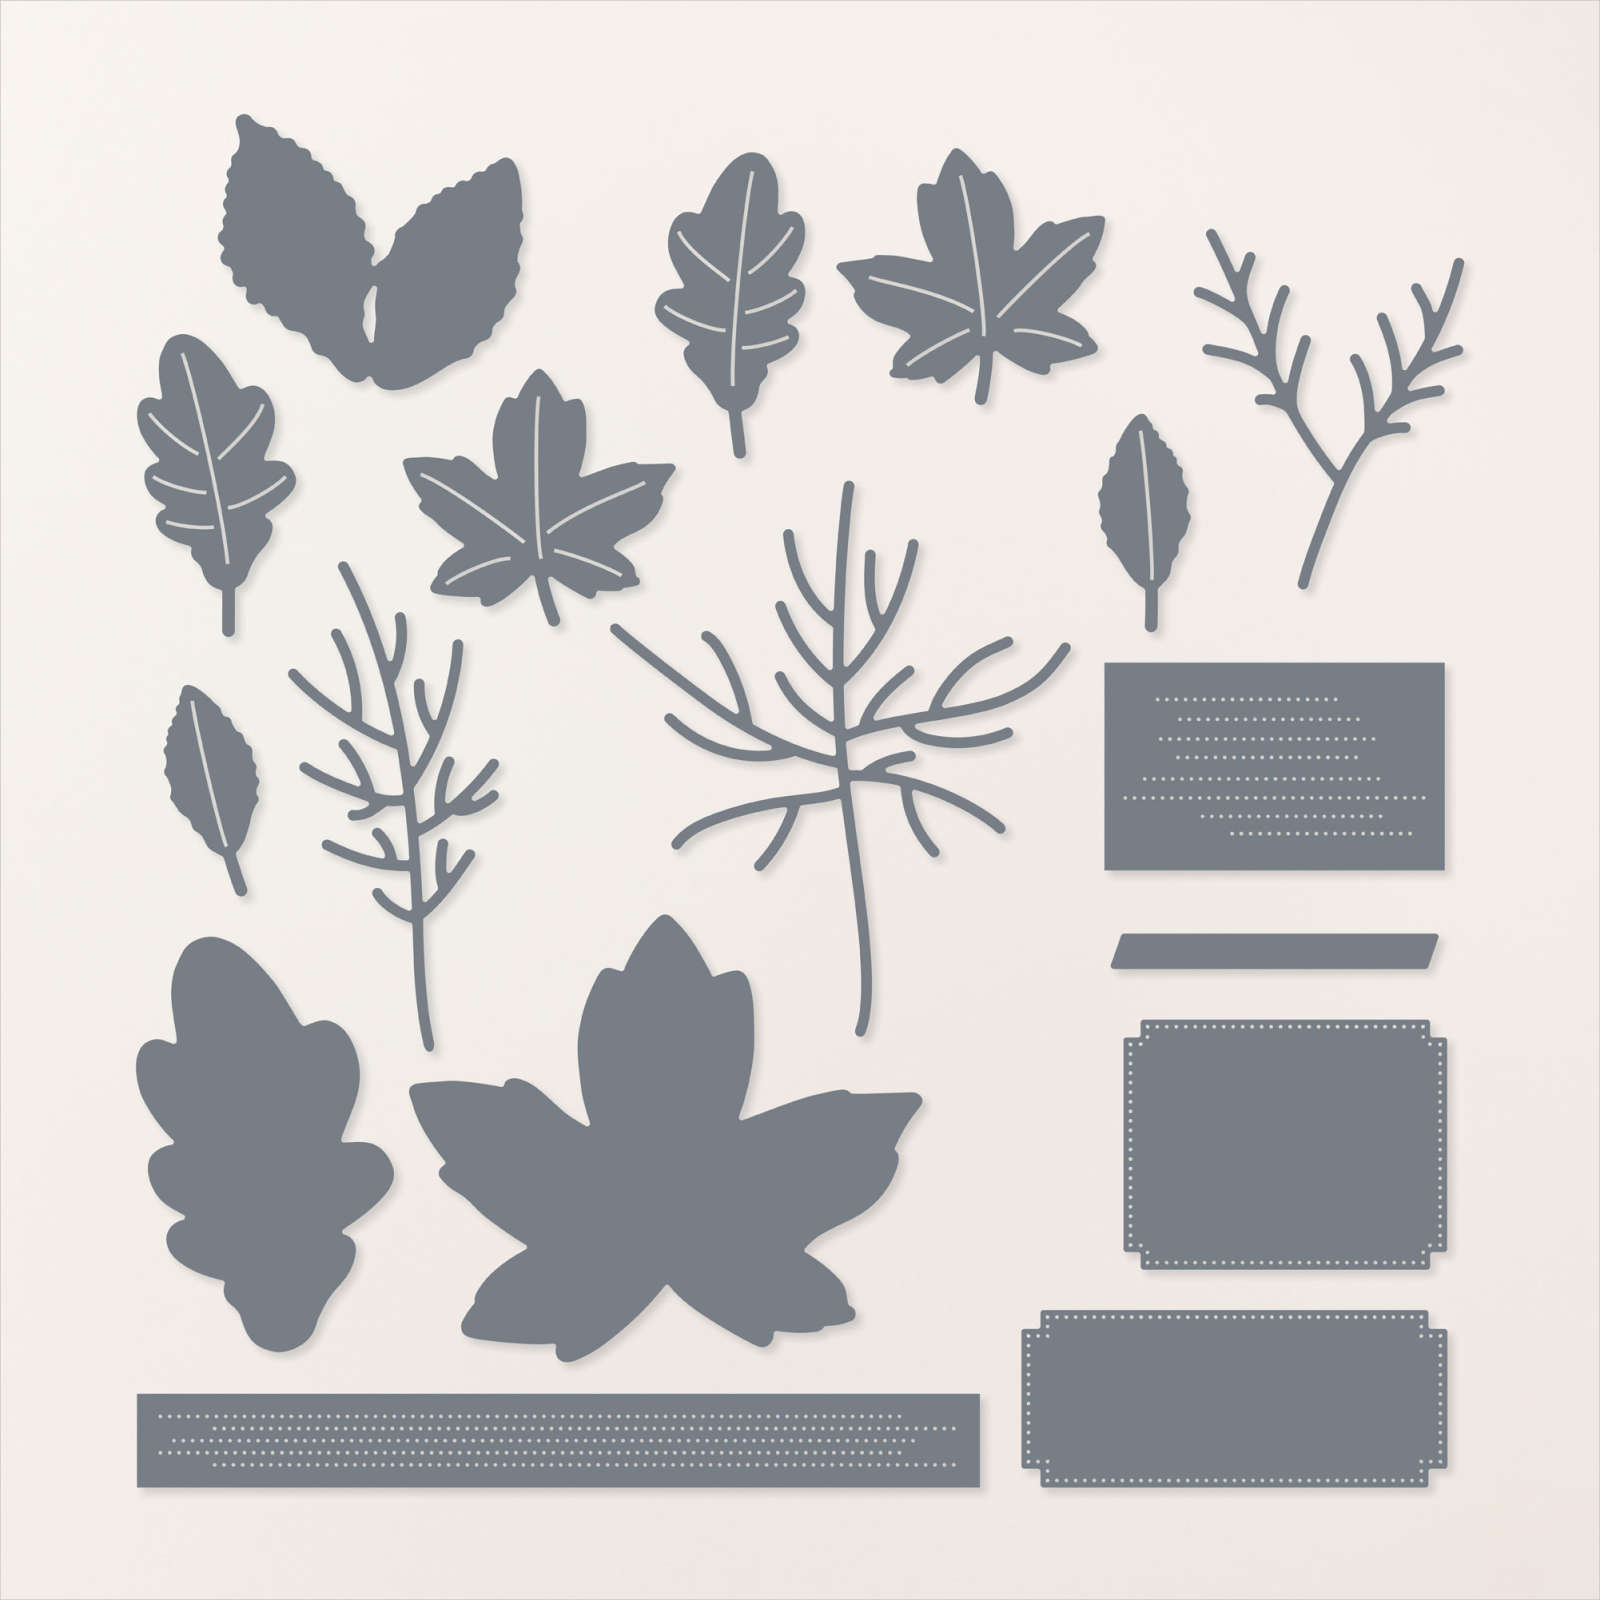
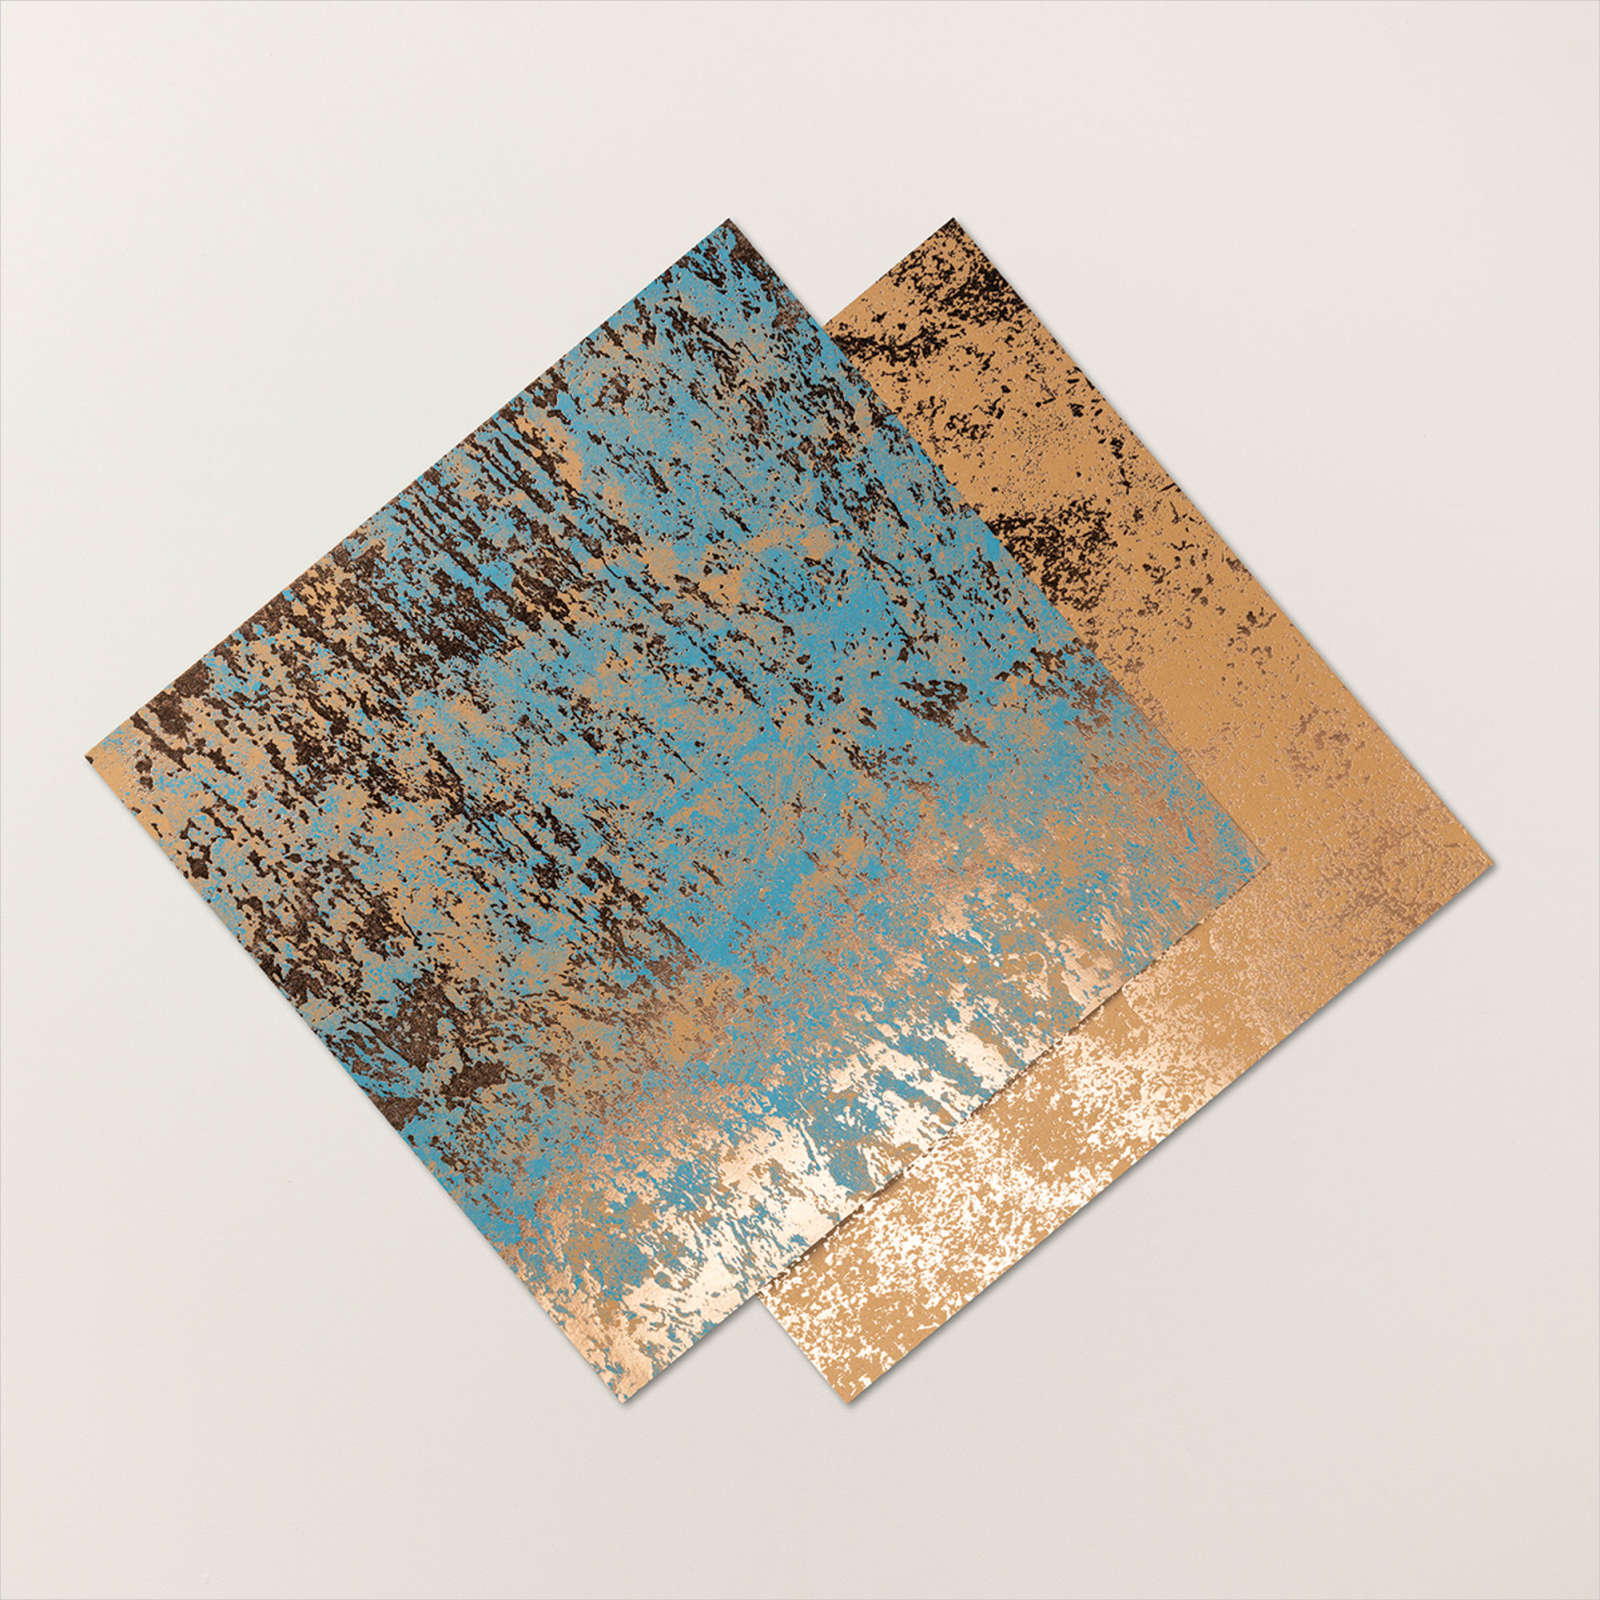
One of my favorite suites in the September – December Mini Catalog is the All About Autumn Sweet (#162193 $105.75 USD). Fall is my favorite season so it’s no surprise I was drawn to this suite. It features the Autumn Leaves stamp set, matching dies, copper and natural ribbon combo pack, Distressed Tile 3D embossing folder, Oxidized Copper 12 x 12 Designer Series Paper and All About Autumn 6 x 6 Designer Series Paper (all products can be purchased separately).
I had so much fun creating with this suite, and this is one card that gets a lot of compliments.
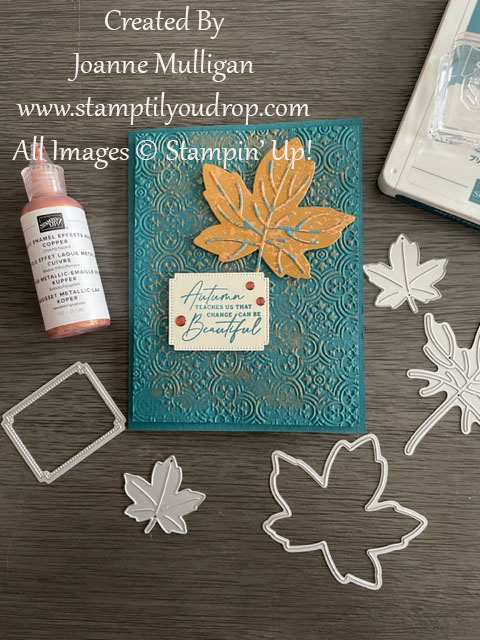
I used Pretty Peacock for the card base with the same color panel embossed with the Distressed TIle 3D embossing file. To get the emphasize the distressed look of the embossed panel I used Metallic Copper Enamel Effects. It really brings out the copper in the leaf and veins.
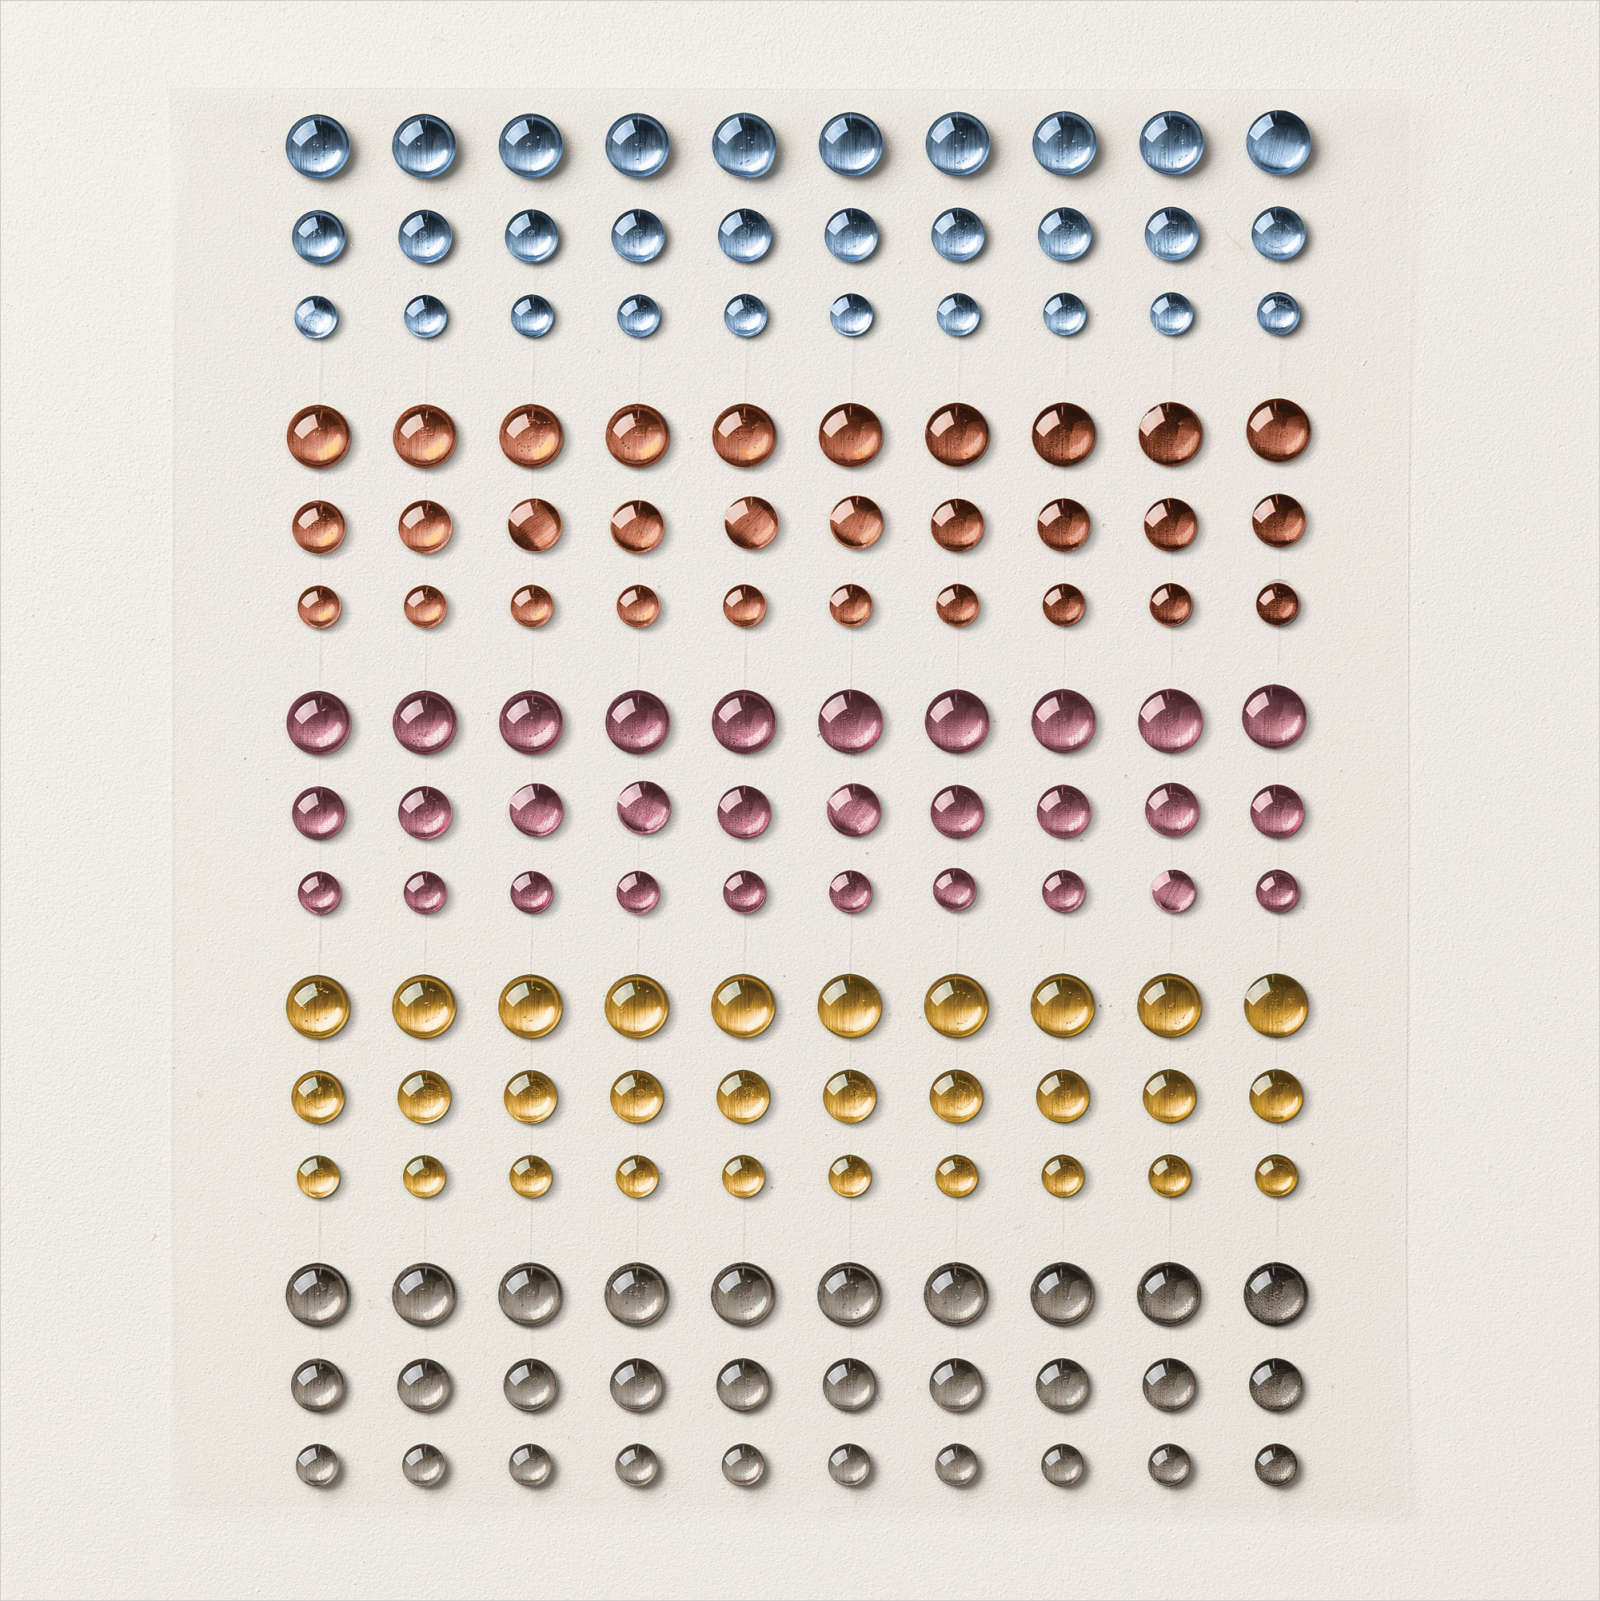
I attached the panel to the main card with dimensionals to make it pop a bit. Then from the Distressed Oxidized Copper DSP I cut one large leaf and two mall leaves and the veins from the Pretty Peacock and Copper DSP. After attaching the veins with mono glue I added it to the card front again with dimensionals. The saying “Autumn teaches us that change can be beautiful” was stamped on Very Vanilla cardstock using Pretty Peacock ink, then cut out using the frame in the Autumn Leaves dies. To add a little sparkle I used 2023 – 2025 In Color Dots on the saying.

For the inside I stamped “I’m Thankful” on Very Vanilla using Pretty Peacock. I added the two remaining leaves to tie it all together.
Cutting Directions:
- Pretty Peacock card stock – cut 5 1/2″ x 8 1/2″, score at 4 1/4″
- Pretty Peacock card stock – cut 4″ x 5 1/4″
- Very Vanilla – cut 4″ x 5 1/4″
- Copper Oxidized DSP – cut 3 1/4″ x 5″ (the large leaf and two small leaves can fit on this piece)
- Pretty Peacock & Copper Oxidized DSP – cut 3″ x 4″
- Scrap piece Very Vanilla at least 1 1/2″ x 2″
Supplies Used:


Please let me know any questions you may have!
Happy Stamping!
Joanne
~making the world a happier place one card at a time
Email: joanne@stamptilyoudrop.com
Share this:

Featured Stamp Set – Coffee Cafe

Anyone who knows me really well, knows that I LOVE coffee! There is nothing like the first sip in the morning it makes me instantly happy. I do have a few coffee rules; only hot coffee in the morning no matter the weather and in the afternoon hot if the temperature is below 50 and iced if it is over. There is a slight variation on this if it is raining I have hot in the afternoon no matter the temperature. I know it’s a little quirky but that’s how I roll in the coffee department.
It was no surprise that as soon as I saw the Coffee Cafe stamp set, and the entire Coffee Break Suite it was a must have for me! I really like the sayings as well as the Designer Series Paper (“DSP”) and the super adorable Corrugated Elements.
The colors are very earthy which play nicely on the coffee theme.

It was the first set I chose to really play with when my first order arrived. Here is what I came up with.

First up a little gate fold card. The card base is Pear Pizzazz cardstock 5 1/2″ x 8 1/2″ score at 2 1/8″ and 6 3/8″). I used the polka dot DSP on the front of each panel (1 7/8 x 5 1/4″). Then I stamped the large cup and lid using Early Espresso and the oval saying with Pear Pizzazz on Whisper White cardstock, then each image was cut out using the Coffee Cups Framelits. I also cut the coffee collar from Early Espresso cardstock using the fluted framelit. Next I attached the lid and coffee collar to the cup with a small amount of Multipurpose Liquid Glue. The oval saying was adhered to the oval Corrugated Element and attached using a dimensional. I tied a strand of linen thread around the top then into a small bow. The coffee cup gets attached to the left side only, make sure you only apply adhesive to that side so the card can open and close.
I will be having a video how to on this card once my editor can help me with it. And by editor I mean my daughter. She is a tad busy the next few weeks moving into her first house, they closed on it this past week and are busy cleaning and painting. They thought it best to get this done before all the furniture was moved in. So production is on hold for a little while until she is settled in .

Next I wanted to continue with the polka dot DSP but add a few new elements. The Coffee Cups Framelits come with a teeny tiny coffee cup that fits perfectly on the cups of another sheet paper from the Coffee Break DSP pack. I thought it would be fun having them stacked on top of one anther going along the inside of the card. The card front is slightly smaller than the back allowing the cups to peek through. The Soft Sky card base is 5 1/2″ x 7 1/2″, score at 4 1/4″. I added a strip of the polka dots to the front panel (3″ x 5 1/4″. Next I stamped the cup and lid in Early Espresso on Whisper White cardstock and the saying in Soft Sky, it fits perfectly in the cup! They were cut out using the framelits and attached as in the first card. I took a small strip of burlap ribbon and attached using Tear & Tape adhesive, then the cup was attached on top using dimensionals. Next I cut 5 little cups from the DSP and glued along inside of the card using Multipurpose Liquid Glue. I always try to use odd numbers in my “works of heart”. In high school my art teacher always told us odd numbers are more pleasing to the eye and that rule has stuck with me all these years.

I decided to change-up the DSP for this card. This time I used Early Espresso for the card base (5 1/2 x 8 1/2″ score at 4 1/4), with a Crumb Cake panel (4″ x 5 1/4″) on top of this. I cut the DSP into 2 strips 1 3/4″ x 5″ with a small Early Espresso Strip 1/4″ x 5″, these were attached to the Crumb Cake panel then attached to the card base. I stamped the cup and lid again in Early Espresso but this time on Soft Sky cardstock and cut out with the framelits. The coffee collar was cut this time using the plain framelit not the fluted one. The cup was assembled as done previously and the heart Corrugated Element was added with a dimensional. I stamped the saying on Whisper White cardstock in Crumb Cake then stamped the hearts in Soft Sky using the outline heart stamp and coloring in with the matching Stampin’ Write marker. I added a touch of clear Wink of Stella for some sheen. This was cut out using the Layering Ovals framelits and I cut a matching oval the next size up in Early Espresso, then attached to the card using dimensionals.

I do love the occasional iced latte with whipped cream so that is what inspired this card. I used Garden Green for the card base, standard size 5 1/2″ x 8 1/2″ score at 4 1/4″. I took a Crumb Cake panel (4″ x 5 1/4″) and stamped it using the Burlap Background Stamp in Crumb Cake ink then attached to the card base. Then I took a 2 1/2″ x 4″ piece of DSP and tore the edges. To get the white inside to show tear the paper toward you not away. This was attached to the Crumb Cake panel. Next I stamped the saying on Whisper White using Garden Green ink. I tore the saying out then using a sponge dauber I inked the edges with Soft Suede, this was attached to the DSP using dimensionals. The cup was cut from Crumb Cake and sponged with Soft Suede. I stamped the straw using the small striped stamp on a scrap of Whisper White using Garden Green. With the photopolymer stamps you can line up each section with ease to create one long strip which was then cut with the framelit. The whipped cream was stamped using Crumb Cake and cut out along with the coffee collar in the matching DSP. To give the whipped cream a little something extra I added a little Wink of Stella in clear. After assembling the coffee cup, it was attached to the card with dimensionals.
This card will be featured in a video, as it has many elements that people always ask me about such as getting a clear image with a background stamp and tearing to get those nice feathered edges.

Now to show you the versatility of this set, I made a birthday card with a cupcake using the coffee collar and whipped cream. I also played with my other must have the Embossing Paste! The card base is Early Espresso, 4 1/4″ x 11″ scored at 5 1/2″, on top of this I added a Pear Pizzazz panel (4″ x 5 1/4″). I took a piece of striped DSP (3 3/4″ x 5″) and cut the center using the largest oval framelit from Layering Ovals. I cut another oval from the polka dot DSP, (I told you I loved the polka dot DSP!) and inserted it in the center of the striped panel. Now comes the fun part….I cut whipped cream out of a piece of thick Whisper White cardstock. I took a small amount of the Embossing Paste and put it on my Silicone Craft Sheet with a palette knife. I added a few drops of Early Espresso reinker and mixed it up to make the yummy chocolate frosting, I swear it looked just like real frosting I was very impressed! Then I frosted the little whipped cream piece, just like a real cupcake. While the embossing paste dries pretty quick when used in a thin layer, since this was so thick I hit it with a hairdryer on low to speed drying time. Then using Crumb Cake card stock I cut my cupcake using the fluted coffee collar. I found it a little large so I trimmed it down with my Paper Snips to a perfect cupcake size. The edges were sponged with Soft Suede and a dauber. I cut out the banners using the Duet Banner punch after I stamped the sayings from the Happy Birthday Gorgeous set in Early Espresso ink. These edges were also sponged with Soft Suede ink. Then the banners and cupcake were attached with dimensionals.
Supplies Used:


I hope you enjoyed these projects using the Coffee Break Suite. If you have any questions about any of the featured cards, please let me know I would be happy to help!
If you would like to get a notification each time I post a project share, specials from Stampin’ Up! or myself, class schedules or video tutorials, please make sure you click “Follow By Email” at the top of this post. That way you won’t miss a thing! As always, please feel free to share any post on Pinterest or Facebook!
Share this:

Step right up..more cupcake fun!

I have to apologize for not posting my Sunday Share this week, life has been a little crazy the past few weeks. My husband sprained his LCL so he is in a knee brace and having a little trouble getting around. He is wonderful about helping me since I also work full time but with his bum leg his number one priority is to rest so he can get better. He is healing nicely and moving around a lot better so I am able to get some stamping time in.
Today I want to show you how to use the two step or as I like to call it the “three step” Sweet Cupcake set to make this adorable birthday greeting.

When you look at the set, you will notice on the image sheet there are little numbers letting you know what order to stamp the images in. But me being the rebel I am I like to stamp mine in reverse, 3, 2 then 1. For me it is easier to start with the solid then build the layers ending with the most detailed stamp.
First I picked the #3 frosting stamp. It is the one that is pretty solid.and inked it up using Pink Pirouette. Stamp off on scrap paper once to make the image pretty light. Then stamp on a small piece of Whisper White cardstock. Next I picked the #2 frosting stamp, ink again in Pink Pirouette and stamp directly over the first image. Note: Because this ink is so light I did not stamp off first but stamped it in full strength. Final step use the #1 stamp and using the same ink again, stamp over the image. Again full strength ink to make those frosting swirls come to life!
Now we are going to do the same with the cupcake. Using the #3 cupcake stamp I inked it using Chocolate Chip classic ink. This time I stamped it off not once but twice on my grid paper to make it as light as I could. Then I stamped it on the same scrap of Whisper White cardstock as the frosting. Next up the #2 stamp, ink in Chocolate Chip then stamp off once on the grid paper and stamp over the first image. Last take the #1 stamp, ink stamp using the Chocolate Chip full strength over the other two images and viola a yummy cupcake with loads of detail.
For the candle this is a two step, I stamped the solid candle in Pink Pirouette then the stripes using Chocolate Chip ink. The Flame is stamped using Pink Pirouette
Run everything through the Big Shot using the coordinating framelits. The word “wish” was cut from Pink Pirouette cardstock.
Learn more about the coordinating framelits and Big Shot here.
Using the Clear Wink of Stella pen I colored over each piece, just to give it a little bit of glimmer. This is one of my favorite new toys! Love how it dries so quick and gives a subtle sheen. When I looked at the candle I thought it should be inside the frosting just how a candle would be. So time to break out the old X-Acto knife and self healing mat to cut a small slit. Then I inserted the candle.
Time to assemble the card! The polka dot DSP in Chocolate Chip is adhered to a Pink Pirouette panel and attached to the far left side of the card base. A Fun Tip: When using photopolymer word stamps it is so easy to create your own phrases. I took “Make A” and “Big” and mounted them on one clear block to make a single “stamp”. I stamped this with Chocolate Chip ink onto a Whisper White panel. This is the mounted on Chocolate Chip cardstock then Pink Pirouette cardstock, attach to the card base as shown. Using itty bitty teeny tiny dots, no bigger than a pin head of Mono Liquid Glue attach “wish” under the stamped greeting. Dimensionals are used to attach the cupcake and frosting taking care to make sure the candle creates the “I” in wish. Then attach the little flame. The final touch, a little bling by adding three rhinestones at the bottom.
The final card!

Sweet Cupcake Set – Stampin’ Up!
I hope you enjoyed this tutorial! Check back soon, next time we will continue the bundle and Big Shot theme with the set Jar of Love. As always if you have any question please feel free to contact me any time!
Happy Stamping!!
~Jo
Supplies used today:


Share this:

Featured Set – Love You Lots


I am so excited about the NEW 2016-2017 Annual Catalog! The 2016-2018 In Colors are just yummy and they have debuted so many new sets that will appeal to all stampers no matter what your favorite style is!
Today’s featured set is one of the exclusive host sets this year, Love You Lots. The cute images are perfect for watercolor and will be sure to put a smile on the face of any recipient. I am a HUGE fan of watercolor it is by far my favorite way to add color to images so this set was right up my alley!


For this card I used the adorable hedgehogs (LOVE them!!) again stamping the image and saying in Basic Black on Shimmery White cardstock. Using Aqua Painters and stamp pads I colored the images with Soft Suede, Sweet Sugarplum and a teeny tiny dot of Emerald Envy for the leaf. After the image dried I used the new Layering Squares Framelits to cut a 2 3/4″ x 2 3/4″ straight edge square and a 3″ x 3″ square from Sweet Sugarplum with the scallop edged framelit. Then mounted that to a panel of Shimmery White cardstock with Stampin’ Dimensionals Before adhering to the Sweet Sugarplum card base I tied a pretty bow using the new ruched ribbon in Sweet Sugarplum.

I decided to use Real Red and Basic Black, the traditional colors of a Lady Bug for this card and I added the new Thoughtful Banners set and matching Duet Banner Punch. First I stamped the image using Basic Black on Whisper White Thick cardstock, then colored it with Real Red and Basic Black Stampin’ Write Markers. Next I stamped the outline of the banner in Basic Black and colored the stripes with Real Red marker. The Thank You was stamped using Real Red ink. TIP: With photopolymer stamps you can bend them any way you want, when I attached it to my acrylic block I made a slight curve to match the curve in the banner. Then I punched out the image with the Duet Banner punch and adhered to the image with dimensionals. Below this I stamped “Friend” in Real Red. The side panel is from the Neutrals Designer Series Paper Stack mounted on Basic Black cardstock.

 Last but not least while using the Confetti Hearts Border punch knew I wanted to make a shaker card. I punched quite a few little hearts using scrap Dapper Denim, Sweet Sugarplum and Rich Razzleberry cardstock and set those aside. I stamped the hedgehogs with Basic Black ink on a small card using Whisper White Thick cardstock and colored them with Soft Suede and Sweet Sugarplum ink and Aqua Painters, the saying is stamped in Sweet Sugarplum. The frame is a piece of 3 3/4″ x 3 3/4″ Dapper Denim cardstock and the center is cut out using the Layered Squares framelits measuring 2 1 /2″ x 2 1 /2″. A piece of window sheet was cut to the same size as the frame. This is attached to the frame using Fast Fuse adhesive. Then Stampin’ Up!’s new Foam Adhesive Strips were attached to outer edges of the card. TIP: Make sure there are no gaps so the confetti stays put! Add the confetti to the center, peel the adhesive backing off and place the Dapper Denim frame on top. Add a little bow in Sweet Sugarplum ruched ribbon and viola a cute little shaker card!
Products used for these projects:


If you have any questions about today’s cards, please let me know!
Happy Stamping!!
~Jo
Share this:

Flurry of Wishes – Stamp Set Spotlight
Welcome to Stamp Set Spotlight!
Today’s set is Flurry of Wishes.


I know it’s hard to think about snow already but this set is perfect for quick holiday cards. It is available in a bundle with the coordinating punch and you can save 15%. Here are three samples that are perfect for easy holiday cards.
Card 1:

A monochromatic card using the double stamp technique
Additional Supplies Used:


Card 2:

This card features embossing on the snowflakes and the background uses the resist technique. I added the set Holly Jolly Greetings and the coordinating Christmas Greetings Thinlits Dies
Additional Supplies Used:


This simple card uses the regal colors of Eggplant Envy with a little glimmer of gold sparkles and several layers.
Additional Supplies Used:


