I am so excited to have been asked to be a guest designer for Craft Project Central for December 2017. My project was featured on December 17, 2017 and here is the next project for the December and it is by Christy Fulk.
This tutorial includes a purse that holds six cards and envelopes. The cards can be given to men and women alike. When the cards are gone, the purse can be used as a special gift bag. There are three card designs, each using the Eastern Medallions Thinlits Dies in different ways. It doesn’t look like it, but only one ink pad was used to make everything! Make two of each card, and your purse is full. This would make a great product-based card class, too.
If you would like to learn how to make this project, you’ll want to subscribe for the month of December. With your subscription, you’ll get illustrated, step-by-step instructions for five wonderful projects for only $10! You can find out how to gain access to a bonus sixth project over at Craft Project Central.
*Bonus projects can be obtained by subscribing to any of the three, six or 12 month subscription packages, that include the month for which you would like the bonus.
Be sure to check back during the month to see the other great projects featured!
If you would like to get a notification each time I post a project share, specials from Stampin’ Up! or myself, class schedules or video tutorials, please make sure you click “Follow By Email” at the top of this post. That way you won’t miss a thing!
As always, please feel free to share any post on Pinterest or Facebook! If you are interested in attending classes or any of my all day events be sure to visit my events page for a current schedule.
Happy Stamping!
~Jo
Making the world a happier place, one card at a time!
I am so excited to have been asked to be a guest designer for Craft Project Central for December 2017. My project was featured on December 17, 2017 and here is the next project for the December and it is by Lauren Alarid.
You will absolutely love this window box and coordinating card! The adorable little box can be filled with all sorts of great things, perfect for classroom treats, baked goods, or even a gift for a loved one. This one-of-a-kind tutorial also includes simple-to-follow instructions on how to make a coordinating card. This card and box set features the beautifully versatile Window Box Dies, Sweet & Sassy Framelits Dies, Bloomin’ Love stamp set and coordinating Bloomin’ Hearts Dies. These projects could be easily customized for any season/event.
If you would like to learn how to make this project, you’ll want to subscribe for the month of December. With your subscription, you’ll get illustrated, step-by-step instructions for five wonderful projects for only $10! You can find out how to gain access to a bonus sixth project over at Craft Project Central.
Be sure to check back during the month to see the other great projects featured!
If you would like to get a notification each time I post a project share, specials from Stampin’ Up! or myself, class schedules or video tutorials, please make sure you click “Follow By Email” at the top of this post. That way you won’t miss a thing!
As always, please feel free to share any post on Pinterest or Facebook! If you are interested in attending classes or any of my all day events be sure to visit my events page for a current schedule.
Happy Stamping!
~Jo
Making the world a happier place, one card at a time!
I am so excited to have been asked to be a guest designer for Craft Project Central for December 2017. Today’s featured project is mine. The Painted Harvest set is one of my favorites it is so versatile and can be used for any season. I hope you enjoy it!
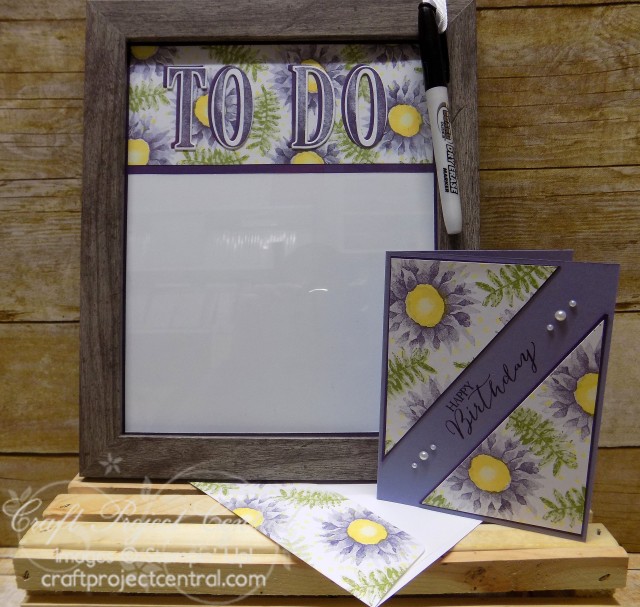
If you’re always trying to get organized this dry erase board just might be the answer! This project features the versatile Painted Harvest Stamp Set and includes a little ribbon to keep the marker within easy reach. The tutorial also includes a matching birthday card with a stamped envelope making this project a perfect gift for someone special. The insert can be customized to your home colors or with the changing seasons, making this not only an organizational tool, but cute home décor. This project is perfect for any level crafter and would make an excellent product based class.
If you would like to learn how to make this project, you’ll want to subscribe for the month of December. With your subscription, you’ll get illustrated, step-by-step instructions for five wonderful projects for only $10! You can find out how to gain access to a bonus sixth project over at Craft Project Central.
Be sure to check back during the month to see the other great projects featured!
If you would like to get a notification each time I post a project share, specials from Stampin’ Up! or myself, class schedules or video tutorials, please make sure you click “Follow By Email” at the top of this post. That way you won’t miss a thing!
As always, please feel free to share any post on Pinterest or Facebook! If you are interested in attending classes or any of my all day events be sure to visit my events page for a current schedule.
Happy Stamping!
~Jo
Making the world a happier place, one card at a time!
I am so excited to have been asked to be a guest designer for Craft Project Central for December 2017. My project will be featured later in the month but here is the next project for the December and it is by Cindy Brumbaugh.
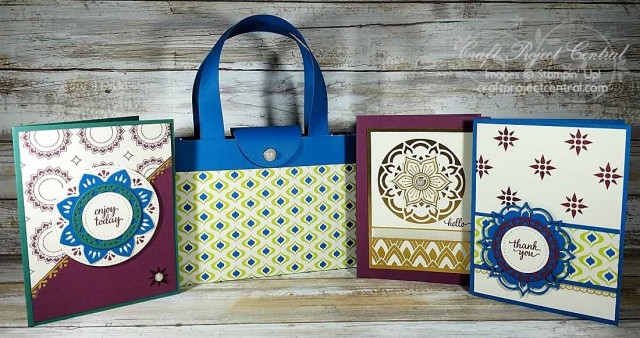
Using the Climbing Orchid Bundle and the Color Theory Designer Series Paper, you will be making three cards with versatile sentiments like Thinking of You, Hello, and Enjoy Today to be used for sympathy, birthday, wedding, or keeping in touch. You will box up your ensemble in a decorated acetate card box. The layout of the cards allows for an economical use of the Designer Series Paper and a replicable design to make more cards with other stamp sets.
If you would like to learn how to make this project, you’ll want to subscribe for the month of December. With your subscription, you’ll get illustrated, step-by-step instructions for five wonderful projects for only $10! You can find out how to gain access to a bonus sixth project over at Craft Project Central.
Be sure to check back during the month to see the other great projects featured!
If you would like to get a notification each time I post a project share, specials from Stampin’ Up! or myself, class schedules or video tutorials, please make sure you click “Follow By Email” at the top of this post. That way you won’t miss a thing!
As always, please feel free to share any post on Pinterest or Facebook! If you are interested in attending classes or any of my all day events be sure to visit my events page for a current schedule.
Happy Stamping!
~Jo
Making the world a happier place, one card at a time!
I am so excited to have been asked to be a guest designer for Craft Project Central for December 2017. My project will be featured later in the month but here is the next project for the month and it is by Buffy Cooper.
How many times have you needed a gift tag or a bookmark or a quick embellishment for a card? Here’s your answer! With this tutorial, you’ll use the Oh So Eclectic Bundle and Naturally Eclectic Designer Series Paper to create a box full of tags – twelve, to be exact. You can add the tags to a gift box or bag, a card, a bottle of your favorite libation, or even use a tag as bookmark for those people who still read “real” books. This would make a fun stamp camp or product-based class.
If you would like to learn how to make this project, you’ll want to subscribe for the month of December. With your subscription, you’ll get illustrated, step-by-step instructions for five wonderful projects for only $10! You can find out how to gain access to a bonus sixth project over at Craft Project Central.
Be sure to check back during the month to see the other great projects featured!
If you would like to get a notification each time I post a project share, specials from Stampin’ Up! or myself, class schedules or video tutorials, please make sure you click “Follow By Email” at the top of this post. That way you won’t miss a thing!
As always, please feel free to share any post on Pinterest or Facebook! If you are interested in attending classes or any of my all day events be sure to visit my events page for a current schedule.
Happy Stamping!
~Jo
Making the world a happier place, one card at a time!
I am so excited to have been asked to be a guest designer for Craft Project Central for December 2017. My project will be featured later in the month but here is another awesome project for December! This month’s card sketch is by Monika Davis. See the sketch below and be sure to enter the contest!
Each month in addition to the great 3D projects that Craft Project Central has for you, they also host a monthly card challenge – Creating Pretty Cards!! To help you recreate the sketch each month, they also provide a free Sketch Mini Tutorial! This mini tutorial has information about how the inspiration card (using the sketch) was created, supplies used, and basic measurements!! For every ten cards submitted, they’ll pick one winner of a free one month subscription! The winner(s) will get to select the month of their choice! Head over to Craft Project Central to learn more and submit your creation!!
If you would like to learn how to make any of the projects for this month, you’ll want to subscribe for the month of December. With your subscription, you’ll get illustrated, step-by-step instructions for five wonderful projects for only $10! You can find out how to gain access to a bonus sixth project over at Craft Project Central.
Be sure to check back during the month to see the other great projects featured!
If you would like to get a notification each time I post a project share, specials from Stampin’ Up! or myself, class schedules or video tutorials, please make sure you click “Follow By Email” at the top of this post. That way you won’t miss a thing!
As always, please feel free to share any post on Pinterest or Facebook! If you are interested in attending classes or any of my all day events be sure to visit my events page for a current schedule.
Happy Stamping!
~Jo
Making the world a happier place, one card at a time!
I am so excited to have been asked to be a guest designer for Craft Project Central for December 2017. My project will be featured later in the month but today starts the awesome projects for December! The first one is designed by Cindy Mitchell-Clark.
PEACE is such a beautiful word and one that is a perfect sentiment for anytime of the year. In this tutorial you will be creating a stunning home décor piece that will be perfect for the upcoming holidays as well as throughout the year, it will also make a perfect gift! Using products from the 2017 Stampin’ Up! Holiday Catalog, you will learn how to make each of the pennants and assemble them for display.
If you would like to learn how to make this project, you’ll want to subscribe for the month of December. With your subscription, you’ll get illustrated, step-by-step instructions for five wonderful projects for only $10! You can find out how to gain access to a bonus sixth project over at Craft Project Central.
Be sure to check back during the month to see the other great projects featured!
If you would like to get a notification each time I post a project share, specials from Stampin’ Up! or myself, class schedules or video tutorials, please make sure you click “Follow By Email” at the top of this post. That way you won’t miss a thing!
As always, please feel free to share any post on Pinterest or Facebook! If you are interested in attending classes or any of my all day events be sure to visit my events page for a current schedule.
Happy Stamping!
~Jo
Making the world a happier place, one card at a time!
I have been wanting to try an explosion box for a long time. With fall sneaking up on us so fast, I got to thinking that a haunted house for Halloween would be perfect for my first one! These amazing boxes look like a regular present until you lift off the lid and all the sides fall down to reveal a little 3D scene hiding inside. They may take a while to construct but I can’t tell you when I have had this much fun paper crafting! It was so therapeutic designing it, cutting all the little pieces and trying to come up with creative ways to make all the parts. Such a great time, even my husband got in on the fun helping me come up with a fun way to make the little fence! Since this is a complex project I did write a pretty long post but please take the time to read it all. There are a lot of fun tips hopefully you will be inspired to make your own explosion box!
Next I added the squares of Basic Black to the outside of the box and the Happy Halloween Designer Series Paper (“DSP”). I wanted the back panel to stand up so the moon and tree would show up behind the house. Before I adhered this panel to the box, I attached the tree and moon DSP to the Pumpkin Pie square. Then I drew extensions of the branches using a Basic Black Stampin’ Write marker and two little bats were cut from Basic Black and adhered to the moon. This was set aside. To make the panel stand up I cut three small trips of scrap cardstock 1″ x 4″ and bent them into an “L” shape. They were adhered to the back panel and base allowing it to stay upright. Then I attached the moon panel on top to cover the strips. Next the squares of polka dot DSP were added to the remaining three panels.
I used a piece of Soft Suede cardstock in the center. Since I wanted it to look like a patch of dead grass and dirt Soft Suede ink was sponged randomly on this piece to give it a little “texture”. The letters B-O-O were cut from Pumpkin Pie cardstock and a little clear Wink of Stella was added to give them a little sparkle. They were added to the center of the bottom three panels with dimensionals.
I stamped five ghosts on Whisper White with Memento Black ink and cut out using the ghost die. Three were attached to the letters and I set the other two aside to use later.
Now it’s time to start the house. I have loved these cute little houses since they were introduced last year. First I cut two of the houses using Basic Gray cardstock. Before assembling I used the embossing paste and brick decorative masks to make the bricks. Since I wanted a slight gray tint, I added a few drops of Smokey Slate into the paste and mixed it all up. After the bricks were dry I assembled the house using Multipurpose Liquid Glue (“MLG”). The shingles were cut from Basic Black and attached to the roof. Don’t throw away the scraps from cutting the shingles, we will use these later on!
I cut the window frames from Basic Black. They were glued to scraps of So Saffron then cut them out. The door is Smoky Slate stamped with the Hardwood background stamp and cut out. The door frame is Basic Black and the door knob is a little pearl. One of the ghosts was attached to the house and a few bats were attached in the windows. When fully assembled the house was then glued to the bottom of the box using MLG. Set aside to dry.
On to the cemetery. Now this is where I had to really think outside the box. What was I going to use for the tombstones??? I started flipping through my framelits and looked at the popsicle from Frozen Treats, yup that’s it! I cut two from Smoky Slate and one from Basic Gray, sponged with Basic Gray ink to give the appearance of stone. They were bent and the trimmed. The last ghost was attached to the center tombstone so he is peeking out.
The little fence proved to be quite the challenge. My husband came to my stamp room to see how I was doing. I was playing with different things but I was stuck on what to use to make the little fence. He happened to be sitting across from me and was playing with the scraps from the cut shingles He grabbed my snips, cut a little and voila a little fence! LOVE that man! Not only has he always supported me in my stamping business but he always willing to help me when I get stampers block.
Me & my husband Brian
The path was torn pieces of Basic Gray then sponged with some Soft Suede to age them.
The final step is the box top. Cut a piece of Whisper White cardstock 8 1/4″ x 8 1/4″. Score at 1″ and 2″ on all four sides. Download the template and box lid tutorial here. Assemble the box lid according to the tutorial. I based this part of the template on the banker’s boxes I use at work for storage.
Attach a Pumpkin Pie square with polka dot DSP panel on top. Stamp the cat image From Spooky Cat using Pumpkin Pie ink on Whisper White, cut out with the cat punch. Two ovals were cut from Basic Black and Pumpkin Pie to layer together. “Trick or Treat” was stamped using a Basic Black Stampin Write marker so I could ink each word separately. After assembling the oval the cat was adhered using a dimensional. To add a little extra something, two bats were added and a black rhinestone dots the “i”. The completed oval was attached to the lid using dimensionals. To finish it off a strip of 7/8″ striped ribbon was attached to the edge of the lid.
And the final project!
I knew this little haunted house was going to be a lot of fun to make! Of course after I was done with this project my head was swimming with all kinds of ideas. I can’t wait to try my next one!
If you would like to get a notification each time I post a project share, specials from Stampin’ Up! or myself, class schedules or video tutorials, please make sure you click “Follow By Email” at the top of this post. That way you won’t miss a thing!
As always, please feel free to share any post on Pinterest or Facebook! If you are interested in attending classes or any of my all day events be sure to visit my events page for a current schedule.
Happy Stamping!
~Jo
Making the world a happier place, one card at a time!
~~~~~~~~~~~~~~~~~~~~~~~~~~~~~~~~~~~~~~~~~~~~~~~~~
September Specials
From Stampin’ Up!:
Earn a FREE exclusive stamp set – From September 1, 2017 through October 31, 2017 you can earn the exclusive Merry Patterns Stamp Set with a qualifying workshop or order.
Everyone loves surprises! As a thank you for supporting my business, with any order of $35 or more (before shipping and tax) you will receive a FREE surprise gift bag share! Just enter Hostess Code GFEC3ZPP when you place your order online. I will send your gift to the address used for your order. If your order is $150 or more DO NOT enter the code. If you enter the code you won’t get your Stampin’ Rewards for FREE goodies and I wouldn’t want you to lose out on those! I will automatically send your gift when the order is placed.
This offer is only available only through Joanne Mulligan, an Independent Stampin’ Up! Demonstrator. Gifts ship at the end of the month and are sent via USPS. At this time I can only accept orders in the United States.
I’m sure you are like me and so many others, you want to get the perfect gift for someone but sometimes times a gift card is the only way to go. I know gift cards feel so impersonal like you just gave up and grabbed the first thing off the rack in the grocery store. Ok maybe that’s true, we have all been there. But I am going to show you how to make it VERY personal. Yes here it is folks, the perfect solution to giving that not so personal gift card….. the one and only greeting/gift card! I have seen similar ideas on Pinterest, and thought WOW what a great idea!! Unfortunately I didn’t pin it so I can’t give credit to the person who gave me the inspiration for this card. This was one of the projects we made for my August monthly stamping club. It is so easy and sure to be a hit with the recipient! Enjoy!
Let’s get started!!
Cardstock dimensions:
Night of Navy Cardstock 4 1/4” x 11”
Whisper White cardstock 4” x 5 1/4” (1), scrap pieces for daisy and saying
Daffodil Delight cardstock 4 1/8” x 5 3/8” (1) and 1 3/4” x 3 1/2”
Delightful Daisy Designer Series Paper (“DSP”) 1 1/2” x 3 1/2 “
1. Score your Night of Navy cardstock at 5 1/2″ and 9″. Fold on score lines and use a bone folder to get a nice sharp crease. Punch a half circle on the end that folds over for the gift card. This gives a little notch to pull the gift card out. Put adhesive on the outer edges only and fold over to create a pocket.
2. Attach Delightful Daisy DSP to the small strip of Daffodil Delight cardstock and attach to card front.
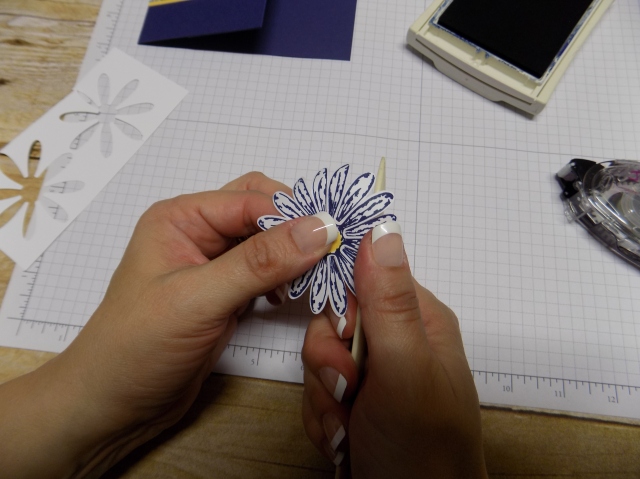
3. Stamp the daisy from the Daisy Delight stamp set on a Whisper White cardstock scrap twice using Night of Navy ink. Cut out using the Daisy punch. Tip: Slide your punch to the left and right, don’t pull it toward you after punching out the daisy. This helps your cardstock from getting caught! Color the centers with a Daffodil Delight marker.
4. Assemble the daisy so that the petals overlap each other. Use a bone folder to curl the petals under slightly, attach to the card. Apply a gold faceted gem to the center.
5. Stamp the Birthday greeting from the set Special Celebrations on a scrap of Whisper White, cut out using the 1 3/8” x 2 1/4″oval stitched framelit. Then attach to the card using dimensionals. I really love this set, it not only includes greetings for so many occasions but it has matching sentiments for the inside of the card. So versatile!
6. Attach the Daffodil Delight panel to inside of the card.
7. Lay the Whisper White cardstock panel on the inside, but don’t attach it yet! This is just in case you make a little boo boo stamping the inside of the card. Trust me I know from experience! I can’t tell you how many times I have made a gorgeous card, you go to stamp the inside and a smudge here, a splotch there and the worst….. you have the dreaded ink halo around the image! Ugh!! Now I never attach the inside panel until I have stamped it first. If I don’t have an inside panel I stamp the inside before assembling my card.
8. With the Whisper White in place, close the card and stamp the stem and little daisy, again from Daisy Delight set, in the center of the white space.
9. Stamp the inside greeting so it will be positioned under the flap.
10. Attach the inside panel over the Daffodil Delight piece.
If you would like to get a notification each time I post a project share, specials from Stampin’ Up! or myself, class schedules or video tutorials, please make sure you click “Follow By Email” at the top of this post. That way you won’t miss a thing!
As always, please feel free to share any post on Pinterest or Facebook! If you are interested in attending classes or any of my all day events be sure to visit my events page for a current schedule.
Happy Stamping!
~Jo
Making the world a happier place, one card at a time!
~~~~~~~~~~~~~~~~~~~~~~~~~~~~~~~~~~~~~~~~~~~~~~~~~
August Specials
From Stampin’ Up!:
Time to redeem those coupons earned during Bonus Days! Between August 1st and 31st you can redeem your coupons. Just enter the coupon codes sent to you by Stampin’ Up!. If you earned more than one, make sure you enter each one separately and watch your savings add up!
Early Release Bundle – Carols of Christmas and Card Front Builder Thinlits. Between August 1st and 31st be one of the first to own a stamp set from the 2017 Holiday catalog! The Carols of Christmas set and coordinating thinlits Card Front Builder are a perfect addition to your stamp collection!
Fall Into Savings – Paper Pumpkin Promotion. New subscribers sign up for Paper Pumpkin between August 11, 2017 and September 10, 2017 and get the your first month half off! Enter the promo code HALFOFF0917 at paperpumpkin.com when you sign up to receive your discount.
Everyone loves surprises! As a thank you for supporting my business, with any order of $35 or more (before shipping and tax) you will receive a FREE surprise gift bag share! Just enter Hostess Code JB7TVAUR when you place your order online. I will send your gift to the address used for your order. If your order is $150 or more DO NOT enter the code. If you enter the code you won’t get your Stampin’ Rewards for FREE goodies and I wouldn’t want you to lose out on those! I will automatically send your gift when the order is placed.
This offer is only available only through Joanne Mulligan, an Independent Stampin’ Up! Demonstrator. Gifts ship at the end of the month and are sent via USPS. At this time I can only accept orders in the United States.
Everyone has their favorite stamping tools and I am no exception. Putting this list together was a lot harder than I thought it would be, trying to narrow down my choices for my top five when my top twenty-five would have been so much easier! I picked the tools I use almost every time I stamp. These are my “go to” tools and ones that if I didn’t have I would be lost. I would love to hear what your favorite tools are!! Please let me know in the comments section!
So without further ado….here my top five tools for every stamper.
A Bone Folder
This is a must have for any stamper whether you are just starting out or have been stamping for years. It may be a simple tool but can do quite a lot. From getting the perfect sharp crease for your cards and projects to burnishing, this little guy needs to find a home in your toolbox.
Simply Scored Scoring Tool
I use this every single time I stamp. The grooves are set 1/8″ apart with the measurements clearly marked on two sides. It comes with a double tipped stylus (two sized heads) and a little compartment where you can store a bone folder, extra stylus and other goodies. You can score cards pretty quickly and is a must for any fancy fold cards, boxes, 3D projects and more!
Paper Snips
What can I say about my snips. I have used many types of scissors but these are truly exceptional. They are super sharp (my finger tips can attest to this fact) and perfect for any intricate fussy cutting you may have to do. They come with a blade case and will stay sharp for years. I have two pair; one for paper and one for ribbon.
Grid Paper
This may seem like an odd choice but this item is often overlooked in the catalog and I think it is the perfect tool for all your stamping. It has a ruler on two sides and markings on the other two for finding a center point. The little squares are in 1/4″ x 1/4″ (the opposite side is in metric) and there are spaces on the side for making notes. Bonus it will keep your stamping area clean. It comes in a pad of 100 sheets which breaks down to just .11 cents per sheet.
And my number one stamping tool….
The Big Shot Die-Cutting Machine
This is another tool I use 99% of the time I stamp and by far my favorite! Yes this is a huge investment but I guarantee it will bring you much happiness and joy with what it can do. Stampin’ Up! offers a huge selection of dies including framelits and thinlits to match their exclusive stamp sets not to mention the Textured Impressions Embossing Folders. It comes with the Big Shot Platform and two acrylic cutting mats. You can purchase the Precision Cutting Plate for intricate thinlits and the Magnetic Platform for exact placement over a stamped image. Also the Die Brush and pads makes removing small pieces a breeze!
To learn more about the Big Shot be sure to watch my video tutorial!
If you would like to get a notification each time I post a project share, specials from Stampin’ Up! or myself, class schedules or video tutorials, please make sure you click “Follow By Email” at the top of this post. That way you won’t miss a thing!
As always, please feel free to share any post on Pinterest or Facebook! If you are interested in attending classes or any of my all day events be sure to visit my events page for a current schedule.
Happy Stamping!
~Jo
Making the world a happier place, one card at a time!
~~~~~~~~~~~~~~~~~~~~~~~~~~~~~~~~~~~~~~~~~~~~~~~~~
August Specials
From Stampin’ Up!:
Time to redeem those coupons earned during Bonus Days! Between August 1st and 31st you can redeem your coupons. Just enter the coupon codes sent to you by Stampin’ Up!. If you earned more than one, make sure you enter each one separately and watch your savings add up!
Early Release Bundle – Carols of Christmas and Card Front Builder Thinlits. Between August 1st and 31st be one of the first to own a stamp set from the 2017 Holiday catalog! The Carols of Christmas set and coordinating thinlits Card Front Builder are a perfect addition to your stamp collection!
Everyone loves surprises! As a thank you for supporting my business, with any order of $35 or more (before shipping and tax) you will receive a FREE surprise gift bag share! Just enter Hostess Code JB7TVAUR when you place your order online. I will send your gift to the address used for your order. If your order is $150 or more DO NOT enter the code. If you enter the code you won’t get your Stampin’ Rewards for FREE goodies and I wouldn’t want you to lose out on those! I will automatically send your gift when the order is placed.
This offer is only available only through Joanne Mulligan, an Independent Stampin’ Up! Demonstrator. Gifts ship at the end of the month and are sent via USPS. At this time I can only accept orders in the United States.